Showing posts with label breakfast. Show all posts

Tuesday, November 17, 2015

Savory Oatmeal

Untitled

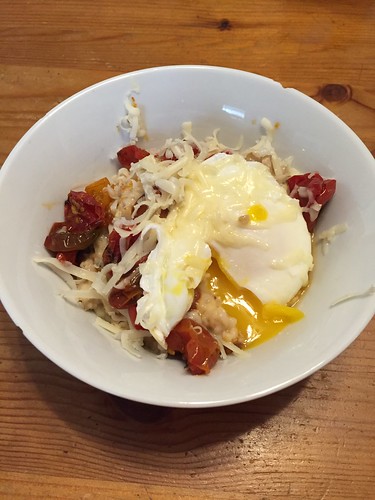
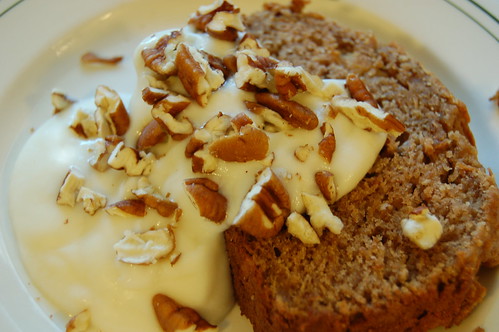
Just a friendly reminder that savory oatmeal is a thing (cheddar, thyme, roasted cherry tomatoes from the freezer), and is delicious. And you can #putaneggonit. Pictured here before hot sauce.

Tuesday, February 4, 2014

Oatmeal Sundays, part deux


Yes. These two pictures look exactly the same. But they're not the same bowl, I swear!


The top photo is Scottish Oatmeal: 2 cups water, 1 cup milk, bring to a boil, stir in a cup of Scottish oats, simmer until cooked, 10ish minutes. Meh. It was ok. The texture was much better than just previous attempts, creamy but with a little chew. I added brown sugar and blueberries.

The second photo (which, ok, technically we ate the Sunday BEFORE the first one) is April Bloomfield's Porridge, and I actually really liked it! The texture was great, no gluey-ness at all. We followed Luisa's instructions to use less salt - we used 3/4 tsp of Maldon salt, which is hugely flakey and thus less salty when measured by volume than kosher. If you try it and want to use kosher, start with a scant 1/2 teaspoon (or less) and work up from there. This stuff is SALTY. I liked it, but I can see how it would be too salty for some. I added brown sugar and blueberries, because that's what we had. I'd like to play around with this one and try using a little more water and a little less milk, or try using almond milk instead (we usually have that in the house and don't always have cow's milk) and I'll also try a double batch next to see how the leftovers hold up.

We took a little break from oats this past Sunday to eat eggs and toast and Adam's famous breakfast potatoes, but there are a couple other oatmeal preparations to try, and I'll report back on those, of course. Happy breakfasting, everyone.

Monday, January 13, 2014

Oatmeal Sundays


I have a confession to make: I don't like oatmeal. I find this to be a confounding thing, as I like porridge-y things made from so many other grains! I love risotto and congee made from rice, I devour polenta and grits made from corn, I am well and truly obsessed with the cream of wheat at The Neighborhood restaurant in Somerville, MA (I'm pretty sure they put sweetened condensed milk in it, to be honest). But other than choking down the occasional packet of instant quaker during my corporate office days, oatmeal hasn't even really make it onto my radar until now.

Oh wait, that was a misleading paragraph. I am not about to tell you that I now like oatmeal, or about a recipe that converted me. Sorry. Instead, let me tell you about my project to learn to like oatmeal. They say it can be done, and since I don't find it actually, like, offensive, just kind of... gluey? Anyway, I think it's a matter of finding the right preparation, and I'd like to get into a routine of eating oatmeal on the regular, because, frankly, it's apparently very good for lactation, and, oh yeah, it's all over my other social media, but have I mentioned on this blog that Adam and I are expecting a baby in June? We are. Yay!

So we've instituted Oatmeal Sundays at our house, and I've got five more months to figure out how to eat oatmeal and not be grumpy about it. Up top you can see an attempt at baked oatmeal. Specifically, Heidi Swanson's baked oatmeal from Super Natural Every Day. It has you slice some bananas for the bottom of the dish, then a layer of berries, a layer of oats + stuff, then more berries, and then you pour a milk/egg combo over the top and bake. It's January, so instead of berries I used jam, and I just left out the sugar in the oat mixture. I thought it was just fine, but it took approximately forever in the oven, and I underbaked it, I think, because I was so hungry I just needed to eat breakfast NOW. The edges were juuust starting to get golden, so the middle, while cooked all the way through, was that sort of weird in between gluey texture that I don't really like. If I had left it in long enough I think it would have had a nicer, chunkier texture. I'll try it again, but not right away.


Next we tried overnight steel cut oats in the slow cooker. I didn't follow a particular recipe, but my friend Cara said 4 cups liquid to 1 cup oats and I just ran with it from there. I used a cup of Bob's Redmill Steel Cut Oats, two cups of milk and two cups of water, a big pinch of salt, a couple tablespoons of brown sugar and two small handfuls of raisins. All mixed together in the slow cooker at 10pm, ready to eat when we got up at 8am. Apparently last time I bought raisins I bought a bag of JUMBO raisins but I think in the future I wouldn't put the fruit in the night before. They got a little too plump, and it was weird. They tasted kind of wine-y. The texture of the oats was actually pretty good, much smoother than I anticipated. I think this would make a good base for toppings added in the morning (oh and I did add a little maple syrup for serving). We'll try these again for sure, if nothing else for efficiency's sake. If these come out the winner, I might get a smaller crock pot, the one I have felt much too big for this. I also realized too late that I had put the raisins in thinking I'd add peanut butter in the morning, which MANY people suggested, for like a PB&J type thing, but then I forgot. It was morning, after all.

The rest of the candidates:
April Bloomfield's Porridge, which gets rave reviews from a bunch of bloggers I trust and is apparently quite salty, which I love.
Megan Gordon's steel cut oats from Whole Grain Mornings - maybe toasting the oats in butter before simmering them is the key to my happiness? Also, note to husbands and other gift-buyers: I want this book reeeeal bad.
My friend Tiffany suggested Scottish Oats which sounds very appealing and more porridge-y than the other types, but it's just a matter of tracking down the oats. There are several hippie-marts near me that carry lots of Bob's Red Mill products so I'll try to find them locally before I order them online. (A five pound bag?! Come on, Bob.) (Ok, apparently smaller bags are available, but Amazon only has them in packages of 4 smaller bags, which add up to... 5 lbs. Oy.)
And finally, another baked oatmeal contender from Joy the Baker, which a friend suggested via Pinterest (PS, I'm on Pinterest now, apparently. How'd that happen?)

So, folks, if you have any other suggestions for oatmeal preparations or recipes, or just want to commiserate about trying to teach yourself to like something that's so darn good for you, please speak up.


Saturday, November 26, 2011

Adam's Breakfast Potatoes

Browned and crispy

I have mentioned before that Adam is in charge of weekend breakfasts at our house (but in case you didn't catch it before: pancakes! Adam's have no sugar, so they don't fight with the maple syrup. Yum).

Potatoes, Chillin'.

When we have eggs (most of the time I want eggs. For some reason I do not like to diverge from routine at breakfast), he often makes home fries. He's been working on this method/recipe pretty much since we started dating, and friends, I think he's got it down.

Pick some thyme

It's a short list of ingredients: potatoes, onions, herbs, butter. We use thyme a lot, and sometimes tarragon in the summer, it really depends what we have around. Rosemary is always nice with potatoes, too. The secret is in the butter (isn't it always?), so don't be shy about it. If you don't use enough, even in a well seasoned cast iron skillet the potatoes will stick. And make sure you give yourself enough time- the potatoes take at least 30 minutes (closer to 40, usually) but much of that time is down time, so pour another cup of coffee and enjoy your morning, my friends.

Butter Bath

Adam's Breakfast Potatoes
serves 3-4 as a breakfast side dish

6-8 medium yukon gold potatoes (a little less than 2 pounds)
3 tablespoons unsalted butter, more as needed
1/2 a medium onion, sliced or diced, your preference
1 teaspoon or so of chopped fresh herbs - tarragon, thyme, or marjoram. If you use sage or rosemary, use a little less.
salt and pepper

Scrub potatoes, but don't peel them; dice into rough 1/2 inch pieces. Heat a 10-12 inch cast iron skillet over medium heat, add the butter and allow it to melt. Add the potatoes, toss to coat in butter and season with a big pinch of salt, and cover the pan - we use one of those universal lids, it doesn't have to be a tight fit, just enough so that the potatoes can steam a bit. Stir it once or twice, but keep the lid on it for ten minutes. After ten minutes, uncover it, add the herbs and begin the stir-and-wait process.

Stir the potatoes every few minutes, but make sure you let them sit still enough so they begin to brown. If at any point the potatoes begin to stick to the pan, add more butter. Adam says "I know, it seems like a lot. Just add more butter." When you begin to ask yourself if the potatoes are almost done, that's when you add the onion. Adam says "when most of the sides of the potatoes are brown that's when I add the onions". I say, when the potatoes are about 80% as brown as you want them to be, add the onions. You might have to add a little nub of butter here. When the onions are soft and the potatoes are brown, yay! they're done. The whole process usually takes 30-40 minutes for us. Enjoy next to your eggs with or without ketchup and hot sauce.


Wednesday, October 12, 2011

Peter Reinhart's Light Wheat Bread

light wheat bread

You know what I love about fall? It's not too hot to bake a loaf of bread. I mean, I like the pretty leaves and I like sweaters and boots, but is there anything better than the smell of bread baking? The loaf you see here is the one I've been baking every week or two for the better part of a year.

harvest grains

The recipe is from Peter Reinhart's book The Bread Baker's Apprentice, which is tied with Vegetarian Cooking for Everyone with my number one favorite cook book. It's a mix of white and wheat flours, and I like to add half a cup of this grain-and-seed blend from King Arthur just to up the hippie factor. The resulting bread is flavorful from the whole wheat flour but not overhwelmingly nutty, so it stands up brilliantly to a variety of sandwich fillings.

kneaded

It's also a dough that is really pleasant to work with. If you've never made a loaf of bread before but you're looking for a place to start, give this one a try. The dough comes together easily and it bakes up with a nice tight crumb.

making bread

And let's be honest, we all know the ultimate test of a bread is how well it toasts. Voila:

breakfast

Peter Reinhart's Light Wheat Bread

Dudes, if you're baking regularly (or if you wish you were), get on the bandwagon and get a scale. I've been using this one for 3 years, and it makes everything so much easier. Just start pouring flour in the bowl and hit the tare button before you add the next ingredient. Who needs mulitple measuring devices? I dirty exactly one spoon for this whole recipe.

11.25 ounces (2 1/2 cups) bread flour (you could use all purpose, too)
6.75 ounces (1 1/2 cups) whole wheat flour
.75 ounces ( 1 1/2 Tbsp) sugar (or honey, added with the water instead)
.38 ounces (1 3/4 tsp) kosher salt
1 ounce (3 Tbsp) powdered milk
.17 ounce (1 1/2 tsp) instant yeast*
1 ounce (2 Tbsp) shortening (or butter), room temperature
10 ounces (1 1/4 cups) water, warm (slightly warmer than body temp, 100-110F is perfect)
spray oil (I use Pam)

Mix together the flours, sugar, salt, powdered milk and instant yeast in a large bowl. Add the shortening and stir to mix it in a bit. Add the water and stir until the ingredients clump together in a ball. Then dump the whole mess out on a lightly floured counter and begin to knead. It should take about ten minutes of fairly vigorous kneading to get it to where you want it, which is smooth and cohesive, maybe a little tacky but certainly not sticky. You can add a bit of flour as you knead if the dough is sticking.

You can also do this in a mixer, just measure the ingredients into the mixer bowl and attach the dough hook, then turn the mixer on low and add the water in a slow stream, it should come together in a ball, then you can turn up the speed to medium and knead in the machine for 6 minutes or so.

With either method, when the dough is ready it will spring back if you poke it with your finger.

Now wipe any crumbs out of the mixing bowl (no need to wash it) and mist it with spray oil. Shape the dough into a ball and put it in the bowl, rolling it around to coat it with oil. Cover the bowl with plastic wrap and leave it alone for an hour or until it doubles in size. When it's doubled, it will feel pillowy and soft if you touch it gently.

Once the dough has doubled, spray the counter with oil and dump the dough out onto it. Press it into a rectangle about 6 by 10 inches, it will deflate as you press it. Starting at a short end, roll the rectangle into a log, pressing each seam tight with your fingers as you go. When you have a loaf shaped log, pinch the seam closed and roll it on the counter top to smooth it out. Spray a loaf pan with oil and put the loaf in, seamed side down. I usually squish it down a bit, trying to even it out some. Cover it gently with plastic wrap.

Preheat the oven to 350F.

Let the loaf rise until it just crests the lip of the pan. When it has risen, Use a serrated knife to slash down the center of the loaf about 1/4" deep. Put the loaf in the oven. After 30 minutes, rotate it for even baking and bake another 15-20 minutes. The loaf is done when it's evenly golden brown all over and sounds hollow if you tap it. If you take the temperature of the finished loaf, it should read between 190F and 200F. Make sure you let the bread cool for at least an hour before you slice it, toast it, and enjoy it with some delicious fried eggs.


*Instant yeast is a lot like active dry yeast but it doesn't need to be proofed or allowed to bloom in warm water first and I prefer it because it's easier to use. If you only have active dry yeast, just use the same amount and let it get foamy in the water first.


Tuesday, July 26, 2011

Let's Talk Pancakes

Pancakes


First, a disclaimer: I am not the breakfast cook in my house. I have exactly two breakfasts on my weekday rotation (but honestly I have eggs and toast 9 days out of ten) and Adam takes over the kitchen on weekend mornings.

Sounds weird, but lasts longer than buttermilk.


I don't have much of a sweet tooth in the morning, but he has finally won me over with these pancakes. Oh, and the secret to a pancake-ready kitchen is this stuff, dried buttermilk powder. I like the King Arthur brand, but Saco is the kind they sell in my grocery store. No worrying about whether the buttermilk you bought for biscuits two weeks ago is off or if it's supposed to smell like that, hooray!

Mix it up


The reason I like these pancakes is that they (eek!) don't have any sugar in them. Pancakes are really just a vehicle for maple syrup, right? So why must they be crazy sweet themselves? I like that the subtlety of these lets the maple flavor shine. Adam also uses a mix of all purpose and whole wheat flours so there's a hint of nuttiness from the whole wheat.

In the pan


Adam's Pancakes
makes 6-8 pancakes depending on how big you like them

1 cup flour (we use 3/4 cup all purpose and 1/4 cup whole wheat or white whole wheat)
1/4 teaspoon kosher salt
1 teaspoon baking soda
2 tablespoons buttermilk powder
1 egg
1 cup plus two tablespoons water
2 tablespoons butter, melted and cooled slightly
butter for cooking the cakes

Combine the flours, salt, baking soda and buttermilk powder in a bowl. Measure the water into another bowl, then crack the egg into the water and beat it up a little bit so it's all combined. Add the melted butter to the liquid, then add the liquid to the dry ingredients and stir just until all the flour is hydrated but no longer. It will be lumpy, but that's ok! If you try to beat out all the lumps you'll develop too much gluten in the flour and your pancakes will be tough.

Heat a griddle or heavy skillet over medium heat for a few minutes, then add a little bit of butter, about a teaspoon or so, swirl the pan to coat the bottom. When the butter is foamy, add a drop of pancake batter. It should sizzle just the slightest bit. If it doesn't, up the heat a little bit.

Scoop about 1/4 cup of batter into the pan. Let it cook on the first side until bubbles start to form and pop on the raw side. Carefully flip the pancake and cook the other side until golden brown. Continue with the rest of the batter. The first pancake will be ugly, so you should eat that one and then keep cooking. Keep pancakes warm in a 200 degree oven until you finish cooking, then serve with butter and (real, obvi) maple syrup.

Monday, June 20, 2011

Gravlax and what to do with it

I know you've all been dying to know, so:  I pulled a card for fruit tarts with almond pastry cream, fruit coulis and a flavored creme anglaise for my final practicum. It didn't go quite as well as I had hoped (my crusts were on the tough side). It seems to have turned out ok, though, because I got a call on Friday from the academic supervisor to tell me I'm the Valedictorian for my class. Eek! Now I have to write a speech. Double Eeek!

Gravlax with traditional accompaniments

Anyway, graduation isn't until Saturday so by way of procrastinating writing a speech, I wanted to write here instead! Plus I wanted to tell you about my creative practicum! I called it "alternative charcuterie" because traditionally charcuterie means salamis and sausages and various porky products and I didn't use any pork. I made duck rillettes, mushroom pate and classic gravlax, plus mustard, cultured butter, dill pickled green beans, two kinds of crackers and a baguette.

gravlax on a bagel with avocado and red onions

Gravlax is a Scandinavian dish of raw salmon, cured in sugar, salt and dill. It's also unbelievably easy. Go get a pound and a half of salmon in two pieces, remove the skin and pin bones. In a separate bowl, mix together 1/2 a cup each of sugar and kosher salt and a teaspoon of white pepper. Spread a bunch of dill over one piece of the salmon, sprinkle the sugar/salt/pepper mixture over that, and if you have it, sprinkle a couple of tablespoons of gin over that. Top with the other piece of salmon, wrap the whole thing in plastic and put it in a dish in the fridge. Flip it every 12 hours or so, but otherwise just let it do its thing for two or three days. Ta-da! When you're ready to serve, scrape off the dill and slice it as thin as you can.

Pasta with gravlax, red onion, capers, dill

Now that you have a pound and a half of cured salmon, what do you do with it? Traditionally, you eat it on rye or pumpernickel bread with red onions and capers and maybe cream cheese. I made rye crackers to go with it for my practicum, and it was lovely. Here's the thing, though: I only used a few ounces of salmon and then I was left with more than a pound. We ate it with the remaining crackers the next day, and then for breakfast on bagels with avocado. Finally on Saturday night I used the end of it for this pasta dish.

Spaghetti with Gravlax and Dill
Serves 2, easily doubled


Use some restraint when seasoning the sauce here, the salmon is pretty salty and you don't want to overwhelm the dish. And a note on timing: start to finish this whole thing took me about 20 minutes, ten for the water to boil and ten for the spaghetti to cook. The sauce comes together while the pasta was cooking. So easy. Also you could probably use smoked salmon, but there would be, of course, a smokey element and gravlax is so easy you really ought to try making it!

1/2 lb spaghetti (I used whole wheat)
1 tbsp vegetable oil
1/4 cup red onion, diced small
1/3 cup chopped dill
1/2 cup heavy cream
1 tbsp capers
4 ounces gravlax, diced small
pepper and maybe salt

Bring a large pot of salted water to a boil.  Cook the spaghetti to al dente.

Meanwhile, in a medium skillet, heat the oil and saute the onion over medium heat until translucent. Don't let it brown, turn the heat down if you have to. Once the onion is soft, add the dill and stir, then add the cream and let it reduce until it's thickened a bit. Season with pepper. If the pasta isn't done yet, turn the heat off and let it hang out. It should be a little too thick, water from the pasta will loosen it back up.

About a minute before the pasta is done, turn the heat back on under the sauce, add the gravlax and capers. When the pasta is al dente, use tongs to transfer it directly from the water to the sauce, water clinging to the noodles will thin the sauce back out. Season with more pepper or possibly salt, if necessary, and serve.

Sunday, March 20, 2011

Citrus Salad (and a little news!)

Citrus Salad

Is this winter a beast or what? Two days last week it was a balmy and delightful 60 degrees, now there's three days worth of snow and sleet and garbage in the forecast. I am way beyond ready for this to be over; I want to cook with asparagus! and peas! and fava beans! But at least I've got the tail end of citrus season to brighten things up.

I first made this salad for our second annual New Year's Day brunch after spotting it over on simplebites, but I've made it a few times since then. I skip the orange blossom water, but I thin the honey out with a little warm water, and I started supreming the citrus instead of just slicing it. (If you want to learn how to surpeme (that's soo-prem, not soo-preem), Tea has a great photo tutorial). There's no real recipe, just cut up some fruit, thin out a little honey and pour it on top, and sprinkle on a little mint. Boom.

Oh, and one more thing! Monday the 28th of March (in like a week) I'll be the student guest chef-for-a-night at EVOO Restaurant in Cambridge. I'm meeting with Chef Peter McCarthy on Tuesday to figure out the menu, and according to my classmates who've done this before, it should be a great night! If you're interested in coming you might want to make your reservations now, the last one filled up fast. Hope you can come!

Wednesday, September 15, 2010

Homemade Pop Tarts

Blueberry Pop Tarts

My first week of classes is already over, can you believe it? On day one, in Food Basics, I learned how to turn on the oven... but only after my "roasted beets" had been in there for an hour decidedly not roasting. Whoops! Tuesday night in seminar I picked out my chef's knife. It's the biggest knife I've ever used - ten inches long with an extra wide blade - not unlike a sword, actually, but after puzzling out the rhythm of cutting on a pile of produce, (potato: medium dice, carrot: brunoise, onion: dice, orange: supreme, cabbage: chiffonade), I switched back to the eight inch as an experiment and I kept wondering where the rest of the knife was.

Blueberry pop tarts

This morning in Baking I made some darn tasty granola and learned the importance of keeping up with the dishes... by which I mean oh boy there are a lot of dishes to do. I am having a freaking blast, but I've got to say, it's kind of weird to be going back to school. It's such a heavily weighted phrase, don't you think? I always think of You've Got Mail, when Meg Ryan emails Tom Hanks (who of course she doesn't yet know is Tom Hanks, duh) "Don't you love New York in the fall? It makes me want to buy school supplies. I would send you a bouquet of newly-sharpened pencils if I knew your name and address." Well, I made not be in New York, and my supplies are running more along the lines of sharpened blades than sharpened pencils, but there's still that sense of freshness, of new, of starting something great.

Blueberry Pop Tarts

Speaking of great, lets talk about these so-called pop tarts. When my cousin Becca comes up to Boston, I made brunch. It's become a thing, if you will, and so I am always on the lookout for tempting breakfast pastries. Last time she was here, I made those jam-filled buttermilk biscuits, and since I went on that canning binge I had a lot of jam around again this time. The jam in these is blueberry lemon verbena, and it worked really well here, but any good quality jam will make an excellent filling. You could also use Nutella or cinnamon and sugar. Be prepared, however, for the fact that these don't actually taste much like pop tarts. They're not dry or cardboard-y, and hell, they're not even iced. But that's because it's essentially a small flat pie. Pie! For breakfast.

Chomp

Homemade Pop Tarts
adapted from King Arthur Flour
makes 9 pastries

I thought this crust was fairly easy to work with, the egg keeps it from being crumbly but it still bakes up flaky and tender. If you find yourself fighting to roll it out, make sure it's well floured, and either do it between sheets of parchment or stick it back in the fridge to firm up a bit before continuing.

For the crust:
1 1/2 cup all purpose flour
1/2 cup whole wheat flour
1 scant tablespoon sugar
1 teaspoon kosher salt
2 sticks (or one cup or 8 ounces) butter, cut into pieces
1 egg
2 tablespoons milk

For the filling:
3/4 cup good quality jam OR
nutella OR
1/2 cup brown sugar with 1/2 teaspoon cinnamon and 3 tablespoons flour, mixed together

You also need:
one egg, lightly beaten, to brush on the pastries before filling

First, make the dough. Whisk together the flours, sugar, and salt. Using your hands, or a pastry cutter, or a couple of forks, work the butter into the flour until pea-sized lumps of butter remain. The dough should hold together when you squeeze it. Mix the egg and milk together briefly, then mix them into the dough just until it comes together cohesively. Separate the dough into two pieces of even size (each should weigh ten ounces), and pat each piece into a 3"x5" rectangle, more or less. You can roll it out right from here or wrap each piece in plastic and refrigerate for a couple of days.

If you've chilled your dough, give it 15-20 minutes on the counter to take the chill off. Roll out on a floured surface to about 1/8" thickness, large enough that you can trim the edges and have a 9"x12" rectangle. Use a 9"x13" pan as a guide. Cut into nine rectangles of approximately 3"x4". Set aside, and roll and trim the second piece of dough the same way. Cut the second piece of dough into 9 rectangles as well.

Brush the entire surface of each rectangle with the beaten egg. In the center of each rectangle, put a generous tablespoon of the filling and spread carefully, being sure to leave at least a 1/2 inch margin. Place an unfilled rectangle on top of each filled rectangle, pressing with your fingertips to seal around the edges of each pocket of jam. Be sure it is well sealed on all sides, and use a fork to re-seal and decorate each edge. Prick each pastry several times with a fork so steam can escape (see, it's just like pie!)

Place the tarts on a parchment lined baking sheet and refrigerate for half an hour. While the tarts chill, preheat the oven to 350. Bake for 25-35 minutes until light golden brown. Let them cool on the pan, if you can wait that long.

Tuesday, September 7, 2010

Peach Crumb Cake

Layers

Peaches, you are delicious. The only problem I have with you, peaches, is that people always want to talk about you the same way: as the summer fruit, eaten standing over the sink, juice dripping down arms, sticky faces. Which of course, peaches, is the best way to eat the first of you, early in August at the beginning of your harvest. But what about later?

Peach Crumb Cake

What about in early September, when my sticky-face, juicy-arm peach gorge is starting to feel a bit cliché? Well, peaches, that's when I start to think about how delicious you can be when cooked. Sometimes I grill you and plop a bit of ice cream down at your side. Simmered down into jam or tucked into a cake, your sweet tartness deepens and cools, rather like the turning season, and I realize yet again that you can be a fall fruit, too.  

230/365: Cake for breakfast

Peach Crumb Cake
Makes nine 2 1/2 inch square pieces
From Gourmet, August 1993


I found the crumb topping on this cake to be very thick. If you wanted to, you could cut it down to 3/4 the amounts listed and I bet you'd still get the same effect. This cake kept, covered, for a few days at room temperature, though the crumb topping is the crunchiest on the first day. I also know from experience that it is excellent for breakfast, so just take that into consideration when planning your next brunch, mmkay? 

First, make the topping:

1 cup AP flour
1/2 cup (packed) brown sugar
6 tablespoons unsalted butter (3/4 stick)
3/4 teaspoon cinnamon

Combine all ingredients and mash with a fork until well combined and crumbly. Set aside.

Then, make the cake:

1 stick softened unsalted butter
2/3 cup sugar
2 eggs
1 cup AP flour plus a couple of tablespoons for flouring the pan
3/4 teaspoon double acting baking powder
1/2 teaspoon salt
3-4 large peaches (about a pound and a half) peeled, pitted, and thinly sliced.

Preheat the oven to 350F. Butter an 8x8 inch cake pan, then add a couple tablespoons of flour and shake and tap it all around so the pan has a layer of flour clinging to the butter.

In a mixer or by hand, cream together the butter and sugar until light and fluffy, then add the eggs one at a time, beating well after each egg. Sift (or whisk) together the flour, baking powder and salt, and add them to the wet ingredients, beat just until combined. Spread the batter evenly in the pan.

Layer the sliced peaches evenly across the surface of the batter, then top with the crumb topping. Bake for 30 minutes, then turn the cake 180 degrees for even baking and bake another 20-30 minutes or until a tester comes out clean. Serve warm or at room temperature.

Wednesday, February 10, 2010

Jam Filled Buttermilk Biscuits


A few weeks ago my cousin Becca was in town, visiting from D.C. and wanting to get together with my sister and me. After a few back and forth emails we decided Sunday brunch would be perfect, and let's also invite my other cousin Dominique, a grad student at Boston College (so close, yet so, so far away on the dreaded Green Line). And hey, have I mentioned how much Adam and I like hosting brunch? We had a big shebang on New Year's Day and I maintain that it's the best meal to host because everyone is happy not to be waiting in line somewhere and it's ok to drink champagne at 10 am. Oh, and if you want to, you can wear PJs. Yes!

So I took a look at the recipes I had earmarked for our previous brunch and noticed I had not had time for these jam-filled buttermilk biscuits from Grand Central Bakery (via Leite's Culinaria). Now you guys know that my fiance is Oklahoma-born-and-bread; buttermilk biscuits are his jam. So imagine if you will: jam on the jam. Homemade jam. Homemade biscuits. BOOM. The six of us ate eleven of these in one sitting.
I  mean, look at that. Look at those biscuits! They're like stained-glass breakfast AWESOME. And yes, that is melty butter all pooled up in the pan. Can I get an aaaaaw yeeeaaah?

Jam Filled Buttermilk Biscuits or "Jammers"
adapted from Grand Central Bakery
makes about a dozen

I mixed up the dry ingredients on Saturday evening and stuck the bowl in the fridge overnight. In the morning I added liquid, patted out the dough, cut and filled the biscuits, and baked. These do bake for a lot longer than regular biscuits (40 minutes versus 15-20) so plan accordingly. Also, I tend to keep dry buttermilk powder around for baking, as I find it somewhat difficult to use an entire quart of buttermilk before it's sad, sour demise. If you choose to use liquid buttermilk, add it where I added water, and skip the buttermilk powder in the dry ingredients.

4 cups  all-purpose flour
3 tablespoons granulated sugar
2 teaspoons baking powder
1 1/2 teaspoons salt
1 teaspoon baking soda
4 tablespoons buttermilk powder
1 cup (8 ounces) cold unsalted butter, cut into small pieces
1 1/4 to 1 1/2 cups (10 to 12 fluid ounces) cold water
About 3/4 cup good quality preserves or jam (I used half peach and half raspberry, both home canned last summer)

Preheat the oven to 350°F .

Measure dry ingreidents - flour, sugar, baking powder, salt, buttermilk powder, salt - into a bowl and whisk it all up.

Using your fingers or a pastry cutter, blend the butter into the dry ingredients until it resembles coarse meal with a few pea-sized pieces of butter remaining.  (This is where you should stop and stick the bowl in the fridge the night before you want to eat jammers.)
Add 1 1/4 cups of ice water (or liquid buttermilk, if using) to the dry ingredients. Using a wooden spoon, gently mix the dough until it comes together in a rough mass. If there is dry flour at the bottom of the bowl, add a little more liquid a tablespoon at a time until it comes together. Turn the 2-3 messy clumps out onto a floured surface and pat them together into one big oval about an inch and a half thick.

Using a biscuit cutter or large mouth glass, cut circles of at least 2 1/2 inches in diameter. Pat the scraps into another oval and cut as many as you can from the second go.
Using your thumb, make an indentation in the center of the biscuit - be careful not to squish the outsides, as that would mangle the layers and mess up the flakiness. Carefully widen the hole in the jammer as if you were making a pinch pot, and fill each hole with a tablespoon or so of jam. (Use the best jam you can stand, you'll be glad you did.)

Lay the jammers on a baking sheet with 1 1/2 inches of space between them. Bake for 35-40 minutes, turning once for even color, until they are a deep golden brown. Serve warm from the oven.

Tuesday, January 5, 2010

Maple Coconut Granola


I've always thought it's a little weird, resolving to eat better and get healthy right as we enter the deepest part of winter. There are so few really fresh vegetables available in January (and February and March, here in Boston anyway), and it seems clear to me that eating more fruit and vegetables and less crap is one of the easiest (and tastiest) ways to get healthy.

 
And with that, I bring you the pomegranate. I'm sure you've seen it before (at least in a bottle); it's a weird little fruit. You eat the seeds which fill the inside, not the nasty white pith that holds them. And they're blood red, and they stain. Oh, and they're a superfood, with higher levels of antioxidants than tea or red wine!
 
But about that staining thing. There's no way to get out of taking that initial cut into the fruit, and you're going to get red juice on your cuttingboard, and you have to sort of worry the seeds out of the pith with your fingers, which is a good way to get them to burst and get red juice all over you and your kitchen. So here's a trick I learned from Alton Brown: pick the seeds out underwater. They sink, and the pith floats. Ta-da! (Word to the wise: don't use frigid cold water from your tap if you want to keep your fingers. Lukewarm, please.)
 

But how do you eat the pomegranate seeds once you have them? You can toss them on a salad, or in cous cous or rice pilaf, use them to garnish a cocktail, or, like me, you can top your yogurt + granola breakfast with the little gems.

Maple Coconut Granola
adapted from Alton Brown

3 cups rolled oats
1 cup slivered almonds
1 1/2 cups other nuts - I used a mix of pecans and cashews
3/4 cup shredded sweet coconut
1/4 cup packed brown sugar
1/4 cup plus 2 tablespoons maple syrup (the real stuff, please)
1/4 cup vegetable oil (or other neutral tasting oil)
1 teaspoon kosher salt
1 cup raisins (you could add other dried fruit, chopped to raisin size, if you like)

Preheat oven to 250F.

Combine the oats, nuts, coconut, and brown sugar (do this in a large bowl so you can toss it all around. Combine maple syrup, oil, and salt in a measuring cup and add to oat-nut mixture, tossing to distribute syrup evenly. Spread mixture out on a large sheet pan (or two).

Bake at 250 for an hour and 15 minutes, stirring every 15-20 minutes so it browns evenly. Remove from oven, let cool slightly, then stir in raisins.

Sunday, October 18, 2009

Apple Spice Cake


It's not unusual for October to be rainy here in Boston, and the forecast called for it, so when I left the house in the morning, I was wearing rain boots, a rain coat, and carrying an umbrella... but then I noticed the drops weren't drops. They were FLAKES. And then today it snowed again, but this time the flakes were the big downy chunks of snow that make me think of instant mashed potatoes. Nature is so cruel!

The only solace I am taking in the fact that we're getting SNOW in OCTOBER is that I have an excuse to bake cake. Well, the snow, and the seven apples, leftover from a picking trip weeks ago, taunting me from the fruit bowl. And the buttermilk going bad in the fridge.* Ok, three excuses to bake.


Apple Spice Cake
I adapted this from a recipe on The Perfect Pantry, based on the spices I like with apples and what I had in the house. It is excellent with ice cream for dessert, but I find it most suited for breakfast, toasted, with a dollop of yogurt and a sprinkling of pecans. I doubled this because I had so many apples and so much buttermilk to use; I brought the extra loaf to work and it was gone in minutes!

2 cups all-purpose unbleached flour
1/4 cup whole wheat flour
1 tsp baking soda
1 tsp salt
1/2 tsp nutmeg
1 tsp cinnamon
1/4 tsp ginger
1/2 cup vegetable shortening
3/4 cup brown sugar
2 eggs
1 tsp pure vanilla extract
1 1/4 cup tart apples, grated (3-4 large apples- I used a mix of Gala, Braeburn, and Macoun, but you can use whatever you have.)
1/2 cup buttermilk

Preheat oven to 350. Lightly grease a loaf pan with butter or baking spray.

Combine flours and spices in a medium bowl, whisk to combine (I like to whisk in the bowl rather than sift, but I guess that might be cheating, so if you want, you can sift them together instead).

In another bowl, cream the shortening and brown sugar until fluffy. Add the vanilla and eggs to the sugar and shortening, and stir to combine well.

Add 1/3 the flour dry ingredients to the sugar mixture, stir to combine. Then add 1/2 the buttermilk and half the apples, stir to combine. Then add another third of the dry ingredients, then the rest of the buttermilk and apples, then the dry ingredients, stirring to combine after each addition.

Scoop the batter into the greased loaf pan, smooth the top a little, and bake for an hour, rotating once. Let the loaf cool in the pan for 10 minutes, then turn it out onto a wire rack to cool completely.

*Do you always have leftover buttermilk from pancakes or ranch dressing (or apple spice cake)? Sarah at the Pink of Perfection has created THE ULTIMATE BUTTERMILK RECIPE REPOSITORY and I am so excited about it that I have to use capital letters. Go check it out.

Friday, July 10, 2009

Currant Cakes (plus a winner and MORE books!)


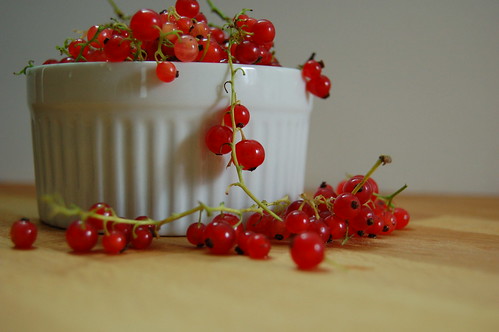
I went up to the market at Government Center on Wednesday around noon, looking for sour cherries. I had plans to start a liqueur. I found myself at the booth for Silverbrook Farms from Dartmouth, where I was drawn in by some lovely (purple!) spring onions. The farmer had some raspberries, but no cherries, so as I handed over my cash for the onions, I asked if he knew whether anyone at the market with cherries. He pointed me in the direction of the Keown Orchard booth (they did have cherries!), but then he asked if I would like to try the currants. I put a tiny red berry in my mouth and it exploded in a burst of tart, vaguely citrusy pink juice that actually made me say aloud "Whoa!" After a discussion of what they could be used for (muddled into drinks, reduced into syrup or jam, baked goods). I handed the man $3 and went on my merry way with a small carton of currants.
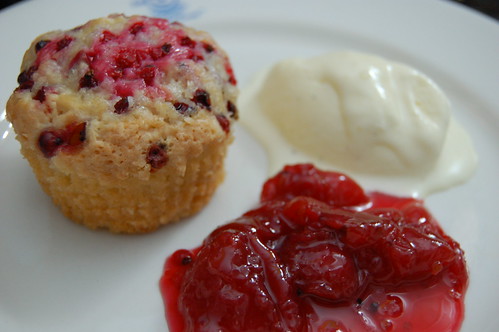
After a brief poll of the twitterverse, I decided on a batch of cakes. Well, cupcakes. Muffins? We ate them for dessert last night but then again for breakfast this morning, so I don't know what to call them. Anyway, I adapted this from Bea's recipe on La Tartine Gourmande, and next time I will almost certainly mix a few berries into the batter instead of just putting them on top, because they were such a nice foil to the sweetness of the cake that I wanted more! more! more!

And about that book giveaway! The random number generator has selected from 17 eligible comment the winner: number 7! Congratulations actionmoviegirl! Shoot me an email with your address (adriennebruno AT gmail DOT com) and I'll get your books in the mail. But wait, there's more!
Because I like you guys, and because I have a bookshelf that STILL needs clearing, here are two more books you can win. This time the theme is gourmets. One, the Amateur Gourmet Adam Roberts and the other, a professional gourmet - food critic and frequent Iron Chef America judge Jeffrey Steingarten. Leave a comment on this post by midnight (Boston time) on Tuesday, July 14th and I'll select a winner on Wednesday. To get you started: what weird food item have you bought with no plans on how to use it? And what did you end up doing with it? Now, about those cakes....

Red Currant Cakes
I used a small muffin tin with six regular sized cups in it, but if you only have a full sized muffin pan, fill the empty cups with water so they don't scorch in the oven.

1/2 cup cake flour
1/2 cup almond meal (pulverize some blanched almonds in a food processor if you don't have this on hand)
scant cup of sugar
1/4 tsp baking powder
1/4 tsp salt
two eggs
large handful red currants
2 Tbsp butter, melted and cooled slightly

Preheat your oven to 350. Generously butter six muffin cups or line them with paper cupcake liners

In a medium bowl, combine the cake flour, almond flour, sugar, baking powder and salt. Whisk to combine. (I use a whisk because I'm a cheater and I hate sifting.) Beat the two eggs in a small bowl, then add them to the dry ingredients and stir gently with a wooden spoon. Before the eggs are completely combined, add the melted butter and stir just until it all comes together. If you're adding any currants to the batter, do so when you add the butter, but save some for the tops of the cakes.

Distribute the batter among six muffin cups, and gently press a tablespoon or more of currants on top of the batter. I started baking these for 25 minutes but I lost count of how many times I added five more minutes to the timer because they were still jiggly. I would start checking them at half an hour, but the may take as long as 45 minutes. Bake until the tops are risen and a thin knife inserted in the center just has a crumb or two clinging to it. Serve with ice cream for dessert or jam for breakfast.

Friday, June 26, 2009

The Custardy Allure

I have never been a sweet breakfast person. If I'm out to brunch, I may try to steal a bite of your banana-walnut pancakes or cheese and strawberry blintzes, but I only ever want a bite, and I will quickly return to my huevos rancheros or everything bagel and smoked salmon.

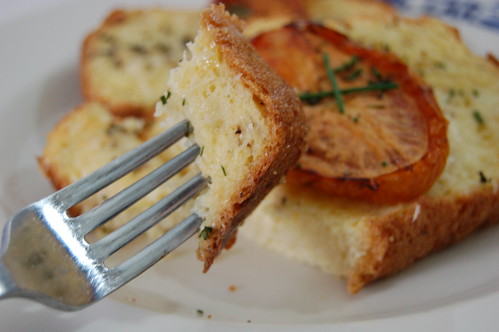
The custardy allure of french toast is not totally lost on me, though, so when Adam suggested we bridge the great sweet/savory divide last weekend and add some Gruyere and fresh herbs to french toast, I said Yes! Now let's make a brioche. (Clearly, you can buy a brioche or use sandwich bread, but don't you own ABin5 yet? So. Easy.)


Adapted from a very schmancy breakfast sandwich recipe found on cookthink, this recipe used the very end (!) of last summer's slow roasted tomatoes that I had hidden away in the back of the freezer. If you're already through your stash, I suggest you 1. bookmark this recipe and make it in September and 2. try it with a different vegetable! Asparagus would be lovely, blanched first and arranged on top of the toast. I bet sauteed spinach would be good, or even broccoli, as long as you cut the florets small enough and tossed the blanched pieces with a light touch of olive oil. Heck, you could even skip the veggie topper altogether.

Savory French Toast with Slow-Roasted Tomatoes
Serves 2

4 thick slices brioche, ciabatta, or other bread
1/2 cup half-&-half, cream, or whole milk
1 egg
salt and pepper
2-3 teaspoons Dijon mustard
1 1/2 tablespoons fresh herbs such as sage, marjoram, thyme, chives (we used thyme and marjoram, and garnished with chives)
3 ounces Gruyere or other swiss cheese, grated
4 halves of slow-roasted plum tomato (one total tomato per person) or the veg of your choice, blanched

Preheat the oven to 400F. In a wide, shallow dish, whisk together the cream, egg, and salt and pepper (start with a half teaspoon salt and 1/4 teaspoon pepper). Dip the bread slices into the egg mixture, turning to coat, and leave them to soak for about 20 minutes. Defrost the frozen tomato halves, if necessary.

Line a baking dish or cookie sheet (with sides) with parchment paper and butter it well so the toast doesn't stick (and believe me, it wants to stick). Place the bread slices on the paper, and spread each with a thin layer of mustard. Sprinkle with herbs and cheese, divided evenly among the four slices, and top each with a tomato half, face up. If you like, you could sprinkle more cheese and herbs on the tomato.

Place the baking dish in the oven for 20 minutes or so, until the bread is slightly browned on the inside and the tomatoes are taking on a little color. Garnish with chopped chives or other herbs.

Tuesday, April 14, 2009

Alton Brown's Buttermilk Biscuits


I can't stop baking. Evidence: cilantro cake, bread, chocolate cake, cupcakes, and biscuits, all in the last two weeks. I made the biscuits twice last week, and I think I might do it AGAIN tonight because it is the last day of my buttermilk's life.

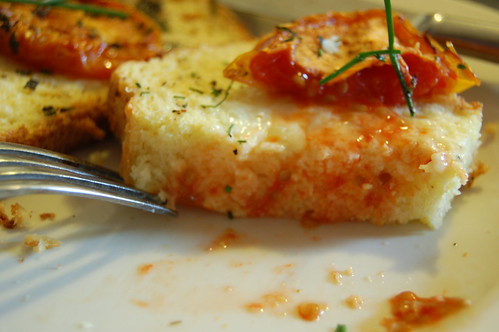
I mean, hello? Buttermilk biscuits? Yes, please, with honey. There's no delightful POP when you jab the can with a spoon, and these are significantly less buttery (I call that greasy) than the insta-biscuit, but it really doesn't take THAT much more time. This dough mixes up in about 10 minutes, and they bake for 15. Piece o' cake biscuit.

Adam made a chicken-sausage based gravy to go with these on Saturday morning that was positively freaking scrumptious, but like those mojitos way back last summer, you'll have to ask him for that recipe.

Buttermilk Biscuits
by Alton Brown, makes 10-12 if you use a 2 inch cutter

2 cups flour
4 teaspoons baking powder
1/4 teaspoon baking soda
3/4 teaspoon salt
2 tablespoons butter
2 tablespoons shortening
1 cup buttermilk, chilled

Preheat oven to 450 degrees.

In a large mixing bowl, combine flour, baking powder, baking soda and salt. Using your fingertips, rub butter and shortening into dry ingredients until mixture looks like crumbs. (Alton says: the faster the better, you don't want the fats to melt. I say: use a pastry cutter if you want, and make sure the bowl is cold, too.) Make a well in the center and pour in the chilled buttermilk. Stir just until the dough comes together. The dough will be very sticky.

Turn dough onto floured surface, dust top with flour and gently fold dough over on itself 5 or 6 times. Press into a 1-inch thick round. Cut out biscuits with a 2-inch cutter, being sure to push straight down through the dough. Place biscuits on baking sheet so that they just touch. Reform scrap dough, working it as little as possible and continue cutting. (Biscuits from the second pass won't be as tall, but they'll still be biscuits, so whatever. I actually reworked my scrap scraps twice and got a single, fairly flat biscuit out of the last pass.)

Bake until biscuits are tall and light gold on top, 15 to 20 minutes. Best served hot, but reheat ok in a toaster oven.

Thursday, March 19, 2009

The Muffins of My Childhood


I know this isn't the most ringing endorsement I'll ever give a baked good, but: this is a solid muffin. It comes together lightning quick (mixing bowl to table in half an hour!), it tastes good, and it makes the house smell fantastic. It's flavored with nutmeg, though I usually add a bit of cinnamon to the batter as well as to the top of the muffin. Adam and I whipped up a batch to take to a birthday brunch last weekend, and I think that's their best application. They're small, so one is not enough for breakfast (at least not for me, but take that as you will) but they are a good supplement to a larger spread.

These are the muffins my mom used to make before church when I was little, and I thought "donut muffin" was just what we called them, but apparently that's their real name!

Doughnut Muffins
adapted from the Marjorie Standish Cooking DownEast Cookbook

1 large egg
1/3 cup cooking oil (canola or vegetable)
1/2 cup milk or plain yogurt
1 1/2 cup unbleached all purpose flour
2 teaspoons baking powder
1/2 teaspoon salt
1/2 teaspoon nutmeg
1/2 teaspoon cinnamon
1/2 cup sugar
cinnamon, sugar, and butter for the tops of the muffins

Preheat oven to 400 degrees.

Using a fork, beat egg in mixing bowl. Add oil and milk or yogurt. Continue beating with fork. Sift flour, measure and sift with sugar, baking powder, salt and nutmeg. Add to mixture and stir with fork, very lightly. Turn into 12 greased muffin tins. (Next time I'll use 9 instead of 12, they were awfully tiny. Fill the empty cups with water so they don't warp in the oven.) Sprinkle each muffin with a mixture of sugar and cinnamon and put a dot of butter or margarine on top of each. Bake at 400 degrees about 20 minutes. Best served warm.

Friday, March 13, 2009

Eggs in Toast


I wish I could claim credit for this idea. Alas, I cannot, because it's Zoe's (one of the authors of Artisan Bread in 5 Minutes a Day, you may recall my obsession), but I can show you how it turned out for me!

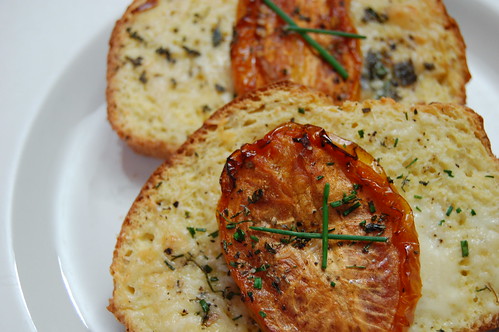
Essentially, you roll out some dough, tuck it into a muffin tin, and slide an egg all cozy into the little toasty basket. I skipped the bacon but I did put some cheese in the bottom, and after I took this photo I added several hearty shakes of Frank's Red Hot sauce. I make myself an egg and some toast every morning so I have it down to a seven minute science... these take a little longer, but I think they would make a great addition to a brunch menu. Yum!

Wednesday, February 4, 2009

Chipotle and Cheese Souffle Muffins

Have you made those cottage cheese muffins yet? I may mentioned them to you a few months ago and told you to give them a try but did you? Did you? Hmph. Maybe you did. I'm sorry, I don't know what's come over me. Maybe it's that I made this awesome chipotle and green onion version last week and they're gone now... tragically gone! And I'm back to store bought English muffins for breakfast! My life is SO HARD! *sob*


Okay! Enough melodrama. Here is the story: I had an open can of chipotles in adobo in my fridge, and for the life of me I cannot remember what I originally opened them for. I know they went into scrambled eggs and chili and these muffins once they were open but the first use escapes me.


Wait, I remember! I opened them for the same reason I bought the queso fresco that aaaalso went into these muffins. I made a giant white bean and kale chipotle baked thingy. It was great. Next time I make it I'll add more kale. So apparently this is a 101 cookbooks-centric post. Thanks for all the recipes, Heidi!


That said, I've tweaked the recipe a little bit: since I didn't have any almonds around I just used whole wheat flour for the whole thing. Now please forgive the wacky tone of this post, as it is only Wednesday and I was ready for it to be Friday when it was still only Monday. Look at that sentence! See what I mean? I blame the snow, not these muffins.


Chipotle & Cheese Muffins
adapted from 101 cookbooks

1 cup plain cottage cheese (low-fat is fine)
3/4 cup queso fresco, crumbled
1 1/4 whole wheat cup flour
1 teaspoon baking powder
2-3 chipotle peppers in adobo, chopped
3-4 green onions, chopped
1/4 cup water
4 eggs, lightly beaten
1/2 teaspoon salt

Preheat oven to 400F degrees. Line muffin tin with paper cups or grease lightly OR use a silicone muffin pan, like me (I love it).

Put the cottage cheese into a bowl with the queso fresco, the flour, baking powder, chipotles, green onions, water, and eggs, and season with salt, then mix all together.

Spoon the mixture into the muffin cups 3/4 full and bake for 30-35 minutes, or until set, risen, and golden brown. Serve as hot or at room temperature.

My muffin tin has 12 cups so this makes 12 smallish muffins.

Tuesday, September 23, 2008

Tarts with Strawberry Tomatoes, aka Cape Gooseberries

When it comes to farmers' markets, I am an easy mark. Sunday afternoon, Adam and I were walking around the SoWa open market, which consists mainly of art and other handmade items, but has a few farmers with produce around the edges. I knew I needed a few things for the ratatouille I was making that night, but I also wanted some apples and leeks. When I got up to the front to pay, the woman at the stand asked if I had tried the strawberry tomatoes, and offered me a sample... They're so strange! Sweet like a berry, acidic and slightly tart like a tomato. I bought a pint. (She also sold me on a pint of some super sweet grapes... again, easy mark). Man, these things are interesting. At first I thought they were just tiny tomatillos because of that husk, but it turns out they actually are called strawberry tomatoes, as well as cape gooseberries. According to their wikipedia entry, they are indigenous to South America but were brought to South Africa in the 1800s, near the Cape of Good Hope (hence the name). They're not related to gooseberries, but they ARE related to tomatillos (as well as tomatoes, eggplant and potatoes) so I'm not completely insane.

After I had tried one, I asked the woman at the farm stand what I could DO with them. She told me to just eat them (ha) but then mentioned that some people make pies with them because they are so sweet. Iiiiinteresting.

A few months ago I was given three small (4 inch) tart tins as a gift, but I hadn't found a recipe yet that struck my fancy enough to actually make tarts, so I made one up. I made a dough, wrapped it in plastic and stuck it in the fridge.

A few hours later I decided eating at 5pm was a bad idea for a Sunday, because I was still hungry. So I took the dough out, and cut it in three pieces, which I rolled out and laid in the tins, pressing the dough into the ruffled edges. I cut off the excess, lined them with foil and added pie weights (look, Hugh! I used the pie weights!).


I baked them in a 375 degree oven for 15 minutes, then I removed the weights and foil and let them cool while I mixed up the filling.

First I husked the berries.

Then I cracked two eggs in a bowl, and added a splash of half & half.

I added salt and pepper.

Then I whisked it all together.


I put a little bit of soft goat cheese in the bottom of the par-baked tart crust, and divided the fruit (vegetable? fruit? vegetable? fruit?) between the three tarts.

I spooned the egg mixture into the tarts and stuck it back in the oven for another 20 minutes, until the filling was set and golden.

I ate one for dinner #2 on Sunday night, but the other two have made wonderful breakfasts and reheat well in the toaster oven. I suspect this would work very well with other veggies, too, particularly those that straddle the sweet/savory line. I have some leftover dough, so I'll probably be experimenting again soon.

Tarts with Strawberry Tomatoes (Cape Gooseberries)
I only had three tart tins (the kind with removable bottoms), but I had enough dough for four. If I had a few more berries I could have stretched this to four, but the recipe below is for exactly what I did.

makes three 4-inch tarts

For crust:
1 1/2 cups all purpose flour (I like unbleached)
4 Tbsp ice water and more as needed
3/4 tsp vinegar (I used cider vinegar)
1/2 cup (1 stick) cold, unsalted butter, cut into cubes
3/4 tsp salt

For filling:
One pint strawberry tomatoes, removed from their husk
5-6 tablespoons soft goat cheese
2 eggs
1/4-1/3 cup half and half or cream
1/4 tsp salt
10-12 grinds black pepper (1/4 tsp?)

Make the crust: Put the ice water and vinegar into a liquid measure cup or bowl. In a food processor or bowl mix the flour and salt together. Add butter cubes and process (or cut in using a pastry cutter or two knives) until the mixture resembles coarse meal. Add the vinegar and ice water slowly while processing or stirring, until the dough clumps together. Add teaspoonfuls of ice water one at a time if dough is too dry to come together. Gather the dough in plastic wrap, flatten into a disk and refrigerate for at least a couple of hours.

Preheat oven to 375. Give the dough a couple of minutes on the counter, then cut the disk into three pieces and roll each piece into a 6-7 inch round. Line each tin, pressing dough into the corner and into the fluted edges. Trim excess dough - you will have extra. Line tarts with foil and weigh them down with pie weights (or dried beans) and bake for 15 minutes, until just golden (put them on a cookie sheet to ease transfer in and out of oven, and in case of leaks). Remove weights and foil, and allow to cool while you mix the filling.

Crack two eggs into a bowl, and add a splash of half and half or cream. Add 1/4 teaspoon of salt and several grinds of black pepper. Whisk to combine. To assemble the tarts, spread about two tablespoons of soft goat cheese in the bottom of each tart and divide the berries evenly between the three. Spoon or pour the egg mixture evenly between the tarts, then put them back in the oven for another 20-25 minutes. Remove when the filling is set in the center and golden. Allow to cool for 5 minutes, then remove from tins. Tarts keep, refrigerated, for a few days and reheat well in the toaster oven.