Showing posts with label seafood. Show all posts

Thursday, January 12, 2012

Tilapia with Endive, Pears and Meyer Lemon

Tilapia with Braised Endive, Pears, and Meyer Lemons

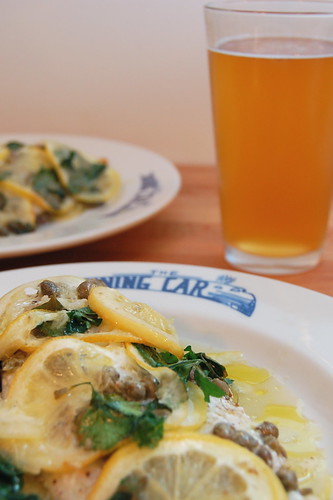
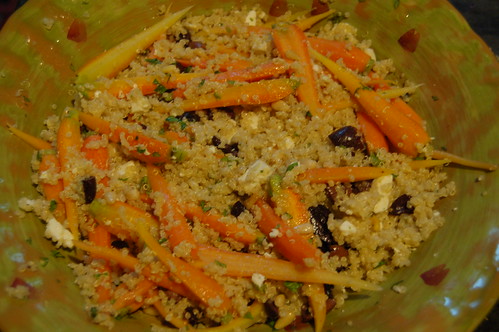
Fish with pears? Fish with pears. But more on that in a second - first, let's recap New Year's Day Epic Brunch 2012. Citrus salad, to make you feel virtuous. I put it on the meat table (bacon, corned beef hash, sausage rolls) because I thought it was funny.

NYD Brunch 2012, aftermath I

Tyler (he of the family smoke house) brought oatmeal, there were two quiches (mushroom and goat cheese, poblano and monterey jack), homemade danishes, Cara's cranberry muffins, spinach and gruyere strata, Glen's famous kugel, and a roasted sweet potato thing I put together with some pecans and pomegranate seeds and mint because of course I thought EEK! There's not going to be enough FOOD! Clearly I am a crazy person.

NYD Brunch 2012 aftermath, II

Also decorating the house this holiday season is my new friend Salty the Snowman, who I think is completely hilarious, so thanks, Santa. Seasonings Greetings to you, too!

Salty the Snowman

But now let's get back to the fish at the top of this post. I didn't really make any resolutions per se this year, but I did decide I should try to cook and eat more fish. So good for you! So tasty! So many different fish to try!

Since this brand new year began just 12 days ago, we've had fish for dinner twice! Already an improvement over last year. I made this salmon last week, and last night we had this oddly delicious thing from the most recent issue of Fine Cooking. I say odd because fish and fruit struck me as bizarre, but not too bizarre to try. As it turns out, pears love salt! And I love pears and salt.

Tilapia with Endive, Pears and Meyer Lemon
Serves 2-3

I usually halve recipes that "serve four" when it seems like it will be too much food, but this time I just bought three small tilapia filets (the extra one is for Adam's lunch the next day) but left the veg amounts the same as the original recipe. I'm glad I did, I don't know if this would have been enough for four people, but then you could always make some rice and call it a day, eh? 

1 meyer lemon (2 if they're very tiny)
5 tablespoons unsalted butter
3 belgian endives, trimmed, quartered lengthwise
3 medium firm (but ripe) pears
1 tablespoon chopped chives plus more for garnish
1/4 cup AP flour
1/4 cup cornmeal
2 or 3 filets of tilapia or flounder, depending if someone needs lunch for the next day
2 tablespoons olive oil
1/2 cup dry white wine
salt and pepper

Zest the Meyer lemon with a microplane; you should end up with almost two teaspoons. Also your hands will smell AWESOME. Slice the lemon in half and juice one half to yield about 1 1/2 tablespoons of juice. Thinly slice the other half, then cut the slices in quarters. You may ned to pick out some seeds.

Heat a medium saute pan (one with a lid) over medium heat. Melt 3 tablespoons of butter, then add the endive, pears, lemon juice and zest, and season the whole thing with a good pinch of salt. Stir to combine, then cover and reduce the heat to medium-low. Cook, stirring occasionally, for 20-25 minutes or until the endive is tender throughout. Remove the cover and continue cooking until there is some browning on the pears and endive, another 5 minutes or so.

While the endive and pears cook, combine the flour and cornmeal in a shallow dish along with a big pinch of salt and pepper. Heat another saute pan over medium high heat and add the olive oil. Season the fish on both sides with salt and pepper and dredge in the flour mixture. Make sure the pan is pretty hot before you add the fish or it won't brown, but cook the fish about 3 minutes per side until it's just cooked through. Remove the fish from the pan, wipe out any residual cornmeal with a towel and add the remaining 2 tablespoons of butter. Once the butter melts, add the quartered lemon slices and cook for about a minute, then add the wine and a pinch of salt. Let the wine reduce by half, then spoon it over the fish and endive. Meyer lemons are pretty sweet and if you slice them thinly and cook them through you can eat them. If you used a regular lemon, you may not want to eat the pieces.


Tuesday, November 29, 2011

Matcha and Pistachio Crusted Fish

Matcha & Pistachio Crusted Cod

I get quite a few food magazines, and even though sometimes it's kind of overwhelming I really do try to cook out of each of them at least once every month. Occasionally Adam will pick up a Fine Cooking or Food & Wine off the coffee table and mention that something looks good, and the man has a good eye. So when he perked up over this recipe in October's Bon Appetit, I put it on the list of "things I want to cook, eventually". I really shouldn't have waited so long. Delicious, easy, fast - what more could you ask for?

Messy

Matcha & Pistachio Crusted Fish
serves 4

The recipe calls for halibut, but I used cod, because it looked better than the halibut when i went to buy fish. Any white fish would work, but the portions I ended up with were quite thick, so the cooking time was way more than the recipe said. Whatever fish you end up with, just make sure you cook it until it's just opaque in the center. Oh, and I found matcha pretty easily at my local Japanese market

1/2 cup shelled pistachios
1 1/2 teaspoons matcha (green tea powder)
1/2 teaspoon sugar
2 tablespoons panko breadcrumbs
1 tablespoon unsalted butter, melted, plus more for the pan
grated zest of 1/2 a lemon
4 5-ounce skinless filets of halibut, cod, or other white fish
salt and pepper
lemon wedges for serving (optional)

If you bought pistachios that are already roasted and salted, skip this step. If you bought raw pistachios, heat the oven to 400 and spread the pistachios out on a baking sheet; toast for 3 minutes or until just browned in spots. Let cool. Even if you're not roasting the pistachios, heat the oven to 400.

Combine the pistachios, sugar and matcha in a food processor (a mini chopper thingy or the processor attachment to an immersion blender is perfect for this) and process until the pistachios are roughly chopped. Add the breadcrumbs, butter and lemon zest and process again, but not too long! You don't want it to be too pasty. Taste the topping and adjust the seasoning with salt and pepper and lemon if necessary (I used roasted, salted pistachios so it was plenty salty and I only needed to add a little pepper).

Line the sheet pan with parchment and butter the parchment. Season both sides of the fish filets with salt and pepper, then top each filet with 1/4 of the pistachio mixture. Bake for 8-10 minutes for thin filets or 16-20 minutes for thicker pieces. No matter the thickness of your fish, bake until opaque and set in the center. Serve with lemon wedges, if you like.


Tuesday, July 13, 2010

The Grill Option: Fish

Pile of scallions
I've mentioned previously how owning a grill has already drastically improved our summer dining experience; it's great to have an option for dinner that doesn't require turning on the oven in our already stifling kitchen. However, one thing I haven't discussed here is the learning curve. Not everything we grill turns out perfect, in fact, we scorched a spatchcocked chicken pretty bad a couple of weeks ago (we ate it anyway, picking off the burnt skin bits, and it was still juicy and good).

181/365: Fish in a basket!

Then there was this halibut. I knew we would need a grill basket if we wanted to grill seafood or other delicate things. What I forgot was that the grill basket would get hot and the fish would stick to it. I marinated the fish in lemon thyme and olive oil, but I didn't oil the basket. When we tried to turn the fish out onto a platter it came off in big chunks, bits of skin clinging to the hot metal and generally looking quite sloppy.
First of July Dinner

It still tasted good, and the grilled scallions were a nice smoky counterpoint to the fish. We ate it with some grilled zucchini and grilled lemon wedges (thanks for the tip, Mr. Bittman) and a piece of toasty bread piled high with Foxboro Cheese Company's fromage blanc.

So tell me, oh ye grillmasters, other than oiling the basket better, what can I do to improve my grilled fish? Should I use a firmer fleshed fish? Or a whole fish? Or do I just need to practice more? I await your guidance.

Thursday, May 6, 2010

Spring Salmon with Peas and Asparagus

123/365: Spring Salmon

The weather here in Boston has been so darn springy lately (78 and sunny for the last week!) that green vegetables are the only thing I want to eat. Add in a trip to Wilson Farms in Lexington where I was able to get asparagus so local I could feasibly ride a bike to where it grows, and ta-da! More asparagus, right after I told you about my old standby pasta and asparagus. And you know what? I've got another asparagus recipe on deck. I know it's a little bit crazy, but it's so GOOD this time of year; asparagus in November is not the same at all. I will gorge myself now instead of eating crappy spears in six months.

I blanched a couple of bunches for another project (aforementioned on deck asparagus recipe) but only ended up using about a bunch and a half. Just bring a pan of water to a boil, add the asparagus (woody ends snapped off), and cook for 15-60 seconds. Fifteen seconds is enough if it's pencil thin and you like it crunchy, a full minute is good if you want it more cooked. The big thick stalks will need to cook for longer to become tender. Then remove the asparagus with tongs or a slotted spoon and put it directly into a bowl of ice water to stop the cooking. You can do this a couple days in advance if you want, and keep the cooked asparagus in the fridge.

You could use frozen peas if you wanted to, but freshly shelled English peas (also called shelling peas or garden peas) are a real treat and not THAT much work. Snap off the blossom end of the pea, and "unzip" it by pulling off the string along the seam. Open the pod, and slide your fingers down the inside to remove the peas. Do this over a bowl, because peas are very bouncy. Enlist a helper and you can get through a pound or two in a flash. Alone, it only took me about 8 minutes to shell a pound.

Update! The latest Spilled Milk podcast is about peas, and it is hilarious. Go listen.
Spring Salmon with Peas and Asparagus
Serves 2, but easily doubled. Buy more shelling peas than you think you will need, because a pound of pea pods yields scarcely a cup of actual peas.

2 4-6 ounce salmon filets (preferably wild-caught sockeye), about an inch thick in the center
1 cup (ish) freshly shelled English peas

1/2 bunch pencil thin asparagus, blanched (see above)
Butter
Salt and Pepper
about a teaspoon chopped chives for garnish

Salt and pepper the flesh side of the salmon pieces (it's easy enough to remove the skin once the salmon is cooked, so for simple preparations like this I just leave it on during cooking). Heat a tablespoon of butter in a large nonstick skillet over medium-high heat until it melts and foams, then add the the salmon, skin side up. Allow to cook without moving for about 3 minutes, until you can see that it is approximately half way cooked - take a peek at the side, it will be starting to get opaque.

Flip the salmon over. Cook for another 2-3 minutes, until the sides are just opaque all the way through. The center will be a touch under cooked, but it's going to rest for a couple of minutes so it will carry over until it's just done. Also, cooking pricey wild caught salmon until it's dry as a bone is a crime. Remove the salmon to a plate and cover very loosely with aluminum foil.

Don't clean the pan, just add another tablespoon of butter, let it melt, then add the peas and asparagus. The peas will cook in less than a minute - they'll still be sort of al dente, but mushy peas are gross. You're just warming up the asparagus. Salt and pepper the vegetables and when they are warm and the peas are cooked to your liking, remove to two plates. If there are any accumulated juices in the pan, pour these over the veg, then add a piece of salmon to each plate. Sprinkle chopped chives over if you want to make it pretty.

Friday, February 26, 2010

Oven Poached Fish in Olive Oil


I have mixed feelings about the month of February. I mean sure, my birthday is in February, so that's usually pretty fun, but it's just so dreary sometimes, you know? On the other hand, it's so short! It's over so fast! But then again, that's a bad thing, too. Rent is due faster than you expect. March sneaks up on you. Here it is the two days before the end of February and I was all, oh, I've got time for my Gourmet Unbound post, it's only the 26th.

HA! Not so. Luckily, I glanced at the calendar at 4:45 this afternoon and noticed the rapidly approaching deadline.  I have lots of baking planned for the weekend, so I wanted to do something quick and easy from Gourmet for tonight's dinner. This oven poached fish in olive oil fit the bill.


As is my wont, I tweaked a tiny bit. Mostly since it was just the two of us for dinner tonight, so I cut the original recipe in half. I didn't garnish with more parsley at the end (gasp!), and I served the fish over a huge pile of spinach. And I do mean huge; we ate an entire 10 oz bag between us. You know that squidgy, frictiony feeling you get on your teeth after eating spinach or lemon? Big time. But worth it.
 
This recipe is dead simple, the only thing is that it takes an hour for the fish to poach, so start it right when you get home from work.  I waited until the fish was done, then sauteed a bag of spinach (washed, stems removed) in a few spoonfuls of oil from the fish pan. There will be plenty of leftover lemony, capery, fishy oil, when I come up with a way to use it in the next couple of days (salad dressing?) I'll let you know in the comments.


It's a layering game from the bottom up: start with the less attractive lemon slices (about half), then the fish, then salt and pepper, then capers, the pretty lemon slices and parsley. I wasn't sure whether to chop the parsley or not, but when it came out of the oven and a few of the parsley leaves were crispy from sitting up above the bath of olive oil. I see no problem with that at all.


Oven Poached Fish in Olive Oil
Gourmet, March, 2000


Don't be intimidated by the cup of olive oil. Very little of it sticks to the fish, so there's a ton left in the pan.

two fillets of cod, halibut or another white fleshed fish
1 cup olive oil
1 lemon, sliced as thinly as you can manage
3-4 tablespoons capers, rinsed if salt-packed
1/4 cup flat leaf parsley
salt and pepper

Preheat the oven to 250˚F.

Pat fish dry, and let sit at room temperature for 10 minutes to take the chill off (say, while you slice the lemon). Line an 8x8 inch baking dish with the least attractive half of your lemon slices. Lay the fish over the lemon slices.

Coarsely chop half the capers, then mix them back in with the whole capers, and sprinkle them over the fish. Top this with the prettier half of your lemon slices, then the capers, prettier lemons, and parsley. Stick it in the oven for an hour. If you're cooking 4 filets you may need an hour and fifteen minutes, but either way, cook it until the fish is flakey and cooked through.

Wednesday, November 11, 2009

Sushi Salad


No, this salad is not a pile of raw fish on a plate. I'm just messing with leftovers again. Adam made maki (rolled sushi) on Monday - nothing too intense, just nori (seaweed), sushi rice and vegetables. And a little crab. I said "Hey, why don't you get some Krab! We have avocados. We'll make California rolls." And he came home with one actual king crab leg.  Which is awesome because even though Krab is standard in Cali rolls and even sort of ok for things like seafood salad, real king crab is AWESOME with capital letters. I harvested the crab meat and prepped the vegetables, he made the rice and rolled the maki. We ate it in front of House and it was delicious.

But then we had leftover vegetables. And leftover rice. And leftover crab and leftover nori and more of that Genji Ginger Miso dressing I'm so completely enamored with.


So I chopped everything up. I tossed the cucumbers, carrots, scallions and rice with some baby arugula (I really wanted bok choy or napa cabbage but the bok choy at the store was rubbery like pencil erasers and the napa cabbage was yellow, limp and sad) and some of the dressing, and topped the whole thing with sliced nori, crab, avocado and some chopped cashews for crunch. I beg of you, dear Japanese friends, to forgive me: I call it sushi salad.

Tuesday, September 22, 2009

Mussels, pasta, beans and greens: a bivalve revelation.

I wish I could say I've never been a picky eater, but if we're being honest I should confess: when I was a kid my salads were more Hidden Valley Ranch and from-a-box croutons than vegetables. I didn't like raw tomatoes until at least the tail end of high school. Ham? No thank you. Spicy food? Mmm, I'll pass. I grew up in Maine, but it was years before I would even consider a lobster. And nothing - I mean nothing - could get me to eat a mollusk. Clams, oysters, the whole phylum was just skeeved me out. (BTW, Mom, sorry if that was annoying for you. I'll make it up to you in preserves and pickles this year, ok?)

While I still don't like ham (or watermelon, ew), I've recently come around to the allure of shellfish. I've eaten an oyster or two. I've sampled a clam. And then last winter I went out to dinner with my parents to one of Portland's best restaurants, five fifty-five, and I tasted the mussels my mom had ordered. It really was like a light bulb went off! They were smokey and briny and when you dipped the bread in the broth it just melted into a little seafood implosion on your tongue. I was SOLD.


But for the last year, mussels were a food I only ordered in restaurants, not something I cooked at home. The scrubbing, and the how would I know if they were dead, and the what if I gave us food poisoning with dead mussels!, it was just too much. But then I saw Mark Bittman's minimalist column in the New York Times a couple of weeks ago, and I could put it off no longer. Mussels, beans, AND pasta? These are a few of my faaaavorite thiiiings... plus the bitter mustard greens that were wilting in the fridge from what turned out to be our last CSA pickup of the year (that rant coming later, I assure you). And mussels are only $2.49 a pound! My friends, this is a keeper.

Pasta with Mussels, Beans and Greens
adapted from Mark Bittman

If you don't like bitter greens, by all means leave them out and use the parsley called for in the original recipe. If you like greens but don't like bitter, use swiss chard or kale or something more mild than the totally insane-in-a-good-way mustard greens. While you're cleaning the mussels, discard those with cracked shells, or those that don't close when you tap them a couple of times. Once they're cooked, discard mussels that HAVEN'T opened.

2 lbs mussels, scrubbed well
1 large bunch bitter greens such as mustard, washed and chopped
1 15 oz can white beans such as cannelini
1/2 lb penne, rigatoni, or ziti
1/4 - 1/2 tsp red pepper flakes
2 cloves garlic, minced
2 Tbsp olive oil
white wine
salt
pepper

Bring a pot of salted water to a boil.

Put the clean mussels in a large pot, cover with a tight fitting lid, and turn the heat to medium-high. You can add a splash of water if you like, but the mussels will let out enough liquid to steam themselves. When you hear the liquid bubbling, turn the heat to medium low and give the pot a shake every 10 seconds or so. When the mussels open up, they're done, probably 3-5 minutes. Shell most of them but leave a few in the shell for presentation if you like. Strain the liquid left in the pot (or just pour it out slowly leaving the gunk at the bottom).

Meanwhile, cook the pasta in the salted water, but take it out while it's still firm, it'll cook more in the pan with everything else. (Come to think of it you could even cook it ahead of time and use the same pot for the mussels.)

Heat a large skillet over medium high heat, add the 2 tablespoons of oil. Add the garlic and red pepper flakes and heat 30 seconds or until fragrant. Add the chopped greens. They should wilt quickly, but they'll go faster if you cover the pot for a minute or two. When there's room in the skillet, add the pasta, white beans, mussels, mussel cooking liquid and a splash of white wine (2 Tbsp or so). Stir to combine, and season with salt and pepper. When everything is warmed through, it's ready to serve, with some good bread for sopping and a glass of that white wine.

Monday, July 6, 2009

Fourth of July + Book Winner + More Books

It's always so nice when dinner greets you with a friendly wave, eh? As usual, lobster was on the menu for the Fourth of July feast-ivities. We also ate some baby carrot salad (recipe via 101 cookbooks, I added feta and tossed it with quinoa).

Oh, and I made coffee-chocolate cake.

And some sweet and fluffy cloverleaf rolls.

We also tried out the jet skis, got caught in a rain storm, played cribbage, and ran into people playing cribbage. All in all a delightful way to spend the holiday weekend!

But now we're here to find out about the winner of my first book giveaway! I used random.org to generate a random winner because, well, it's 10pm and I'm here by myself. Also, I'm having a pretty bad hair day so I don't think you want to see pictures of me drawing a name out of a hat. I can't figure out how to show you how it works, so you're going to have to trust me: of the 13 eligible comments (I didn't include my own comments, people who commented after midnight, or people who said they didn't want the book), the random number generator spit out the number...... TWO! Congratulations, Aimee, you're the lucky winner of a paperback copy of Julie and Julia! Shoot me an email with your address and I'll get it in the mail.

What's that? You wish YOU had won the book? Well, let's see. How about I sweeten the deal a little bit? We'll go the nonfiction route, but this time it'll be a pair of books:


The United States of Arugula, by David Kamp, an essential history of the gourmet revolution in the US, and In Defense of Food by Michael Pollan, which if you haven't heard of by now... well, that's all the more reason for you to read it. I'll pick a winner at random on Friday. Two books for the low, low price of a comment left on this post before midnight (Boston time) on Thursday, July 9th. I want to know: what was the best thing you ate this weekend?

Wednesday, March 4, 2009

Salmon, butter, and marjoram


One of the thing that simultaneously frustrates and thrills me about Mark Bittman's recipes is that they're often written in a casual, off the cuff style, listing dozens of options for substitutions and tweaks. When I was learning how to cook for serious a couple of years ago, and full of self doubt, that kind of thing drove me crazy: how much IS a "knob" of butter? What's a palmful? How big is my hand? Where am I? And what happened to my pants? Ok, kidding about the last part, but now that I'm more comfortable in the kitchen I too can be obnoxiously casual about things like substitutions! Check out the end notes on the Salmon Roasted in Butter from Bitten.


Salmon, fat, herbs: how can you go wrong? It would be awfully difficult, I think. And this recipe is gosh darn simple: heat the oven, put butter and herbs in a baking dish in the oven. A few minutes later, add the salmon, a few minutes after that, flip it, skin it, season it. Easy as pie. Way easier, actually, and the salmon was incredibly moist... butter will do that. Plus, I got to use more marjoram, huzzah! Served with broccoli rabe and beans (which makes a fine dinner on its own, as well as being a great side), this made a nice little weeknight meal for two with plenty of leftovers. I'm already looking forward to lunch.
Salmon Roasted in Butter
adapted from Mark Bittman

4 T butter
2 T marjoram leaves, chopped finely
1-2 lbs salmon filet (I had two under-a-pound filets)
salt and pepper
lemon wedges
Heat the oven to 475F. Add the butter and half the marjoram to the pan, and put the pan in the oven for 3 minutes or until the butter is melty and starting to bubble a little. Add the salmon, skin up, and roast for 4 minutes.
Remove from the oven and carefully peel the skin off. Season with salt and pepper, then flip the filets and season again with salt and pepper. Roast another 4 minutes. Cut into portions and serve with a squeeze of lemon and some butter from the pan, sprinkled with the other half of the herbs.
Serves 4 (generously)

Friday, January 9, 2009

Shrimp Ramen


I may have mentioned before that I'm a big Alton Brown fan. This particular recipe is one I've used before, but last time I followed the directions. Heh. You're supposed to lay down the half brick of ramen noodles (yes, the 11 cent ones) in a tin foil square and stack the other ingredients on top, then make a pouch and pour in the liquids, and bake the whole thing in a 400 degree oven for fifteen minutes.

Except I'm almost out of tin foil. So I heated the liquids (veggie broth, mirin, soy sauce, sesame oil) in a pot, then added some red pepper flakes, then added the veggies and shrimp together. I think next time I'll wait and add the shrimp at the very end; they got a bit overcooked what with the boiling instead of steaming. I also halved the original recipe but kept the original red pepper amount - so this was a spicy one. Also, soy sauce is plenty salty (even the low sodium variety) so I didn't add any extra salt. Next time I'll play with adding more and different vegetables, and I bet you could use chicken or beef in place of the shrimp, too...

Spicy Shrimp Ramenadapted from Alton Brown
serves 2
1 brick ramen noodles, broken up a little bit (toss the nasty spice packet)
10-12 large shrimp, peeled and deveined
4 scallions, chopped
1/4 medium onion, chopped
1/4 cup dried mushrooms, chopped
1/2 cup fresh mushrooms, sliced
1/4 - 1/2 teaspoon red pepper flakes, depending on how spicy you want it
3 cups vegetable broth (can add more if you like a brothy-er soup)
1/4 cup mirin (or use a combo of a scant 1/4 cup white wine and a tablespoon rice vinegar)
2 Tbsp soy sauce (low sodium preferred)
2 tsp sesame oil

Combine the veggie broth, mirin, soy sauce and sesame oil in a medium pot over medium heat until it simmers. Add the noodles, red pepper flakes, both kinds of mushrooms, scallions and onions, stir everything under and cook for about 2 minutes. Add the shrimp and cook another minute or two until the shrimp are pink and cooked through. Taste for spice, add more red pepper for more spice or more veggie broth to dilute if it's too salty. Serve immediately.

Thursday, October 30, 2008

Lemon Risotto with Shrimp

Aah, risotto. You've had it before, right? So creamy you think they MUST have dumped half a gallon of heavy cream in, salty and just a touch chewy and all around delicious. I freaking love the stuff. The best part is that it's SO much easier than you think. Time consuming, yes. Challenging, not so much.


Ok sure, it takes a little while, but it's such a neat process. Look at that photo above: grains of rice swimming in chicken broth. Now look at the one below it: creamy and smooth. And the RICE did that. Not me! I swear I only added a little cheese at the end, and no cream! You don't have to use arborio or carnaroli (two types of short grain white rice) but they're easy to find (especially arborio) and they're the standard rices for this particular application. Oh, and don't even THINK about throwing out your parmesan rinds. Stick 'em in a bag in the freezer when the cheese is gone, and drop one in the pot with the rice. (See the triangle in the photo above.) You'll get every speck of creamy delicious cheesiness out of it before you throw it away.
Plain risotto made with an onion, chicken broth, and a little parmesan cheese is all well and good, but it also makes an excellent canvas for whatever flavors you're in the mood for. The other night, I wanted something light tasting and fresh, so I added the juice and zest of a lemon and some herbs. On top of the rice went some simple sauteed shrimp et voilà! Dinner, she is served! (YES I know this is an Italian dish. Whatever dudes, I'm feeling the French at the moment.)

Lemon Risotto with Shrimp
serves 4
1 1/2 cups arborio rice
5 c chicken broth
one small onion, finely chopped
olive oil
parmesan rind (optional but highly recommended)
1/2 - 3/4 cup grated parmesan
salt and pepper
one lemon, juice & finely chopped zest
1 T mint, finely chopped (or basil, but I had mint on hand)
3 T parsley, finely chopped
Peeled, deveined shrimp, 5-6 per serving, sauteed
Heat the chicken broth in a medium sized pot over low heat, just to keep it warm. Add a couple tablespoons of olive oil to a large pot over medium heat, add the onion and saute a couple of minutes until the onion is translucent but not browning. Add the rice and saute for about two minutes until you can smell it getting nutty. A few touches of gold on the grains is fine, but keep the rice moving at this point so it doesn't brown.
Add the parmesan rind (whole) and a ladelful of chicken broth to the rice and stir it in. Leave it alone for a couple seconds and stir again. At first the rice will absorb the broth quickly. When you scrape the spoon against the bottom of the pot and no liquid rushes in to cover it, you need to add more broth. Continue adding broth a ladelful at a time until the rice is creamy, 25-35 minutes. It may take longer depending on your exact heat level, your rice, and your stirring. Just go till it's done, and if you run out of broth use water - you can add more salt at the end if it needs it.
Meanwhile, chop the herbs and zest the lemon. Reserve a little bit of the herbs and zest for garnish if you like. Saute the shrimp in a touch of olive oil in another pan towards the end of the cooking process and cover to keep warm.
When the risotto is creamy (taste it to be sure the rice is cooked to your liking), add the grated cheese, lemon juice, lemon zest and herbs, salt and pepper to taste. Taste it again and adjust seasoning if necessary. Serve on a plate or in a shallow bowl with shrimp on top and garnished with reserved herbs and lemon zest.

Monday, July 14, 2008

On OUTRAGE! and soup.

Dear reader, do you notice anything missing from this photo? Say, three bare spots where potted plants used to live? Three botanical babies, lovingly cared for by moi? *sigh* Someone stole two of my plants today. They had been moved down to the yard with all the other stuff you see by the guys refinishing the deck. I got home from work and headed around the back to water (the promised thundershowers did not show up today) and two of my three pots were missing. Including the beautiful raku pot I bought on clearance at the end of last summer. And someone has absconded with it! Not to mention the parsley, thyme, basil and tarragon living in it! And the rosemary in the green pot next to it. My mint in its mustard yellow pot was left. I watered it and brought it up on the porch, then I raged a little bit and yelled. And then I made soup.

A couple of weeks ago in Maine, just before getting on the train back to Boston, we had lunch at Walter's, where I had not been before. They had a special of Coconut Split Pea Soup, and although my fish taco's were delicious (grilled fish, not fried, yum!) the soup was really a standout.

I knew I had half a bag of green split peas in the cupboard, so I picked up a can of coconut milk and two carrots, oooh about ten days ago. Those poor little carrots were languishing in the crisper drawer getting a little floppy, but after a crappy day and the herb heist, I decided it was time for a project.

In the end I sauteed some shrimp, chopped it and served it on top of the soup, but it was absolutely delicious (and vegan) on its own. AND I didn't even have to blend it. Split peas get creamy on their own. Who knew? You know what would have looked nice on top of this? Parsley. Or maybe basil. Harumph. I hope you like this soup, too.


Coconut Split Pea Soup

inspired by a soup special at Walter's in Portland, ME

1 1/2 cups green split peas, rinsed and picked (I bet this would be pretty with yellow peas, too!)
2 carrots, diced
1 onion, diced
2 cloves garlic, smashed and chopped
1-2 tbsp red curry paste
1/2 - 1 tsp ground cumin
1 14 oz can coconut milk
salt
pepper
2 tbsp olive oil
4-6 cups water

Optional:
Shrimp, peeled & deveined - I used five jumbos (size 24-28/lb) per bowl of soup - sauteed with a clove of minced garlic in a couple of tablespoons of olive oil.

In a large pot, heat a couple of tablespoons of olive oil over medium heat. Add the carrots, onions, and garlic and sweat a couple of minutes. Don't let them brown, just warm them up. Add a tablespoon or two of red chili paste. I used one, but I think next time I'll use two - there wasn't quite enough heat for me. Add the cumin.

Add the split peas and four cups of water. You could use vegetable or chicken stock here if you want; I started with 4 cups because I knew I would be adding more liquid at the end, but I had to add a cup of water when I turned the heat down. Bring to a boil for 2o-25 minutes. Add salt and pepper to taste (I used about a teaspoon and a half of salt and about 10 grinds of pepper), then turn the heat to low and simmer for another 20, stirring occasionally to avoid sticking to the bottom of the pot.

Fifteen minutes before the soup is done, stir in the can of coconut milk and taste the soup. Mine needed another hefty pinch of salt and more pepper.

If using, chop the shrimp and add it to the soup in each bowl. Slurp happily.

Friday, July 11, 2008

Simple, Spicy, Scrumptious Shrimp

Adam and I took a little stroll through the park yesterday. We sat on a bench and watched a guy boxing with himself while a terrified child looked on. We were approached by some very, very bold squirrels looking for food. We watched a guy with two yellow labs get pulled in two directions. The humidity has finally broken here in beantown and the shady bench was cool, but our bellies were starting to grumble so we made our way over to the T, thinking about what to make for dinner. Suddenly, a voice from above!


"You should make Pioneer Woman's spicy barbecue shrimp for dinner," the voice intoned. "Stop at the store and pick up a loaf of crusty bread. And some shrimp." How could we do anything but comply with such divine gustatorial guidance? We made a quick stop on the way to my house and also picked up one avocado and several limes. Here is what we had for dinner on my back porch:

Mojitos by Adam (you'll have to ask him what's in there - all I know is it took longer to make the drinks than the meal), spicy "barbecue" shrimp, half an avocado each and most of a loaf of bread. I rubbed the avocado halves with one of the squeezed limes so they wouldn't discolor too much, and that bowl is for shrimp shells. What's that? You want to see the shrimp? Ooooh, ok. I dare you not to drool.
These little puppies were totally scrumptious, and my lips were still tingling half an hour later. Over on The Pioneer Woman Cooks there are step by step photos, but here's the rundown of what I did:

Preheat your broiler. Dump some shell-on shrimp in a pan - I used just under a pound for the two of us and it was plenty. Drizzle with olive oil. Squeeze the juice of a lemon over the shrimp. Shake on the Worcestershire sauce and the Tabasco (I used Frank's Red Hot because that's what I had). Sprinkle Kosher salt and cracked black pepper. I used about a teaspoon of salt but probably closer to a tablespoon or two of pepper. Luckily I had cracked pepper in my spice cabinet and didn't have to use the grinder for this. As for butter I used half a stick, cutting it into pats and scattering them over the surface of the shrimp. Broil for 10-15 minutes. Prepare to get messy. Bring the whole thing outside with a loaf of bread, and a bowl for the shells, peel the buggers and enjoy the juicy, flavorful goodness. Sop up the sauce with the bread, and slurp your mojito. Be happy it's summer, and thank the statues in the park for their guidance.