Friday, May 28, 2010

Garden Tour!

Here in New England, Memorial Day Weekend is the traditional weekend in which gardeners say ok, it's time. It's time to... plant the tomatoes! We don't usually (fingers crossed!) get a frost past this weekend, but some of us like to push the envelope a bit and plant our tender little baby seedlings earlier. I've had almost everything I plan to grow this year in the ground for about a week and a half, some of it much longer than that.


Since I'll be out of town for the long weekend visiting future-family (that is, Adam's sister, bro-in-law, and parents - Hi Amy! Hi Matt! Hi Rita and Scott!), we've been mostly foraging for leftovers and going out for dinner this week. I don't have much to report on the recipe front, so I thought I'd take you on a little tour of my back patio container garden. Grab a glass of iced tea or a nice chilly beer, and I'll show you around.


Rosemary


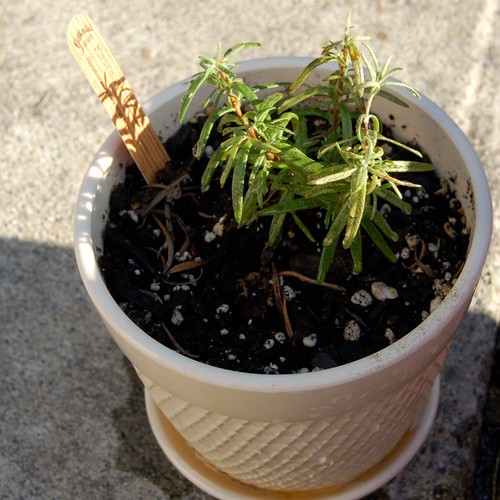
Let's start with the failures: I am not very good at growing rosemary. This is the fourth plant I have tried to keep alive in five years. Last year I didn't even buy a seedling because I'm so used to my rosemary dying within a month or two of transplant that I rarely cook with it, and that's a shame. I recently gave this one a big trim, hoping some new growth will sprout if I coddle it with frequent water and lots of sun, but it's not looking so good. Have you got any tips for success with rosemary?


Carmen

Hola, Carmen! This mildly hot pepper is a new one for me. We started a bunch of hot pepper seedlings but, uh, none of them made it. Don't worry, I did have SOME seedling success, but this plant was purchased at Russell's Garden Center out in Wayland. (Boston area gardeners, do yourself a favor and check Russell's out - they have a huge selection and the staff is awesome.)


Salad Bowl

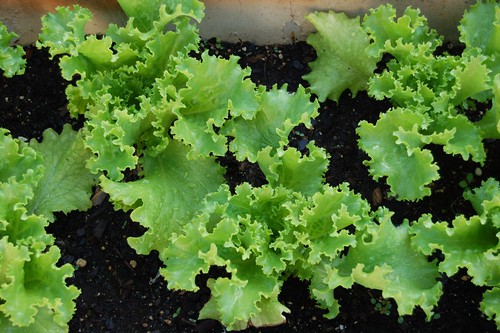
I like the name of this lettuce: salad bowl. Yep. Name the vegetable after where it will end up. I also think this sturdy green would make an excellent lettuce wrap. Maybe for some beef bulgogi?


Herbs

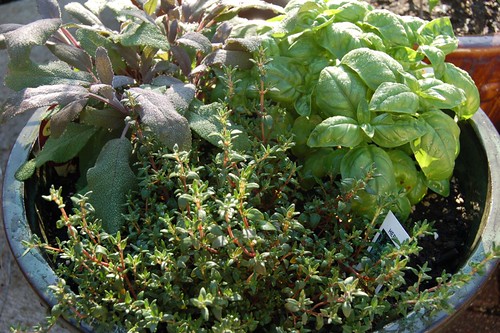
Friendly herbs, from top left, clockwise: sage, basil, thyme. I say friendly because these guys all like the heat and none of them are desperate for water, really. I water them about half as often as the rest of the garden.


Tomatoes


Ah, the great white hope of my spring. Yes, that's right. These are my tomatoes. I've got two San Marzanos and two Sun Gold Cherries here, if I didn't mix up my seedlings too much in the last few weeks. The best part about these is that we grew them ourselves from seed. In a minute I'll show you how well they're doing...


Sweet Bay

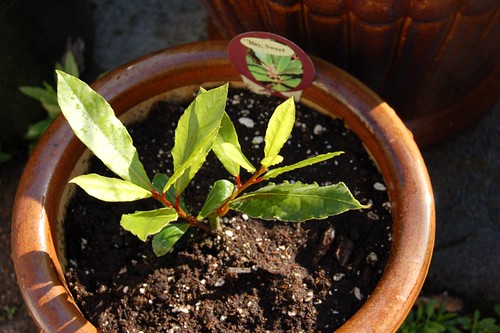
This is a fun one, I think. It's a bay! As in bay leaves, those leaves you buy dried in the spice section of the grocery store. Apparently if I take good care of it (and re-pot it a few times) this little cutting could grow into a five foot tree. If bay is as picky as rosemary I have my doubts, but we shall see.


Oregano


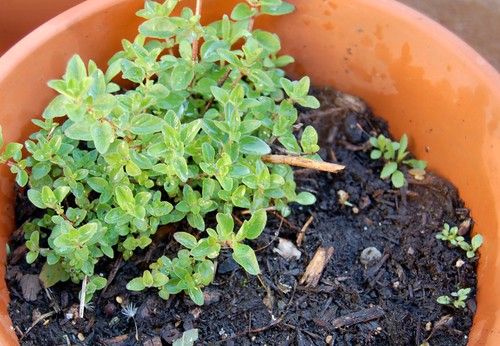
This is my grandfather's oregano. Which makes me the third generation caretaker. My mother took a cutting from his original plant many years ago, and it moved with her when my parents moved seven years ago. Last summer Adam and I took a cutting from the oregano SHRUB at my parents' house and left it on Adam's porch, where it, ahem, didn't get any water for over a week. We brought it with us when we moved into this apartment, continued to water the sad, dry sticks, and lo and behold it came back to life a month later! We left it outside under the porch with the rest of the potted annuals last winter and it came back this spring. Thanks, Pepere.

Herbs and Onions


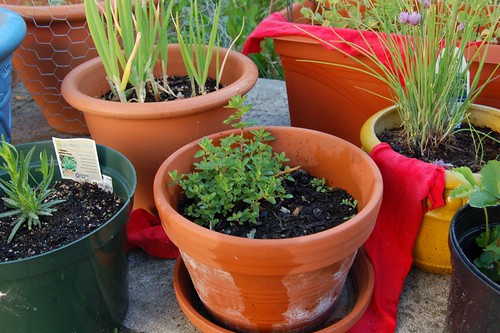
Oregano is center stage here, on the left is tarragon (a seedling from Russell's), with chives and strawberries on the right. The red clothes all over the place are bits of old t-shirt that we soak in white vinegar to discourage squirrels from diggin in the plants (apparently it smells like the urine of a predator, and it's much nicer than peeing on our plants.) That scallion looking plant behind the tarragon and oregano is an allium, indeed, but what a weird one...

143/365: Walking Onion Scape


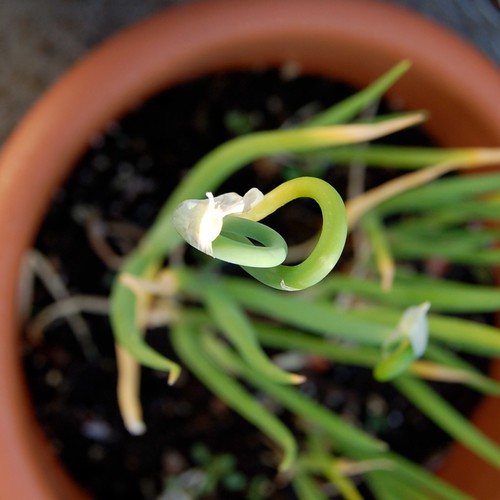
Walking onions. Ann has some too! I got these from a coworker last fall, and I stuck them in this pot. In March, as soon as the weather warmed up even a bit, they started poking these green shoots out. Now the scapes are up, looking all weird and creepy and awesome. Eventually bulbs will form up a the top of the stalk, weigh down the plant, and cause it to bend over. The bulb then settles into the earth and re-sprouts the next season, and the onions "walk" around the garden. They don't really get to do that in containers, but they look happy to me.

Peas


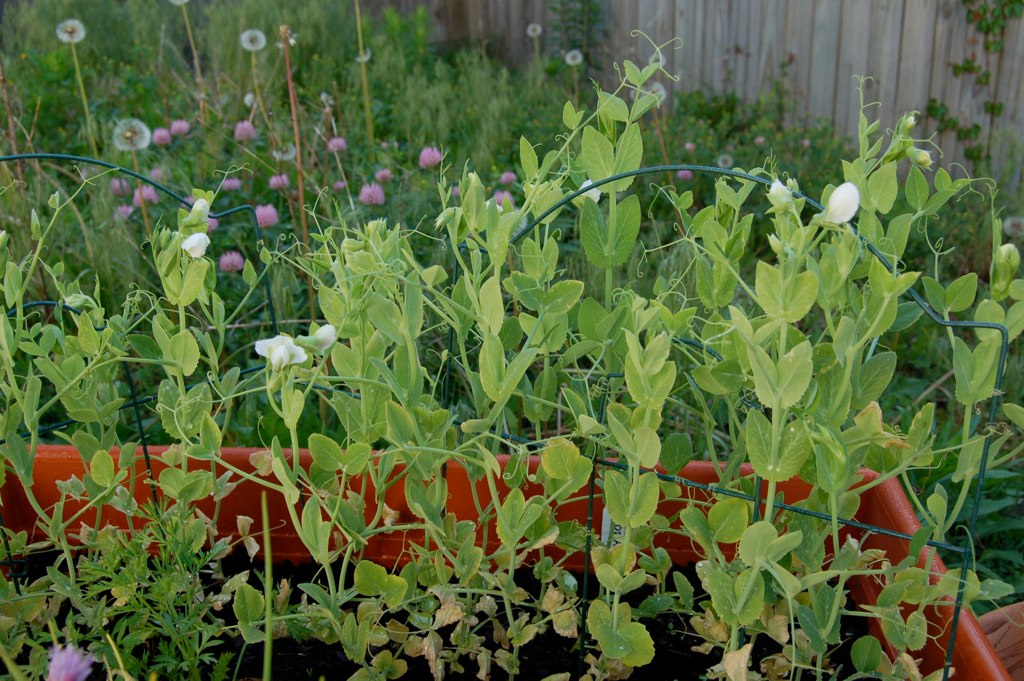
Peas! I'm not sure what that yellowing is all about at the bottom of the plants, do you?

144/365: Baby Pea!

But we do have baby peas!


Zukes and Cukes

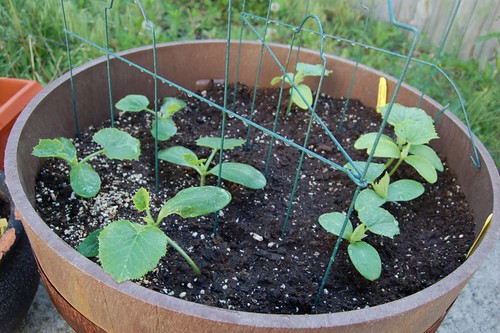
Zucchini on the left, cucumbers on the right. This was taken on the 24th.

Zukes & Cukes II

This was taken today, the 28th. Ooooh boy. I clearly put too many plants in this pot. But we grew them from seed and I'm just couldn't handle ditching them.


147/365: They're Growing!


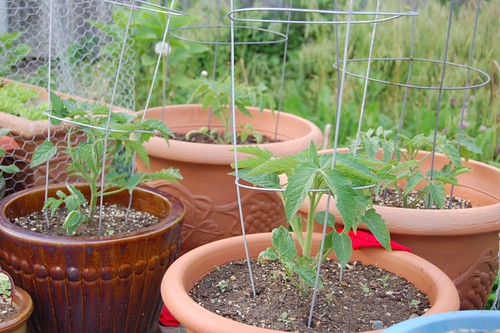
Speaking of grown from seed, look at the growth of the tomatoes in the last four days!


So, friends. What are you growing this year?

Tuesday, May 18, 2010

Asparagus Pesto

Leftovers pizza again
So after I made all that pickled asparagus, trimmed down to fit in pint jars, I was faced with a gallon bag of asparagus ends that I was too stubborn to throw out feed to the worms. Some of them were woody and inedible, but there was an inch or two on each that was perfectly good, if I could only figure out how to use it.

The very next day in the New York Times (kismet! fate! serendipity!), Mark Bittman's Minimalist column suggested asparagus pesto. It turned out to be an absolutely perfect way to use up not-so-pretty bits and bobs of asparagus. We ate it that first day as a sauce for seared scallops, but the next day I used it on another leftovers pizza and it really shone: the garlic mellowed out and the asparagus flavor deepened in the heat of the oven. We had half an onion in the fridge, so I sliced that very thinly and sprinkled it on top. We also had an open package of turkey bacon, so I cooked up a couple of strips until they were almost done, then sliced those up and layered them in with the onion. Ten minutes or so in a super hot oven and dinner was ready to go.

Asparagus Pesto
adapted to use what I had from the New York Times

the end pieces of four bunches of asparagus, woody ends removed (or one bunch of asparagus, woody ends removed, cut in 1-2 inch lengths)
1 garlic clove, finely chopped
a handful of pine nuts (about 1/4 cup)
3/4 cup freshly grated parmesan (I bet pecorino romano would be good in this, too)
1/4-1/2 cup olive oil
zest and juice of half a lemon
freshly ground black pepper

Bring a pot of salted water to a boil and cook the asparagus until tender, but not mushy, 5-8 minutes. Drain, reserving some cooking liquid.

Put the pine nuts and garlic in a food processor and pulse to combine and chop the nuts. Add asparagus, cheese, and lemon zest, and pulse to start the process. Add the lemon juice and a few tablespoons of olive oil, pulse a few times again and taste the pesto. It will probably need more olive oil, add it now and pulse again. Add some black pepper, a few turns of the grinder, and (wait for it!) pulse again. If the pesto still seems dry, add olive oil or some of the reserved cooking liquid. Continue in this manner, tasting and adding oil or pepper (or lemon juice?) until you reach the consistency and flavor you like.

Use as a sauce for fish or pasta, or on pizza. Asparagus pesto keeps for a day or two in the fridge.

Thursday, May 13, 2010

Pickled Asparagus

Pickling Spice


Do not be frightened of the giant jar full of spices. This is my pickling spice blend. Yes,  you can buy it at the store in a tiny 1.5 ounce bottle labeled "Pickling Spices" with McCormick on the label for $3.99. But then you might end up with a blend you don't like. (McCormick uses way too much cinnamon and clove for my tastes; I do not want pickles that taste like Christmas.) So I mixed up a jar of my own. The recipe is down below, and though a few of these things were already in my spice drawer, the majority were purchased for about $14 in bulk baggies at my favorite spice shop, and I have tons leftover. Which is to say my pint was way cheaper than $4 per ounce and a half. 


Blanched Asparagus


Yes, I can hear you out there, asking what in the sam hill am I going to use all that pickling spice for? Do not despair my friends, for you can pickle just about any vegetable (and some fruits, too!). And you don't have to have a giant pot full of boiling water or deal with funny shaped tongs or funnels or any of that nonsense if you don't want to. Personally, I want to, because water-bath-processed pickles can keep for about a year on the shelf, which means I can eat these pickled asparagus in November when I'm just starting to get bummed out by the cold, and get a tangy reminder of what spring tastes like. 


Pickled Asparagus


I followed the pickled asparagus recipe over on Food in Jars for my shelf-stable pickles, except I skipped the lemon slice and used one dried red chile in each jar instead of adding additional red pepper flakes to the brine. The spears are quite spicy, but that's how I wanted them. Below I've written out the method for the first small batch I made- refrigerator pickles that will keep for a few weeks, getting more pickley each day. It's a good place to start if you've never made pickles before.


124/365: Composed Salad


And once you do have spicy, sour, puckery pickled asparagus at your disposal, you can make this lovely composed salad, adapted (but not much) from Eugenia Bone's Well Preserved. A few spears of pickled asparagus, a sliced hardboiled egg, pepper, olive oil, and a bit of flakey salt. It's a very elegant (and delicious!) way to enjoy your pickles. Or you can just eat them straight out of the jar, standing in front of the open fridge when you get home from work... I won't tell.


What's the weirdest thing you've ever pickled?


Refrigerator Asparagus Pickles
You can use any jar you like for this, just trim the asparagus to fit, making sure the tips won't stick up above the brine level in the jar. If you plan to process these, you should double this brine and use 4 bunches of asparagus in 3 pint jars... or use Marisa's recipe


1 to 1 1/2 bunches asparagus, trimmed to fit your jar
1 1/2 cups white vinegar
1 1/2 cups water
1 Tablespoon kosher salt (make sure your salt contains only salt, no sulfites or anti-caking agents - these do weird things to pickles. Diamond brand is great.)
2 Tablespoons pickling spice (recipe below)
1 1/2 teaspoons red pepper flakes or 1 whole small dried chili pepper
1 clove garlic, peeled


Blanch the asparagus for about 15 seconds in a large pan of boiling water, then transfer it immediately to a bowl of ice water. Drain, then pack the asparagus into the jar, tips up or down (I alternated to make more spears fit in the jar). Tuck the chili pepper, if using, and the garlic clove in amongst the spears. 


Bring the vinegar, water, salt, pickling spice and red pepper flakes (if using) just to a boil in a small saucepan, remove from heat, and pour over the asparagus in the jar. Put the lid on the jar, and let it cool for a few hours on the counter before refrigerating. 


Let the asparagus stew in the brine for a couple of days before eating. Mine were pickly enough for me after 2 days.


Pickling Spice Blend
Adapted from all over the dang internet, and adjusted to fit my tastes. Which is to say, no cinnamon. I've seen recipes using cardamom, and I added the celery seed because I like it. Fiddle around with the mix until you find something you like, just make sure you write it down once you find it!


1/4 cup mustard seeds
1/4 cup dill seeds
1/4 cup coriander seeds
3-4 T red pepper flakes
2 T crushed bay leaves
2 T peppercorns
1 T celery seed
1 T allspice
1 T cloves
1 T ginger flakes* 

Stick this in a jar. Shake it up. Make pickles. 

*Adam brought home this odd flakey ginger from the spice shop, and I thought it was pretty perfect for a pickling blend. Ground ginger would be fine too, just use less. I also dumped in the last tablespoon or so of McCormick's blend, but that's just because I wanted the jar for something else. 


Sunday, May 9, 2010

Cheesy Polenta with Skillet Roasted Mushrooms

Cheesy Polenta with Skillet Roasted Mushrooms


We've been eating a lot of pasta lately. I think it's because we're starting to get tasty produce again, and I'm not quite warmed up for vegetable season yet; I haven't gotten into the swing of meals on the fly based on what looks good that week. My default has been yay, asparagus! I don't know what to do with it, but I guess we can just toss it with some pasta. And you know what? That was a wonderful meal.


Mushroom Meez


But sometimes I remember that there are other starches out there in the world. Wonderful things like rice! and quinoa! and polenta! And that those, too, can be the base of an improvised dinner. We had a cup of instant polenta in the cupboard, and some Monterey Jack in the fridge, Adam stopped on the way home to pick up some portabello mushroom caps.


Thick Slices


It was also very exciting to be able to walk outside and snip some fresh thyme and chives from our container garden, it makes remembering how to use vegetables that much more fun. Do you grow herbs or vegetables? Which are you most excited about for the spring?


Cheesy Polenta with Skillet Roasted Mushrooms


Cheesy Polenta with Skillet Roasted Mushrooms
Serves 2 with leftover polenta*, to serve four, double the mushrooms.


I happened to have some homemade vegetable stock in my fridge - we make it in big batches and freeze it, and I had recently defrosted some. I don't know if I'll ever go back to making polenta with water ever again. If you've got broth or stock on hand, please try it! It is so flavorful. I wanted this polenta to be pourable, so I used a lot of liquid, but you could cut it down if you like it firmer. Oh, you could also do this with regular non-instant polenta, it would just take longer. It's entirely between you and the contents of your pantry.


For the polenta:
1 cup instant polenta
4 cups vegetable stock (or chicken broth or water)
4 ounces monterey jack cheese, shredded


For the mushrooms:
3-4 portabello mushroom caps, cut into 1 inch pieces
1 tablespoon olive oil
1 tablespoon butter
1 teaspoon chopped fresh thyme
1 medium shallot, finely chopped
salt and pepper
chopped fresh chives for garnish.


Heat the olive oil and butter over medium high heat in your largest skillet (12 inches is good). Once they are hot, add the mushroom pieces and toss to coat with the fat. If the mushrooms don't fit in one layer, do them in batches. If you crown the pan, they'll steam instead of browning. Add the thyme and salt and pepper to taste, and cook the mushrooms, stirring occasionally, for three minutes. Then add the shallot and a touch more oil if necessary, and continue cooking until the mushrooms are tender and browned and the shallot is softened. If you haven't cooked the polenta yet, turn the heat way down and keep the mushrooms warm over a low flame.


Meanwhile, bring the stock or water to a boil in a medium sauce pan. Pour the polenta in a slow stream while whisking to combine it with the broth. Whisk constantly for about 5 minutes over medium heat, then add the cheese in three handfuls so it melts and doesn't clump. If the polenta is too thick, thin it with a little hot water or stock.


Pour the polenta onto two plates, then top each with half the mushrooms. Garnish with chopped fresh chives.


*Leftover polenta should be spread in a plastic-wrap-lined square baking pan and allowed to cool then refrigerated for up to three days. You can slice it into squares, toss it with some tomato sauce, and grate a little Parmesan over the top. Bake it in a 350 degree oven for 20-30 minutes until heated through and the top is starting to brown.

Thursday, May 6, 2010

Spring Salmon with Peas and Asparagus

123/365: Spring Salmon

The weather here in Boston has been so darn springy lately (78 and sunny for the last week!) that green vegetables are the only thing I want to eat. Add in a trip to Wilson Farms in Lexington where I was able to get asparagus so local I could feasibly ride a bike to where it grows, and ta-da! More asparagus, right after I told you about my old standby pasta and asparagus. And you know what? I've got another asparagus recipe on deck. I know it's a little bit crazy, but it's so GOOD this time of year; asparagus in November is not the same at all. I will gorge myself now instead of eating crappy spears in six months.

I blanched a couple of bunches for another project (aforementioned on deck asparagus recipe) but only ended up using about a bunch and a half. Just bring a pan of water to a boil, add the asparagus (woody ends snapped off), and cook for 15-60 seconds. Fifteen seconds is enough if it's pencil thin and you like it crunchy, a full minute is good if you want it more cooked. The big thick stalks will need to cook for longer to become tender. Then remove the asparagus with tongs or a slotted spoon and put it directly into a bowl of ice water to stop the cooking. You can do this a couple days in advance if you want, and keep the cooked asparagus in the fridge.

You could use frozen peas if you wanted to, but freshly shelled English peas (also called shelling peas or garden peas) are a real treat and not THAT much work. Snap off the blossom end of the pea, and "unzip" it by pulling off the string along the seam. Open the pod, and slide your fingers down the inside to remove the peas. Do this over a bowl, because peas are very bouncy. Enlist a helper and you can get through a pound or two in a flash. Alone, it only took me about 8 minutes to shell a pound.

Update! The latest Spilled Milk podcast is about peas, and it is hilarious. Go listen.
Spring Salmon with Peas and Asparagus
Serves 2, but easily doubled. Buy more shelling peas than you think you will need, because a pound of pea pods yields scarcely a cup of actual peas.

2 4-6 ounce salmon filets (preferably wild-caught sockeye), about an inch thick in the center
1 cup (ish) freshly shelled English peas

1/2 bunch pencil thin asparagus, blanched (see above)
Butter
Salt and Pepper
about a teaspoon chopped chives for garnish

Salt and pepper the flesh side of the salmon pieces (it's easy enough to remove the skin once the salmon is cooked, so for simple preparations like this I just leave it on during cooking). Heat a tablespoon of butter in a large nonstick skillet over medium-high heat until it melts and foams, then add the the salmon, skin side up. Allow to cook without moving for about 3 minutes, until you can see that it is approximately half way cooked - take a peek at the side, it will be starting to get opaque.

Flip the salmon over. Cook for another 2-3 minutes, until the sides are just opaque all the way through. The center will be a touch under cooked, but it's going to rest for a couple of minutes so it will carry over until it's just done. Also, cooking pricey wild caught salmon until it's dry as a bone is a crime. Remove the salmon to a plate and cover very loosely with aluminum foil.

Don't clean the pan, just add another tablespoon of butter, let it melt, then add the peas and asparagus. The peas will cook in less than a minute - they'll still be sort of al dente, but mushy peas are gross. You're just warming up the asparagus. Salt and pepper the vegetables and when they are warm and the peas are cooked to your liking, remove to two plates. If there are any accumulated juices in the pan, pour these over the veg, then add a piece of salmon to each plate. Sprinkle chopped chives over if you want to make it pretty.

Monday, May 3, 2010

Pasta with asparagus, bresaola and smoked gouda

Asparagus tips


Aaah, asparagus. Is there any more longed for harbinger of spring? I made pasta with asparagus last year, but I went slightly heavier this year - no pea shoots and lettuce, this time we're using smoked cheese and cured beef! Mmmm, charcuterie...


Cheeeeeeese


This is a riff on a recipe from Giada De Laurentiis that I used to make all. the. time. I even suggested it to an old house mate as a simple and delicious meal to impress a date. From what I remember, he was impressed. I, however was NOT impressed when she left the resulting dishes in the sink for three days, but that's a story for another time. Anyway, I couldn't find smoked mozzarella at the store, so I used smoked gouda. Mozzarella is meltier, but gouda worked fine. For the sake of pork avoidance, I used bresaola, a cured beef salumi instead of prosciutto. It's not the same; bresaola is distinctly beefy, but it filled the salty fatty meaty hole left by prosciutto.


Meat mosaic
I got the bresaola at Dave's Fresh Pasta right in Davis Square, which is also where I picked up this, uh, fresh pasta. This made an obscene amount of food, much more than we needed. When I bought the fresh pasta, the woman at the shop suggested 1 1/3 pounds for 4 people (I wanted dinner for two + leftovers), but we got 7 (admittedly not enormous) servings out of that much pasta. It was good enough for us to eat for a few days later, but it certainly was not as good reheated as freshly cooked. If you do use that much pasta, use two bunches of asparagus and a bit more cheese.

Pasta with asparagus, bresaola and smoked gouda

Pasta with Asparagus, Bresaola and Smoked Gouda
I originally found this recipe in one of Giada's cookbooks and she suggests you make it with penne or ziti to mimic the shape of the asparagus. I think it's very good with penne, but I liked it with fresh pasta quite a bit. She would also have you saute some minced garlic in olive oil and toss the whole mess in that pan, but I skipped garlic and drizzled olive oil on at the end. If you have fresh basil or parsley on hand (I didn't), a tablespoon or two of slivered herbs works very well, toss it with the pasta just before serving.

1/2-3/4 pound fresh pasta (I used a variety with black pepper in the dough)
1 bunch asparagus, woody ends removed, cut into 1 1/2 inch long pieces
scant 1/4 lb bresaola (or prosciutto) cut into strips
3 oz smoked gouda (or smoked mozzarella), cut in small (1/4 inch) cubes
olive oil
salt and pepper

Bring a large pot of salted water to boil. Add the fresh pasta, then 1 minute later add the asparagus pieces. When fresh pasta is cooked through (taste to check, it should only take another two or three minutes after you add the asparagus), and the asparagus is crisp-tender, reserve a cup of the cooking water, then drain pasta and asparagus.

Return to pot, add strips of bresaola and cubed cheese, toss with a couple of tablespoons of olive oil, salt and pepper to taste (I used 1/2 a teaspoon of salt and 8-9 grinds black pepper). Remember that the meat is quite salty, and if you've salted your pasta cooking water well you shouldn't need much salt at this point. Taste, add more salt or pepper if necessary or pasta cooking water if it seems dry, then serve.