Tuesday, September 28, 2010

Tofu and Tomato Stir Fry

Tofu and Tomato Stir Fry

This is weird, right? Tofu and tomatoes together? I know, that's what I thought, too. Tomatoes are not the first thing I think of when I think tofu (soy sauce is the first thing I think of when I think tofu). And tofu is not the first thing I think of when I think tomatoes (basil is). And I admit, it took me a few bites to decide that I liked this; it's not clear immediately that they play well together. Which I guess is really not something I should say if I want you to make this, huh?

242/365 Tomato Butt

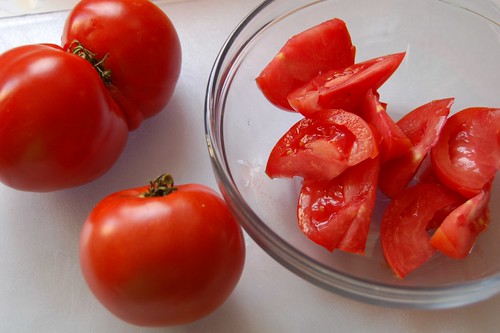
However, I had an overflow of tomatoes from our CSA (clearly I made this a few weeks ago) and I  didn't want pasta or caprese or tomato sandwiches... and I had tofu in the fridge. So I googled. And  came across this little number on Epicurious, from Charles Phan, the chef at the famed Slanted Door restaurant in San Francisco. I was skeptical, but you can't learn if you don't try, right? And while it wasn't the obvious home run combo of chocolate and peanut butter or figs and bacon, tofu and tomatoes was good. Good enough that you shouldn't discount it immediately, is what I'm saying. Give it a try. I'm curious to know what you think.

243/365 Fried Tofu

Since I am, ahem, prone to adjusting recipes based on what I have, I made a few changes to the original. First of all, I don't often deep fry at home, so I used my usual tofu frying method: shallow oil, cast iron skillet. If you wanted it crispy you could dredge it in corn starch first. I added a bell pepper because there was one in the crisper. And I used rice vinegar instead of mirin because I was out of mirin. You could add more vegetables if you had them, I bet broccoli rabe or arugula would be a nice counterpoint to the sweetness of the tomatoes.

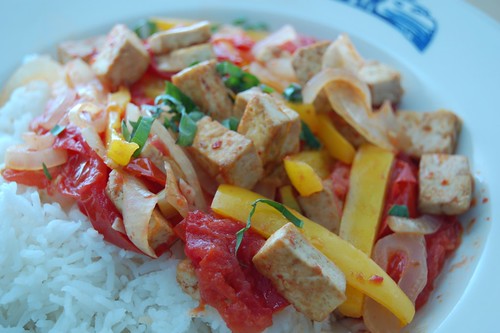
Tofu and Tomato Stir-Fry
Serves 3-4

I like to press my tofu before I slice and cook it so it lets go of a lot of water and absorbs the marinade better. I find that it improves the texture and makes it easier to stir-fry. I prop up one end of a cutting board so it slopes into the sink at just a slight angle, then put the tofu on the cutting board. Lay a paper towel on the top of the tofu, then balance a saute pan on top and put a couple of cans of whatever's in the cupboard in the saute pan to give it some extra weight. Then I just leave it alone for half an hour or so. It's less precarious and easier to set up if you don't  make the cutting board slope into the sink, but then the tofu just sits in a puddle of its own liquid instead of really draining. Remind me to take a picture of this step next time I blog about a tofu recipe...

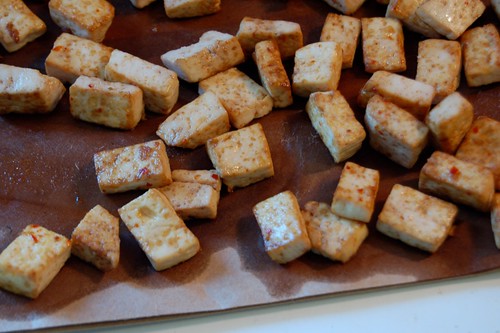
14 ounces firm or extra firm tofu (I generally buy Nasoya brand, which comes in 14 ounce packages, but up to a pound is fine), cut into bite-sized cubes
1/4 cup canola or vegetable oil
3 tablespoons soy sauce
1 tablespoon sriracha or similar hot chile sauce
3-4 medium sized ripe tomatoes, cut into wedges (about a pound)
3 cloves garlic, minced
1/2 a large onion or a whole small onion, sliced
1 bell pepper, sliced into strips
2 tablespoons rice vinegar (preferably unseasoned)

cooked white or brown rice for serving
basil chiffonade or sliced green onions for garnish

Mix the soy sauce and sriracha together in a medium bowl. Pat the tofu pieces dry, then add them to the marinade in the bowl, tossing gently to coat each piece. Let stand 15 minutes while you cut the vegetables.

Heat the canola oil in a large wide skillet over medium high heat. Add one piece of tofu; if it sizzles, add the rest. You may have to do this in batches. Cook, turning occasionally so all sides brown, until the tofu is golden brown and crispy on the edges. Remove from pan and drain on paper towels or a paper bag.

Turn the heat down to medium and add the onion slices, cook for 2 minutes until the onion is just starting to go translucent, then add the garlic and bell pepper strips. Cook for about a minute, stirring constantly so as not to let the garlic burn, until the pepper is just tender (it will still be crispy, add it with the onion if you prefer a softer pepper). Add the tomato wedges and cook for just a couple of minutes until the tomatoes start to break down and give off juice. Add the rice vinegar and cook for about a minute to deglaze the pan, then add the tofu to the pan and stir to combine everything, then remove from heat and serve over rice. Season with salt (or soy sauce) and garnish with strips of basil or green onions if you like.

Saturday, September 25, 2010

Stone Soup Farm CSA: Week Sixteen

264/365: Stone Soup Farm CSA Week 16
If you are like me, the first thing you will notice is the lack of tomatoes in this share. Le sigh... but! there are still tons of 'maters in the farmer's markets, so I'm not quite done with them yet. I bought a huge yellowy pink heirloom whose proper name escapes me now, but I munched on juicy slices of it over buttered sourdough toast all week for breakfast...

Ahem. As for what I did with this share, honestly I was so busy at school and with wedding stuff this week that we haven't had many right and proper dinners. I have seminar Tuesday nights and I snack early and often so I won't be hungry in class. Wednesday we made pate a choux in Baking class and I ate a whole lot of Dauphine Potatoes and Cream Puff Swans so never really ate dinner. I assisted at a recreational class - The Wines of Italy - at school Thursday night so I munched on caponata and prosciutto and cheeses (oh, scamorza, you are so delicious and fun to say!) instead of dinner. It is sort of funny how cooking school is giving me this weird eating habits.

Anyway, we ate the corn sauteed with chipotle powder and butter next to our huevos rancheros this morning, the lettuce and a few cucumbers in today's lunch salad. I used some purple basil in the dressing. The peppers got tucked into some curried apple chutney I canned with last weekend's bounty, and the garlic whizzed into the salsa verde I canned yesterday.  Tonight Adam's making quesadillas and I'll probably try roasting the green beans, which I've never done before. Delicata squash will be roasted and filled with rice and maybe sausage for tomorrow's dinner.

I know this isn't my most exciting CSA post of all time, but guys, our wedding is two weeks from tomorrow. We have 100 favors to wrap, a seating chart to finish, and Adam still doesn't have shoes to go with his suit. Seriously. I beg your forgiveness if posting is light until AFTER October 10th. Thanks, dudes.

Sunday, September 19, 2010

Sunday Night Special: Apple Picking

Apple pickin'

It's fall in New England, which means it's time for cider doughnuts. The thing about cider doughnuts is that they're best hot and fresh from the farm where the cider is pressed, so in order to get cider doughnuts, you have to go to an apple orchard. While you're there, you might as well pick some apples.

We like Cider Hill Farm in Amesbury, MA, though this year we arrived a week too late to pick peaches - it's been such a warm season in New England that every crop is about two weeks early this year, which means they also finish two weeks early! Cider Hill has five apple orchards with several different varieties of apple grown in each orchard. We got Cortlands, Galas, a few Macintosh and some Honeycrisps (my favorite for plain old eating) and then we grabbed a few Fortunes, a new variety. As you can see from my ridiculous expression below, I was pretty shocked by how enormous the Fortune apple is.

Apple the size of my head!

Thanks to Adam for letting me climb on his shoulders to pick the ripe ones, and thanks to Julia for taking pictures! So is there an apple picking tradition near where you live? Do you have a favorite orchard? What's your favorite kind of apple?

Thursday, September 16, 2010

Stone Soup Farm CSA Week Fifteen

257/365: Stone Soup Farm CSA Week Fifteen

I know I said this last week, but I love this part of the year, all the jumping back and forth between fall produce and summer vegetables. Last week we got acorn squash and cabbage, this week eggplant and corn. And also: two pounds of carrots, two tomatoes, three big potatoes, a few onions, a head of broccoli, and a bunch of parsley.

It feels like I haven't quite gotten my fill of eggplant yet this year (I've actually got another eggplant recipe on the docket), so I bought another eggplant at the farmer's market on the way home from picking up the CSA. Last week's cabbage was still in the fridge, and I thought they might be nice together. I tossed the sliced eggplant with a little oil and some five spice powder, then baked it at 400 degrees for about 20 minutes. I like baking eggplant because you can use much less oil - eggplants are super absorbent, and if you cook them in a pan with oil every time you turn around the pan will be dry. I sauteed the shredded cabbage with some homemade hot sauce and added some soba noodles for bulk. Hot spicy plus five spicy equals delicious dinner.

258/365: Spicy Cabbage and Five Spice Eggplant

Five Spice Eggplant with Spicy Sauteed Cabbage
serves 2-3

I thought about calling this a stir-fry because it's sort of in that vein, but, um, I baked half of it. If you didn't make your own hot sauce (but why? it's so easy and delicious!) then use sriracha or something similar. I'd use two small eggplants instead of one large one, and if you can find the skinny Japanese kind, that would be ideal. Don't use the biggest eggplant you can find, the big ones are often bitter so it's not really a good shortcut.

2 small eggplants
3 tablespoons vegetable oil
1 1/2 teaspoons five-spice powder
1/2 teaspoon dark sesame oil
1 medium head napa cabbage
1 tablespoon chili garlic hot sauce (more or less to taste)
2 cloves garlic, minced
2 more tablespoons vegetable oil
another 1/2 teaspoon sesame oil
1/2 package soba noodles
salt
chopped chives for garnish

Preheat the oven to 400. Slice the eggplants about 1/3 inch thick in halves or quarters depending on the size of the vegetable. Combine three tablespoons of vegetable oil, 1/2 a teaspoon of sesame oil and the five-spice powder and toss with the eggplant slices, making sure each slice is coated. Line a baking sheet with aluminum foil and lay the eggplant slices out on it in a single layer, sprinkle with salt, then bake for 20 minutes. You may want to flip them once if you think of it.

Slice the cabbage into thin strips. Heat a large saute pan over medium high heat add two tablespoons of vegetable oil. Add the cabbage, in batches if necessary - maybe let half of it cook down before you add the other half. After a all the cabbage is in the pan, add the garlic and hot sauce and continue cooking until cabbage is just tender. Turn off the heat if the eggplant isn't done yet.

Meanwhile, bring a pot of water to a boil and cook the soba noodles according to package directions.

When the eggplant is tender, remove it from the oven and add it to the pan with the cabbage. When the noodles are done, drain them and add them to the pan as well. Toss to combine, plate, and garnish with chives.

Wednesday, September 15, 2010

Homemade Pop Tarts

Blueberry Pop Tarts

My first week of classes is already over, can you believe it? On day one, in Food Basics, I learned how to turn on the oven... but only after my "roasted beets" had been in there for an hour decidedly not roasting. Whoops! Tuesday night in seminar I picked out my chef's knife. It's the biggest knife I've ever used - ten inches long with an extra wide blade - not unlike a sword, actually, but after puzzling out the rhythm of cutting on a pile of produce, (potato: medium dice, carrot: brunoise, onion: dice, orange: supreme, cabbage: chiffonade), I switched back to the eight inch as an experiment and I kept wondering where the rest of the knife was.

Blueberry pop tarts

This morning in Baking I made some darn tasty granola and learned the importance of keeping up with the dishes... by which I mean oh boy there are a lot of dishes to do. I am having a freaking blast, but I've got to say, it's kind of weird to be going back to school. It's such a heavily weighted phrase, don't you think? I always think of You've Got Mail, when Meg Ryan emails Tom Hanks (who of course she doesn't yet know is Tom Hanks, duh) "Don't you love New York in the fall? It makes me want to buy school supplies. I would send you a bouquet of newly-sharpened pencils if I knew your name and address." Well, I made not be in New York, and my supplies are running more along the lines of sharpened blades than sharpened pencils, but there's still that sense of freshness, of new, of starting something great.

Blueberry Pop Tarts

Speaking of great, lets talk about these so-called pop tarts. When my cousin Becca comes up to Boston, I made brunch. It's become a thing, if you will, and so I am always on the lookout for tempting breakfast pastries. Last time she was here, I made those jam-filled buttermilk biscuits, and since I went on that canning binge I had a lot of jam around again this time. The jam in these is blueberry lemon verbena, and it worked really well here, but any good quality jam will make an excellent filling. You could also use Nutella or cinnamon and sugar. Be prepared, however, for the fact that these don't actually taste much like pop tarts. They're not dry or cardboard-y, and hell, they're not even iced. But that's because it's essentially a small flat pie. Pie! For breakfast.

Chomp

Homemade Pop Tarts
adapted from King Arthur Flour
makes 9 pastries

I thought this crust was fairly easy to work with, the egg keeps it from being crumbly but it still bakes up flaky and tender. If you find yourself fighting to roll it out, make sure it's well floured, and either do it between sheets of parchment or stick it back in the fridge to firm up a bit before continuing.

For the crust:
1 1/2 cup all purpose flour
1/2 cup whole wheat flour
1 scant tablespoon sugar
1 teaspoon kosher salt
2 sticks (or one cup or 8 ounces) butter, cut into pieces
1 egg
2 tablespoons milk

For the filling:
3/4 cup good quality jam OR
nutella OR
1/2 cup brown sugar with 1/2 teaspoon cinnamon and 3 tablespoons flour, mixed together

You also need:
one egg, lightly beaten, to brush on the pastries before filling

First, make the dough. Whisk together the flours, sugar, and salt. Using your hands, or a pastry cutter, or a couple of forks, work the butter into the flour until pea-sized lumps of butter remain. The dough should hold together when you squeeze it. Mix the egg and milk together briefly, then mix them into the dough just until it comes together cohesively. Separate the dough into two pieces of even size (each should weigh ten ounces), and pat each piece into a 3"x5" rectangle, more or less. You can roll it out right from here or wrap each piece in plastic and refrigerate for a couple of days.

If you've chilled your dough, give it 15-20 minutes on the counter to take the chill off. Roll out on a floured surface to about 1/8" thickness, large enough that you can trim the edges and have a 9"x12" rectangle. Use a 9"x13" pan as a guide. Cut into nine rectangles of approximately 3"x4". Set aside, and roll and trim the second piece of dough the same way. Cut the second piece of dough into 9 rectangles as well.

Brush the entire surface of each rectangle with the beaten egg. In the center of each rectangle, put a generous tablespoon of the filling and spread carefully, being sure to leave at least a 1/2 inch margin. Place an unfilled rectangle on top of each filled rectangle, pressing with your fingertips to seal around the edges of each pocket of jam. Be sure it is well sealed on all sides, and use a fork to re-seal and decorate each edge. Prick each pastry several times with a fork so steam can escape (see, it's just like pie!)

Place the tarts on a parchment lined baking sheet and refrigerate for half an hour. While the tarts chill, preheat the oven to 350. Bake for 25-35 minutes until light golden brown. Let them cool on the pan, if you can wait that long.

Sunday, September 12, 2010

Sunday Night Special: Canning

Canning 2010

I thought about calling this post "What I Did On My Summer Vacation," but I actually only had two weeks off. Ah, but no, I didn't amass this many jars of delicious things in just two weeks. If you don't count the meyer lemon marmalade I made in January (citrus season: the highlight of the colder months), I starting canning in earnest in May with pickled asparagus, which we'll eat with hardboiled eggs like before or maybe as part of an antipasto platter.

In June I kept the momentum going with dilly beans, which we have already eaten a jar of, with cheese and crackers during a night of card games. July was the month for jam: apricot, plum, and blueberry (we picked the blueberries ourselves and added lemon verbena from our garden). We've been eating the jam on toast, and as part of a delicious pastry that I have yet to tell you about, and I've got my eye on this jam tart recipe, too. We also made a kosher-style dill cucumber pickle in July, using a method from the new-this-year canning book Canning for a New Generation. I want to make every single thing in this book, but I'm running out of pantry space. Oh and if I run out of ways to use all this jam, here's a great list of ideas.

In August I made one more batch of jam (peach) and I made jalapeno jelly for the first time. It was also my first time using commercial pectin. My dad just emailed me to say he's enjoying the jar I sent up to Maine on crackers with goat cheese, so I'm going to call it a success. Speaking of spicy, we also put up sixteen pints of salsa in August.

September has been tomato month so far: 8 quarts of whole peeled tomatoes, 9 pints of crushed tomatoes, and three pints of tomato juice as a byproduct of the crushed tomatoes. We'll eat the tomatoes as sauce or on pizza or in any of the many, many things we eat that call for a can of tomatoes. I bet the tomato juice will show up as in a bloody mary for our New Year's Day brunch party if not before. Last week I made my first ever batch of mixed pickles using cauliflower, celery, carrots, pearl onions, cucumbers and hot and sweet peppers. We like these spicy pickles in salad or with cheese and crackers like the dilly beans.

I took this photo the other day mostly to remember what I've canned this year. I'll probably still do a batch of peach chutney since we enjoyed that so much last year, and I can always find room for more salsa in the cupboard. It was also fun to get it all out and see how productive we've been all season!  So, what have you put up this year? And how are you going to use it?

Friday, September 10, 2010

Stone Soup Farm CSA Week Fourteen (and squash ravioli)

Stone Soup Farm CSA Week Fourteen

This week's share is sort of cracking me up: watermelon and tomatoes = summer. Squash and cabbage = winter. It pretty much defines the in-between-season we're in at the moment. Tuesday it was 90 degrees. Yesterday it was barely 70. Either way, we're still eating well. Here's what we've got this week: another watermelon (ick), two acorn squash, two pounds of green zebra tomatoes (mature tomatoes that happen to be green, not green tomatoes), a pound and a half of beets, half a pound of edamame, a napa cabbage, a bunch of basil, and half a pound of mixed salad greens. My food processor died last week, mid-pesto, so I'm not sure what to do with the basil now. I've been making small batches and sticking them in the freezer, but I'll have to come up with another way to preserve this bunch. Oh and hey, did you know that you can keep basil fresh by cutting the bottom of the stems and sticking it in a glass of water just like you would for cut flowers? It does start to wilt after a few days, but it's better than the fridge!

251/365: Roasted Acorn Squash

My Aunt Helen (hi Aunt Helen!) gave us the pasta roller attachment for the Kitchenaid as a bridal shower gift a few weeks ago, and we broke it in this week when we used the acorn squash as ravioli filling. I don't say this lightly, guys, but it is life changing. Adam loves fresh pasta, and it's not that hard to make the dough: for every 100 grams of flour, one egg. Add a bit of salt, knead until smooth, rest, roll, cook. The only problem was that with our hand-cranked (read: Adam-cranked) pasta machine, it took us 45 minutes to roll out enough pasta for two people. Rolling out the dough with the Kitchenaid took ten minutes. Ten! I foresee lots of fresh pasta this winter.

Acorn Squash Ravioli

No actual recipe today, because I wasn't completely happy with way the filling turned out. I mixed the roasted acorn squash with some salt and a few plops of ricotta cheese, then we served the ravioli with a sage brown butter. It was tasty, but not as good as it could have been. Acorn squash was good (and our CSA farmer advised that we use the acorn squash sooner than later, it won't keep as well as last week's buttercup), but butternut would have been better since it has a smoother texture when cooked.

Tuesday, September 7, 2010

Peach Crumb Cake

Layers

Peaches, you are delicious. The only problem I have with you, peaches, is that people always want to talk about you the same way: as the summer fruit, eaten standing over the sink, juice dripping down arms, sticky faces. Which of course, peaches, is the best way to eat the first of you, early in August at the beginning of your harvest. But what about later?

Peach Crumb Cake

What about in early September, when my sticky-face, juicy-arm peach gorge is starting to feel a bit cliché? Well, peaches, that's when I start to think about how delicious you can be when cooked. Sometimes I grill you and plop a bit of ice cream down at your side. Simmered down into jam or tucked into a cake, your sweet tartness deepens and cools, rather like the turning season, and I realize yet again that you can be a fall fruit, too.  

230/365: Cake for breakfast

Peach Crumb Cake
Makes nine 2 1/2 inch square pieces
From Gourmet, August 1993


I found the crumb topping on this cake to be very thick. If you wanted to, you could cut it down to 3/4 the amounts listed and I bet you'd still get the same effect. This cake kept, covered, for a few days at room temperature, though the crumb topping is the crunchiest on the first day. I also know from experience that it is excellent for breakfast, so just take that into consideration when planning your next brunch, mmkay? 

First, make the topping:

1 cup AP flour
1/2 cup (packed) brown sugar
6 tablespoons unsalted butter (3/4 stick)
3/4 teaspoon cinnamon

Combine all ingredients and mash with a fork until well combined and crumbly. Set aside.

Then, make the cake:

1 stick softened unsalted butter
2/3 cup sugar
2 eggs
1 cup AP flour plus a couple of tablespoons for flouring the pan
3/4 teaspoon double acting baking powder
1/2 teaspoon salt
3-4 large peaches (about a pound and a half) peeled, pitted, and thinly sliced.

Preheat the oven to 350F. Butter an 8x8 inch cake pan, then add a couple tablespoons of flour and shake and tap it all around so the pan has a layer of flour clinging to the butter.

In a mixer or by hand, cream together the butter and sugar until light and fluffy, then add the eggs one at a time, beating well after each egg. Sift (or whisk) together the flour, baking powder and salt, and add them to the wet ingredients, beat just until combined. Spread the batter evenly in the pan.

Layer the sliced peaches evenly across the surface of the batter, then top with the crumb topping. Bake for 30 minutes, then turn the cake 180 degrees for even baking and bake another 20-30 minutes or until a tester comes out clean. Serve warm or at room temperature.

Friday, September 3, 2010

Stone Soup Farm CSA: Week Thirteen (and mystery squash)

CSA Week Thirteen

Happy long weekend, my friends! What are you going to do with your three days?

Here's what we're working with this week: basil, lettuce, cucumbers, tomatoes, potatoes, a small watermelon (shudder), and a mystery squash. Those tomatoes are in a jar now, in salsa. I also made some pesto with the basil and stuck it in the freezer. We'll eat the lettuce in salad or on sandwiches, cucumbers can go in a salad, too. The watermelon will sit in the fridge until Adam remembers it because I sure as heck am not going to eat something that tastes like compressed spiderwebs in syrup. Heck, no.

The only thing I can't figure out is what type of squash this is and what I should do with it. Suggestions anybody?

I've spent my week of unemployment so far canning a lot of things: jam, salsa, plain old tomatoes. My kitchen floor looks disgusting, just like last year.

241/365 Mystery Squash

Wednesday, September 1, 2010

Chili Garlic Hot Sauce

Hot Sauce

We go through hot sauce in this house like nobody's business. Adam is a spice fiend, and it's rubbed off on me to the point that I now have preferences from dish to dish. I'll eat a fried egg with a healthy dose of Frank's, a burrito with a splash of Tabasco, or a side of Adam's breakfast potatoes with a sprinkle of Cholula. Speaking of which, somebody remind me to tell you about Adam's breakfast potatoes at some point, because they are gooood.

233/365: Scotch Bonnet

A couple of Saturdays ago while Adam made potatoes to go with our eggs, I browsed my google reader and came across Melissa Clark's Good Appetite column on homemade hot sauces. I loved the idea of a chili garlic sauce sweetened with sweet peppers instead of sugar, and we had a heap of sweet red peppers coming ripe in the garden. Plus, habaneros are crazy cheap, like a quarter a piece, so this huge jar of sriracha-like sauce cost us a buck plus pantry ingredients. And hey, it was fun!

Carmen

Chili Garlic Hot Sauce
adapted from Melissa Clark in the New York Times


I know everyone is always saying you should wear plastic gloves when chopping hot peppers. For milder chiles like jalapenos, I don't usually do so (oooh, living on the edge!). In fact, I don't even have plastic gloves. But when chopping four habaneros, I thought it was good advice, and I improvised by sticking sandwich baggies on my hands before I got started. A little goofy looking, but it worked. Oh, and try not to breath in chili-vinegar fumes, that stuff will sting your sinuses like no other.

4 hot chili peppers, preferably habanero
3/4 pound sweet red peppers (2-3 red bell peppers or similar)
3 huge or five regular garlic cloves
3/4 cup white vinegar
1/2 teaspoon kosher salt


Roughly chop the chilis (wear gloves or baggies, please!), sweet peppers and garlic. Combine in a medium pot with the vinegar and salt, and bring to a simmer over medium heat. Simmer for about 10 minutes or until peppers are tender. Transfer carefully to a blender, or use an immersion blender, and blend the sauce until you have a mostly smooth puree. Pour into a jar (I got a little more than a pint) and stick it in the fridge. 


The original recipe says to wait three days before eating, but we ate some the night I made it and loved it.


Makes about 2 cups (one pint, though I got a tiny bit more than that), and should keep in the fridge for at least a month.

Chile Garlic Sauce

Plus, look how awesome my timing is: September first is sweet and hot peppers day and the first week of Fall Fest 2010! Did you play this week?