Wednesday, December 30, 2009

2009: The Year in Review

I don't know if you guys have looked at a calendar recently, but uh, it's almost 2010. Twenty ten! This boggles my mind. So much happened in 2009: I stuck my feet in the Pacific ocean for the first time, I moved in with a boy(!), I caught the canning bug, and boy-oh-boy did we go to a lot of weddings.The end of a year seems like a good time for reflection, so let's take a little peek back and see what we learned this year.


1. People like dessert. This brown butter raspberry tart is my most popular post of the year.


2. Hungry Bruno readers aren't steak people. Flank steak with potato artichoke hash and the big piece of meat I put on top of blue cheese risotto were two of the least popular posts this year.


3. Chips do not have to be made of potatoes. I dare say that kale chips are more addictive than their spud based forebears.


4. Old dogs can learn new tricks. I can learn to love mussels.


5. Patience is a virtue. Homemade vanilla extract takes 3 months. So does homemade cherry liqueur.


6. French toast does not have to be sweet. I like it better with cheese and tomatoes.


7. Leftovers are a good thing. You can slap them on pizza or mix them up with lettuce and call it salad.

And how was your twenty-aught-nine? What did you learn? What was the best thing you ate, and was it something you cooked for yourself?

Here's wishing you and yours a joyful and well fed 2010!

Sunday, December 27, 2009

Baked Cheddar Olives


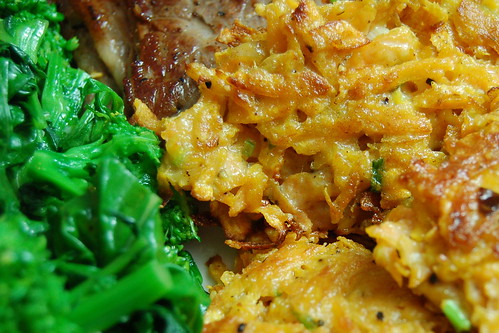
Oh my goodness. Has it seriously been NEARLY A MONTH since I told you about sweet potato latkes? My friends, it appears December has gotten the better of me.

No no, it's not that I haven't been cooking! It's the holidays; I most certainly have been cooking, and I've done a LOT of baking.  I made these sweet, sharp, unstoppable ginger chocolate chip cookies no fewer than four times. Those cardamom pistachio cookies over on The Wednesday Chef? Twice. They're subtle, mysterious, and a great foil for the in-your-face combo of peppermint and white chocolate we are often assaulted with this time of year. I've made at least five loaves of dill bread. I made three panettone: one for my Sicilian landlord, one for my mom, and one for my Nonna. I made a blueberry pie for Christmas dessert, and we ate it with my mom's homemade chocolate chip ice cream. For Christmas dinner, we had a big, gorgeous prime rib roast and I made eggy, sky-high yorkshire puddings.

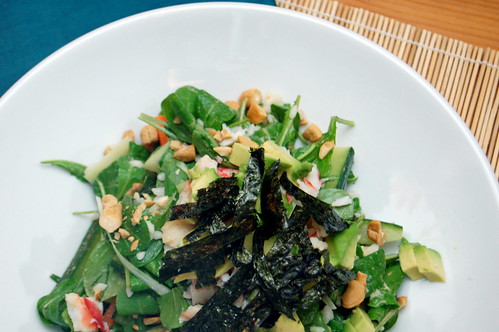
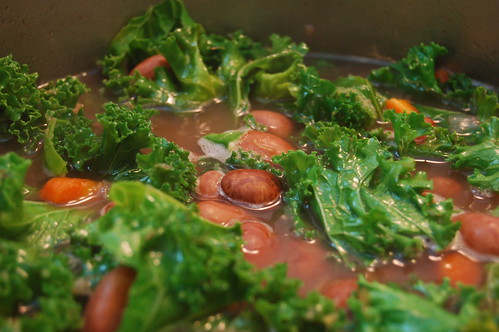
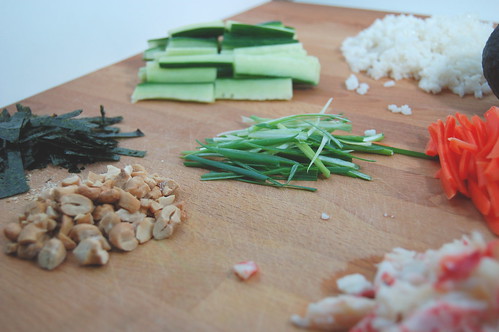
In the non-carbohydrate arena I've been less successful. I tried a riff on this warm rice salad from the New York Times, but I couldn't find smoked duck so I used smoked turkey. Way too much smoked turkey. It was a heavy, greasy mess, but we ate it anyway. These little appetizers I'm about to tell you about fall into the carbohydrate category I suppose, and perhaps that's why they work so well, but they are the savoriest little buggers and wonderful for parties. Like, say, that party you're going to on Thursday?


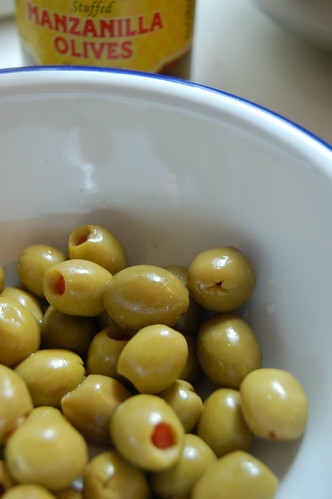
Start with some small green olives stuffed with pimento. These little Manzanilla olives are just the right size, no bigger than my thumbnail.

 
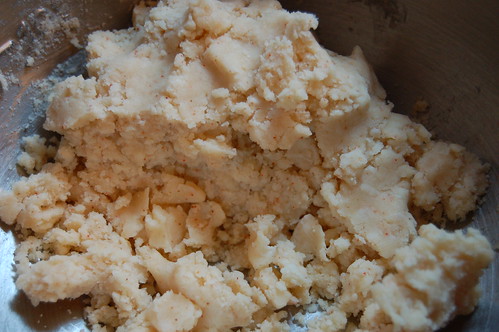
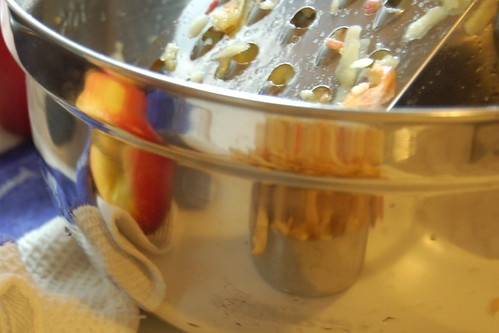
Grate up a flurry of cheddar cheese - I always double the original recipe because these things fly out of the bowl and 24 just isn't enough. I usually use Cabot extra sharp, and half a block is about enough (a block is 8 ounces) The tiny little shreds from a microplane make the dough cohesive; you don't want to use pre-shredded cheddar here or the big chunks will make the dough lumpy.


Smush that together with a cup of flour, half a stick of softened butter, and as much cayenne as you can handle. I use about half a teaspoon here - more than the original recipe, but not enough to overpower the brine with heat. I also add a splash of the olive juice from the jar to bring the dough together, but you might not need it. Also keep in mind that the olives will still be a little wet and that will help he dough hold.


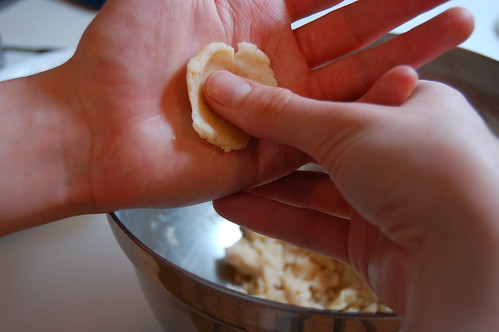
Break off a small chunk of dough. It's easier to start with too much and tear the excess off.


Squash it flat.


Make a little pocket with your thumb. The heat of your hands helps the dough go from crumbly to smooth.


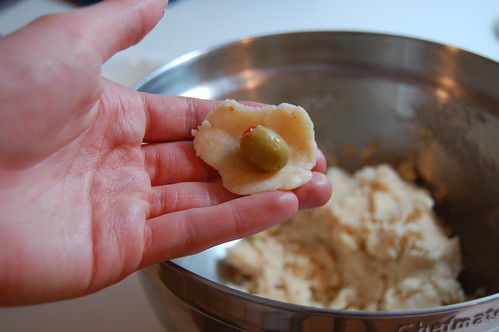
Pop an olive in there, and begin to close it up.


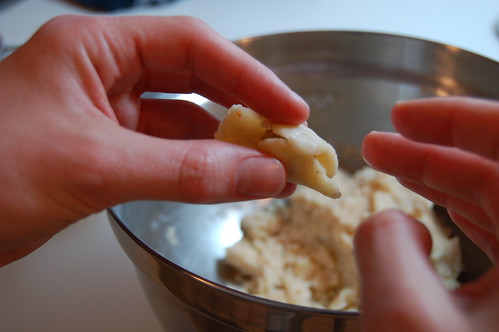
Fold two sides together, then pinch the ends closed.


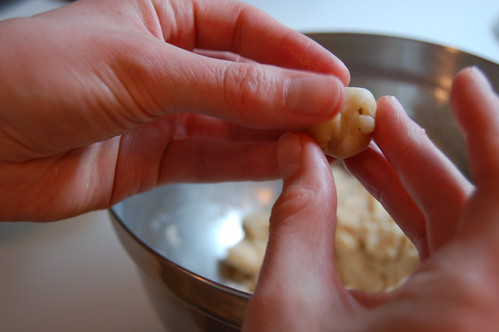
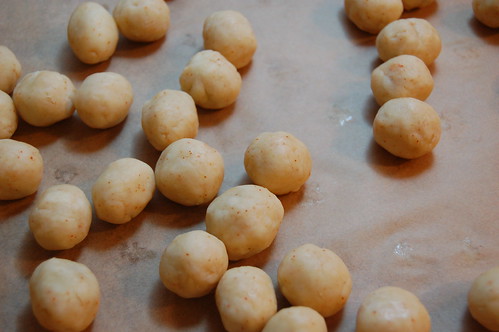
Pinch the holes closed or roll it gently to make it a smooth-ish ball.


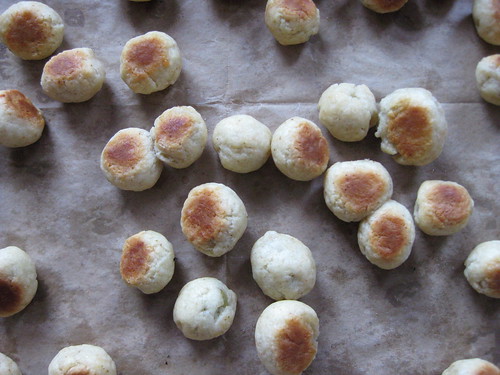
Lay the olives out on a baking sheet lined with parchment.


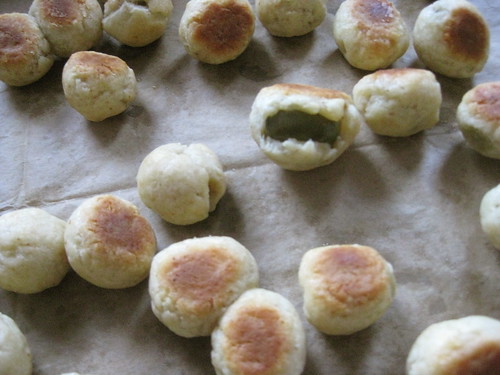
And bake! Don't worry if the dough splits away from some of them, they'll still be delicious and you can just eat those ones in the kitchen before anybody sees.


Baked Cheddar Olives
adapted from Gourmet, January 1991

48-60 small green pimento stuffed olives such as manzanilla, drained (from a 7 ounce jar, you will have extras)
4 ounces finely grated sharp cheddar cheese (a generous 2 cups)
2 ounces (four tablespoons) unsalted butter, softened
1 cup all purpose flour
1/2 teaspoon cayenne pepper

Preheat oven to 400F.

Combine butter and cheddar in a bowl, and add the flour and cayenne. Smush it together with a wooden spoon or your hands until it starts to come together as a crumbly dough. You may need to add a little of the olive juice to make it go from crumbs to dough, but do so sparingly, start with a couple of teaspoons and add it slowly.

Break off a small chunk of dough, press it in your palm into a sheet, and wrap it around an olive, rolling and pinching to surround the olive completely. Repeat with remaining olives, and lay them on a parchment lined baking sheet. These freeze beautifully at this point - stick the whole sheet in the freezer for an hour, then take the individual frozen olives and put them in a freezer bag. You can bake them all or just a few straight from the freezer, they just need an extra couple of minutes.

Bake olives for 15-20 minutes, or until the pastry is golden. If you think of it, turn them over once, but it's not completely necessary.

Makes 4-5 dozen olive poppers.

Tuesday, December 1, 2009

Sweet Potato Latkes


Hello my friends! Did you all have a wonderful Thanksgiving? Mine was a delight - we had a 28 pound turkey for only seven people, so I've been eating leftovers for days and days (and days). If you have any leftover sweet potatoes that didn't get marshmallowed, pureed or turned into soup, you should change things up this week and make some sweet potato latkes.


I fried these puppies up the week before Thanksgiving, knowing I would be eating so many leftovers and that I would still want to participate in the very first Gourmet, Unbound. We had them with a simple steak (done the Steamy Kitchen way) and broccoli raab with lemon. Since the pancakes really show off the sweetness of the potato, I thought the bitter green was a particularly nice foil.

Sweet Potato Pancakes
Gourmet, December 2001

I only made a half recipe since it was just the two of us, and we ate every last one. Next time (and there will be a next time) I'll make the whole thing, since I suspect they would re-heat well in a toaster oven for breakfast, or topped with a little dollop of sour cream and more green onions as an appetizer. My half-recipe measurements are below; for the full recipe click the link above.

1/2 lb sweet potatoes (one large), peeled and coarsely grated
2 scallions, finely chopped
1/4 cup all-purpose flour
1 large egg, lightly beaten
1/2 teaspoon salt
1/2 teaspoon black pepper
vegetable oil

Stir together potatoes, scallions, flour, eggs, salt, and pepper.

Heat enough oil to cover the bottom in a deep 12-inch nonstick skillet over moderately high heat until hot but not smoking. Working in batches of 4, spoon 1/8 cup potato mixture per latke into oil and flatten to 3-inch diameter with a slotted spatula. Reduce heat to moderate and cook until golden, about 1 1/2 minutes on each side. Transfer latkes with spatula to paper towels to drain. If you aren't ready to eat them immediately (for instance if your broccoli raab is still not done), latkes can be held in a 200 degree oven for at 15 minutes.

Wednesday, November 25, 2009

Ack! It's Thanksgiving!

 Oh, hi there. I haven't forgotten you exist, blog friends. Really. AND I've been cooking! Look, soup!


And monster-enormo-giant carrots! (baby carrot and onion for scale)


And beautiful Borlotti beans!


In addition to actual cooking, I've been doing a TON of baking. My contribution to the Thanksgiving table consists of dill bread (my family would revolt if I show up without this for any holiday), parker house rolls, multigrain bread, compound butter, jam from my canning extravaganza (well, ok, that won't be ON the Thanksgiving table), and the turkey. Yep. My employer gives us a turkey from Bob's Turkey Farm every year on the Wednesday before The Big Day... and he's in a cooler in the hallway now, waiting for the trip up to Maine, which we'll be taking in a couple of hours. I'll be back on Sunday with Sweet Potato Latkes for Gourmet Unbound. Until then, I'll leave you with this awesome soup I learned about from The Wednesday Chef.


Cranberry Bean, Lacinato Kale and Pasta Soup
Makes 8 to 10 servings, seriously. This is a lot of soup. I sometimes halve the recipe. I soaked my beans for the eight hours I was at work, plus Rancho Gordo beans are super fresh, so my cooking time for the beans was a little shorter than what's noted here.

1/4 cup olive oil plus 2 1/2 tablespoons, divided
2 leeks, white part only, cleaned and sliced, about 2 cups
2 medium carrots, finely chopped, about 1 cup
1 onion, finely chopped, about 1 cup
3 cups dried cranberry beans (I used Rancho Gordo Borlotti beans)
Kosher salt
2 bunches lacinato kale (or one and a half bunches curly kale), cleaned, stemmed and coarsely chopped, about 10 cups
3 cups dried orecchiette pasta (about 9 ounces)
1 tablespoon fresh minced sage
1/2 cup fresh chopped parsley
1 1/2 tablespoons smoked paprika
1 1/2 teaspoons Hungarian paprika
1/8 teaspoon fresh lemon juice
Grated Parmesan cheese, for garnish

1. In a 4-quart soup pot or cast iron casserole, heat 1/4 cup of olive oil and cook the leeks, carrots and onions over medium-low heat until just softened, 8 to 10 minutes.

2. Add the dried beans and 12 cups of water. Bring to a simmer over high heat, then reduce the heat to low and cover the pot with the lid, stirring occasionally. After about 45 minutes, add 1 tablespoon of kosher salt. Continue to cook, covered, and again stirring occasionally, just until the beans are soft, 45 minutes to 1 hour or more (my beans only needed another half hour or so).

3. With a slotted spoon, remove 1 cup of the beans and, separately, 2 tablespoons of bean liquor and set both aside. Add the kale to the soup, stirring in a few cups at a time as the greens wilt. Cover, and continue to cook for 8 to 10 minutes more until the greens are tender, then remove from the heat.

4. Meanwhile, bring a pot of salted water to a rolling boil and cook the pasta until al dente; drain and reserve.

5. Combine in a food processor or blender: reserved beans and bean liquor, sage, parsley, paprikas and lemon juice, 2 1/2 tablespoons olive oil and a pinch of salt. Blend until smooth. Give it a taste, it may need salt or more liquid from the soup for ease of blending.

6. Right before you're ready to serve it, stir the cooked pasta into the soup. Ladle the soup into bowls and top each with 2 tablespoons of spiced bean purée (feel free to be generous, this stuff really makes the soup). Grate Parmesan over the top of each bowl to taste and serve immediately.

Wednesday, November 11, 2009

Sushi Salad


No, this salad is not a pile of raw fish on a plate. I'm just messing with leftovers again. Adam made maki (rolled sushi) on Monday - nothing too intense, just nori (seaweed), sushi rice and vegetables. And a little crab. I said "Hey, why don't you get some Krab! We have avocados. We'll make California rolls." And he came home with one actual king crab leg.  Which is awesome because even though Krab is standard in Cali rolls and even sort of ok for things like seafood salad, real king crab is AWESOME with capital letters. I harvested the crab meat and prepped the vegetables, he made the rice and rolled the maki. We ate it in front of House and it was delicious.

But then we had leftover vegetables. And leftover rice. And leftover crab and leftover nori and more of that Genji Ginger Miso dressing I'm so completely enamored with.


So I chopped everything up. I tossed the cucumbers, carrots, scallions and rice with some baby arugula (I really wanted bok choy or napa cabbage but the bok choy at the store was rubbery like pencil erasers and the napa cabbage was yellow, limp and sad) and some of the dressing, and topped the whole thing with sliced nori, crab, avocado and some chopped cashews for crunch. I beg of you, dear Japanese friends, to forgive me: I call it sushi salad.

Thursday, November 5, 2009

Leftovers Pizza


Do you eat your leftovers as leftovers? Sometimes we do that here, especially if dinner transports or reheats easily for lunch the next day. Sometimes, though, you get stuck with bits and bobs and pieces of things that might not make sense alone, plain, reheated. When that happens, it's nice to turn them into something else. Tonight we took some leftover mashed sweet potatoes and fried them into loose patties with leftover braised leeks. They were structurally unsound, but tasty and here's the kicker: it wasn't exactly the same thing we ate yesterday.

One of my favorite ways to jazz up leftovers is to throw them on a pizza crust. The opening photo features leftover roasted root vegetables that had gone with a chicken, and some leftover Acorn Squash with Chili Lime Vinaigrette. I mashed up some goat cheese with some leftover vinaigrette, plopped it on the crust, topped with the chopped vegetables, and voila! Pizza! Drizzled with a little olive oil it and alongside a glass of wine it made a mighty fine dinner, and I felt awfully thrifty.

Occasionally you may find yourself with a seemingly bizarre mix of flavors, but you just have to pretend you run a fancy artisan pizza place and trust your instincts that weird combinations will in fact be delicious. Take this leftovers pizza from earlier this week: tomato sauce, extra from some pasta. emmental cheese, some sauteed kale that was just hanging out in the fridge. A little pepper jack for good measure. And one sliced hot dog, because there was only one, we were out of buns, and why not? It's been tasty before. When this came out of the oven, we ate it with mustard and sauerkraut. Heck yes we did.


What's the weirdest leftovers pizza you've ever made?

Speaking of leftovers - for a brilliant treatise on the subject of leftovers, you should check out this post on Simmer Till Done that includes many uses for the onions from that giant batch of french onion soup you just made.

Whole Wheat Pizza Dough
adapted from Deborah Madison
The key to leftovers pizza (which then becomes leftover leftovers pizza the next morning... heh) is having a reliable crust. I find this one an absolute dream to work with; I use 1 cup of whole wheat flour and 3 cups of all purpose, but you can use as little as 1/2 cup of whole wheat flour in this dough, just increase the AP flour to 3 1/2 cups. Just make sure the total you use is 4 cups of flour. This dough also keeps well in the freezer for about a month, just make sure to take it out the day before you want to use it and let it thaw in the fridge.

1 1/2 cup warm water
2 tsp yeast,
2 tbsp olive oil
1 1/2 tsp salt
1/2 cup to 1 cup whole wheat flour
3 cups to 3 1/2 cups all purpose flour

In a large bowl, add the yeast to the warm water. Allow to sit for ten minutes; if the yeast begins to foam, continue - if it hasn't started to foam after 10 minutes start over with new yeast.

Add the salt, olive oil and whole wheat flour, and start mixing, then add the white flour. Mix until a shaggy dough forms. Turn out onto a lightly floured countertop and knead until smooth (5-10 minutes, generally). You may need to add additional flour to the counter to keep it from sticking.

Coat the original bowl with a little bit of olive oil, then add the ball of dough. Turn the dough to coat it with oil so the surface has enough moisture to expand during rising. Cover with a clean towel and allow to rise until doubled, 40-60 minutes.

Divide the dough in two, shape each piece into a ball, then put the pieces on the counter and cover with a towel. Let rest for another 20-30 minutes. At this point, I put one of the balls of dough into a quart size freezer bag and stash it in the freezer for use later on. Or you could just make two pizzas...

While the dough is resting, start pre-heating your oven and pizza stone (or another upside down cookie sheet) to the highest temperature possible, mine goes to 500 but yours may only go as high as 450. Either way, crank it up. A super hot oven is crucial to good pizza at home.

Take the ball of dough and begin shaping it into a circle on a floured counter or pizza peel (back of a cookie sheet also works). You should be able to get about a 14 inch circle of about 1/4 inch thickness. Cover again with a towel and let it rest for 5-10 minutes.

Add the leftovers of your choice (don't be overzealous, too much sauce/cheese can overwhelm a dough, leaving it soggy), and slide the pizza off the peel/cookie sheet onto the stone/cookie sheet. Bake for 8-15 minutes. I start checking mine at 8 - really thin crusts cook very quickly - but if your crust is thick or you used a lot of toppings it may take up to 15 minutes to properly brown.

Remove from the oven (careful, it's VERY hot) and allow to cook for a couple of minutes before slicing so the cheese has a chance to set back up again. Unless you didn't use cheese (hey, it could happen) in which case, dig in!

Sunday, November 1, 2009

Pear, Port & Thyme Conserve


I've made this Pear, Port and Thyme conserve twice now, but I still can't get over the name. Not of this one, specifically, but of conserve. Don't you just want to Frohnchify it? No not French, FRONCH. It's different. CooohnSEEEERVh. COHNseehve. Coh-hon-hon-hooon sehhhh heh heh hehVE.  I can't figure out where the emphasis goes.


What I have figured out is where this sweet and aromatic condiment goes: IN MY BELLY. Like I said, I've made it twice. The first time I got five half-pint jars out of it, but the second time I only got four... partly because I used slightly fewer pears and partly because I ate so much while it was cooking.

This recipe is from Eugenia Bone's book Well Preserved, though I've made a couple of changes. I'll be bringing it with me to a Canvolution event in Boston, the focus of which is a preserve swap (!) in a few weeks. If you don't want to can the conserve, you could cut the recipe in half to a more usable amount and store it in the fridge. According to the recipes that follow in the book, this stuff is good with squash and veal and in gingerbread, but I also gave a jar to a friend who used it as a sauce with a pork tenderloin and said it was a big hit, and I suspect it would go well with cheese and crackers. However you use it, if you figure out how to pronounce it, will you please let me know?


Pear, Port & Thyme Conserve
adapted from Well Preserved


So it turns out a conserve is defined by the presence of raisins and nuts. This one calls for slivered almonds and golden raisins, but if you only have the regular purple kind I don't think it will make much difference flavor-wise. It may affect the color.

Makes 4-5 half pint jars

1/2 cup golden raisins
1/2 cup light brown sugar
1/2 cup fresh squeezed orange juice (see note, below)
1/4 cup bottled lemon juice (see note, below)
1 tablespoon grated lemon zest
1/2 teaspoon cinnamon
1/2 teaspoon nutmeg
1/2 teaspoon ground ginger (the spice powder, not the root)
pinch of salt (I used 1/4 teaspoon)
3 pounds Bosc or Anjou pears, peeled, cored and coarsely chopped (they don't break down much so don't leave any huge chunks)
1/2 cup sliced blanched almonds
1/4 cup port wine
1 tablespoon chopped fresh thyme (lemon thyme is very nice here)

Note: Total amount of juice is 3/4 cup. When I juiced one orange and only got between 1/3 and half a cup of juice, not the full 1/2 cup called for, I just poured bottled lemon juice in until I hit the 3/4 cup mark. I like acidity though, and I didn't have a backup orange.

If you're planning to hot-water-bath can these*, bring a large pot of water to a boil with a rack on the bottom of the pot. I usually put my empty jars (without the lids) in the rack while the water comes up to temperature, that way they've been sterilized by the time the preserve is cooked and ready to be canned. Heat the lids in a small pot of simmering (not boiling) water to soften the flange.

Combine the raisins, brown sugar, orange and lemon juices, lemon zest, cinnamon, nutmeg, ginger and salt in a large pot over medium high -heat. Stir to dissolve the sugar while the mixture comes up to a boil. Add the pears, lower the heat, and cover the pot. Let it simmer on low for 15 minutes. Remove the cover so it starts to thicken up, and cook another 15 minutes, stirring occasionally.

Add the almonds, port and thyme, and stir to combine. Once heated through, fill the jars, leaving 1/2 inch of head space, clean the rims then apply the simmered lids, and the rings to finger-tight. Put the filled jars on the rack in the pot (make sure they're covered by 2-3 inches of water) and process for 20 minutes (start counting once the water comes up to a boil). After 20 minutes, shut off the heat, but leave the jars in the water for five more minutes. Remove to the counter and let cool undisturbed for 6 hours.

*Precise, exlicit instructions for water bath preserving are available from Canning Across America or the National Center for Home Food Preservation. The Ball Blue Book of Preserving is also a great basic resource for methods and recipes.

Thursday, October 29, 2009

Seared Radicchio


This is radicchio. It's so pretty! Radicchio is a chicory, whose roots are often substituted for or mixed with coffee beans. It's related to escarole and endive, and it's a very popular vegetable in Italy. Here in the US it often makes an appearance in those bagged salad mixes, but radicchio can be so much more than just a filler green (er... purple?)


And when you cut it open, it's like purple lace! This is a vegetable fit for a princess! Or, you know, Prince. It's also fit for your supper tonight, because it is crunchy and bitter in a good way, like cabbage and kale.
 

Take your two small heads of radicchio, and cut them in half. Then you stop and admire the frilly-ness. Don't you just want to make a dress out of this stuff?


Then you cut them in quarters. And you stop and admire the frilly-ness, again. Then you brush them with olive oil, season with salt and pepper and set them aside for an hour or so to absorb some oil and start to soften.

Then you get your cast iron pan (or your grill or your grill pan) screaming hot. Hot is key. Not-hot-enough will make for limp lettuce which is decidedly NOT crunchy, awesome, seared radicchio. So, screaming hot cast iron: brush the pan with a little bit of olive oil, and place the radicchio cut side down on the pan. Wait two minutes for some golden brown spots to develop, then turn it onto the other cut side.


When the second side has some golden brown spots, take the wedges out of the pan, shave some parmiggiano regiano on top, and sprinkle on a little bit of parsley, if you have it. The thin shavings of cheese (as opposed to sprinklings of grated cheese) are a fun textural contrast with the radicchio, so just grab your vegetable peeler and attack your block of parm. We ate this the other night with some polenta "fries" and basic tomato sauce for a light dinner.

Do you use radicchio? What do you use it for?

Seared Radicchio
serves 2

two small heads purple radicchio
2-4 tablespoons olive oil
salt
pepper
shaved parmesan cheese
2 tablespoons minced fresh parsley (optional)

Trim and discard any discolored outer leaves, and trim the root end of the radicchio, leaving enough that the wedges will stay intact. Slice the head in half, then each half in half again so you have quarters. If your radicchio is very squat, you may want to slice the halves into thirds - basically you don't want any wedges whose widest points are larger than two inches.

Brush wedges generously with olive oil on each cut side, and season with salt and pepper. Set aside to marinate for an hour (I just left them on the cutting board while I made tomato sauce and polenta).

Heat a cast iron pan or skillet over medium-high heat until it is very very hot. You shouln't be able to hold your hand over it for more than 10 seconds. Brush it with a thin film of olive oil, and place the radicchio wedges cut side down in the pan. They should sizzle. Don't crowd the pan, it's better to work in batches so it doesn't steam.

After 2-3 minutes the radicchio should be browning in spots. If it's not, wait another 30-60 seconds. When it's golden brown, turn it to the other cut side for an additional 2-3 minutes. Remove to plates and top with shavings of parmiggiano reggiano and sprinkle with parsley.

Sunday, October 18, 2009

Apple Spice Cake


It's not unusual for October to be rainy here in Boston, and the forecast called for it, so when I left the house in the morning, I was wearing rain boots, a rain coat, and carrying an umbrella... but then I noticed the drops weren't drops. They were FLAKES. And then today it snowed again, but this time the flakes were the big downy chunks of snow that make me think of instant mashed potatoes. Nature is so cruel!

The only solace I am taking in the fact that we're getting SNOW in OCTOBER is that I have an excuse to bake cake. Well, the snow, and the seven apples, leftover from a picking trip weeks ago, taunting me from the fruit bowl. And the buttermilk going bad in the fridge.* Ok, three excuses to bake.


Apple Spice Cake
I adapted this from a recipe on The Perfect Pantry, based on the spices I like with apples and what I had in the house. It is excellent with ice cream for dessert, but I find it most suited for breakfast, toasted, with a dollop of yogurt and a sprinkling of pecans. I doubled this because I had so many apples and so much buttermilk to use; I brought the extra loaf to work and it was gone in minutes!

2 cups all-purpose unbleached flour
1/4 cup whole wheat flour
1 tsp baking soda
1 tsp salt
1/2 tsp nutmeg
1 tsp cinnamon
1/4 tsp ginger
1/2 cup vegetable shortening
3/4 cup brown sugar
2 eggs
1 tsp pure vanilla extract
1 1/4 cup tart apples, grated (3-4 large apples- I used a mix of Gala, Braeburn, and Macoun, but you can use whatever you have.)
1/2 cup buttermilk

Preheat oven to 350. Lightly grease a loaf pan with butter or baking spray.

Combine flours and spices in a medium bowl, whisk to combine (I like to whisk in the bowl rather than sift, but I guess that might be cheating, so if you want, you can sift them together instead).

In another bowl, cream the shortening and brown sugar until fluffy. Add the vanilla and eggs to the sugar and shortening, and stir to combine well.

Add 1/3 the flour dry ingredients to the sugar mixture, stir to combine. Then add 1/2 the buttermilk and half the apples, stir to combine. Then add another third of the dry ingredients, then the rest of the buttermilk and apples, then the dry ingredients, stirring to combine after each addition.

Scoop the batter into the greased loaf pan, smooth the top a little, and bake for an hour, rotating once. Let the loaf cool in the pan for 10 minutes, then turn it out onto a wire rack to cool completely.

*Do you always have leftover buttermilk from pancakes or ranch dressing (or apple spice cake)? Sarah at the Pink of Perfection has created THE ULTIMATE BUTTERMILK RECIPE REPOSITORY and I am so excited about it that I have to use capital letters. Go check it out.

Thursday, October 8, 2009

Wild Mushroom Pasta

I'm sure by now you've all heard about the shocking shut-down of Gourmet Magazine by Conde' Nast on Monday. The New York Times broke the news Monday morning around 10
right when I was getting out of a meeting. I glanced at my google reader, and had to stifle a sob. Then I watched as Twitter reverberated with cries and sighs and "oh, no!"s, and my heart broke into little bits with each friend's discovery of and reaction to the news. So many in the food world-especially those of us here on the fringes-looked forward to each new issue for inspiration, reliable recipes and beautiful images.
(That's not to say everyone is upset about this. There are those who believe that print media is dead, and we should all move on, and whatever, Gourmet was elitist and irrelevant and too stuffy anyway. If you are one of those people, I'd like to point you to this fine obituary by Alex Van Buren of Salon, in which she points out that Gourmet was for the young and scrappy, too.)
In order to "get some positive energy flowing," Julie from A Mingling of Tastes has proposed that we cook a favorite recipe from Gourmet by next Thursday, October 15th. Since I have too many favorites from Gourmet (do you hear me, Conde Nast?), I decided to cook something new.
I also wanted to use the gorgeous hen-of-the-woods mushroom I picked up at the farmer's market on Tuesday, so last night we made this Wild Mushroom Pasta from the September 2006 issue. I thought that the recipe was spot on, as reliable as I have come to expect from Gourmet (are you LISTENING, Conde Nast?). I would never have thought to add lemon to mushrooms, but it elevates the woodsy flavors like you wouldn't believe.

Wild Mushroom Pasta
adapted from Gourmet, September 2006
You could certainly use a blend of wild mushrooms as the original recipe suggests, but I made a lot of adjustments from the based on the mushrooms I had available. I puchased a small container of fresh shitake mushrooms at the grocery store to supplement the hen-of-the-woods I got at the farmer's market, but crimini (baby bella) would be great if that's what you have. I would avoid regular old white button mushroms here, they just don't pack the necessary punch.
1/2 oz dried porcini mushrooms (could also use morel)
1 3/4 cups boiling-hot water
5 tablespoons unsalted butter
4 oz fresh shitake mushrooms, stems trimmed off, caps sliced 1/4 inch thick
1/2 lb fresh hen-of-the-woods (maitake) mushrooms, thoroughly and chopped into pieces roughly 1/4 inch thick
2 large garlic cloves, minced
3/4 teaspoon salt
1/4 teaspoon black pepper
1/2 lb spaghetti, fettucini, or other long pasta
1-3 tablespoons chopped fresh chives (use the larger amount if you like chives, I only had a tablespoon or so around and could still taste them)
1 1/2 teaspoons finely grated fresh lemon zest
1/2 teaspoon fresh lemon juice

Boil 1 3/4 cup of water in a small pot, and add dried mushrooms. Let sit until softened, at least 20 minutes. Drain the now-softened mushrooms through a sieve lined with a coffee filter or paper towel, reserving the filtered liquid. Rinse, dry, and finely chop the reconstituted mushrooms.
(Efficiency alert! Start a pot of water boiling for the pasta. If using fresh pasta, don't cook it until the mushrooms are done and you've taken them off the heat, because it only takes a minute, but if using dried, it will take about 10 minutes and you want to get it in there sometime while the fresh mushrooms are browning)
Heat 3 tablespoons butter in a large heavy skillet over moderately high heat until foam subsides, then sauté fresh mushrooms, garlic, salt, and pepper, stirring occasionally, until liquid mushrooms give off is evaporated and mushrooms are browned, 8-10 minutes. (Original recipe says 5-7 minutes but I found it took a bit longer for the mushroom liquid to evaporate.. Stir in chopped soaked mushrooms and reserved mushroom-soaking liquid and simmer 1 minute, then remove from heat. Doesn't it smell woodsy and wonderful in your kitchen right now?
Cook pasta in boiling salted water until al dente, timing will depend on the size and shape of your pasta. Using tongs or a large slotted spoon, remove pasta from water and add it to mushrooms in skillet. Add remaining 2 tablespoons butter and cook over moderately high heat, tossing and adding some pasta-cooking liquid if necessary to lightly coat, 1 minute. Add chives, lemon zest, and juice, then toss well. Serve immediately with cheese and pepper to taste.

Saturday, October 3, 2009

Sour Cherry Liqueur

So you start with a bunch of cherries from Keown Orchards, in Sutton. This is back in, say, June. Pit most of them.

You end up with a big pile of mostly pitted cherries. Tuck them away in a big jar or crock, add some sugar and a whoooole lotta vodka. Wrap it in a towel to protect it from light, and wait two months.
Ta-da! Summer, distilled. Delicious on ice cream, not quite as delicious to photograph when you're running out the door on the way to another wedding! I'll be back next week my friends.

Sour cherry liqueur, not-so-loosely adapted from Not Derby Pie.

Wednesday, September 30, 2009

Kale Chips


I know it's been a quiet month here, my friends, but I was browsing my Flickr stream the other day and I realized I never told you about Adam's favorite snack! Please to be forgiving me for my oversight... and please to be sharing with me when you make these.


Oh and how about this: kale chips are as easy as freakin' pie. Easier! No rolling of stubborn dough. You just wash your kale and dry it super well (wouldn't want it to steam in the oven). Put it in a big bowl, toss it with a glug of olive oil - not too much - salt, pepper, and maybe some hot sauce or a little vinegar if you're feeling adventurous.


Spread it out on a cookie sheet or two, and bake at 350 for 10-15 minutes. You should flip the chips over half way through. Start checking them at 10 minutes, some of the smaller leaves will be ready, though the big ones will still have some chew left in the stem.

Once they're crispy and dry (smaller leaves will be done first) stand them up in a glass and take a pretty picture. OR just stand at the stove and eat the whole pan. That's what we do, so I won't judge you.

Kale Chips

one bunch lacinato/Tuscan/dinosaur kale OR one bunch curly kale stemmed and torn into medium sized pieces, washed and dried thoroughly
1-2 tablespoons olive oil
1 teaspoon kosher salt
1/2-1 teaspoon black pepper
a few shakes hot sauce (optional) or 1/2 teaspoon vinegar (optional)

Preheat the oven to 350F.

In a very large bowl (or in two batches) toss the kale leaves/pieces with oil, salt, pepper, and hot sauce (if using). Spread in a single layer on two baking sheets. Bake for 10-15 minutes, turning once, until kale is dry and crispy.