Showing posts with label cheese. Show all posts

Tuesday, March 12, 2013

Homemade Mozzarella, Take One

Untitled

It takes kind of a lot for me to be amazed by something that happens in the kitchen. I  mean, I've studied cooking, I've watched a lot of Good Eats, and I work at a culinary school, so I get that pitas puff in the heat of the oven, corn pops when it gets too hot and proteins caramelize to make many things tastier. This doesn't mean I'm hard to impress (really!) just that few things really feel magical to me anymore.

I've made fresh, no-rennet cheeses plenty of times - ricotta, paneer, things of that nature. But making mozzarella feels like magic. Milky, delicious magic. You start with a pot of milk, turn it into milky jello, and then after a couple of quick trips in the microwave, you can roll it into a ball. A ball of CHEESE!


Untitled

I followed the directions from Animal Vegetable Miracle pretty much to the letter (except I cut the recipe in half, so I used shorter bursts in the microwave.) We ate this blob yesterday, under some of last summer's slow roasted tomatoes, a flurry of salt and pepper, and a drizzle of good olive oil and condimento balsamico. I wish I had added more salt while I was making the cheese. I also wish I had left it with a little more moisture (experienced cheesemakers: could I use a little less rennet for a more tender cheese?).

Last year's slow roasted tomatoes meet last weekend's homemade mozzarella. #latergram #food #cheese #local

Apologies for crappy iPhone photos, but do know that I'll be making this again VERY soon. Roasted tomatoes, while delicious, are entirely different from fresh, and I'm happy to have time to perfect my mozzarella technique before tomato season rolls around again.

Monday, September 17, 2012

Baked Ziti with Eggplant

Fall is baked ziti season. This one has eggplant, too!

I know I've fallen out of the swing of things around here, but how about I skip the apologies for my absence (the usual summer fun distracted me, and then I started a new job, woo!) and instead I offer you this baked ziti. Yesterday after our weekend house guests left for the airport and we put together some awesome new furniture, I found myself on the couch with WGBH on the TV. And Lidia was on. I've never actually watched Lidia before, but she was making baked ziti and it looked good. Like really really good. Like go buy a box of pasta and some cheese and get that in the oven. So tonight we had baked ziti. And when I took that mediocre picture up there and put it on facebook, somebody asked for the recipe (Hi, Maura!), so I figured that was as good a reason as any to get back here. Buon appetito!

Five Cheese Baked Ziti with Eggplant
inspired by Lidia Bastianich
Serves 6-8

1 pound ziti (or penne or some other tubular pasta)
3-4 tablespoons olive oil
1 large onion, diced
4-5 cloves garlic, minced
1 lb skinny eggplants, peeled and cut into 1/2 inch chunks
1 32 oz can crushed tomatoes (or a quart of home canned if you've got 'em)
1 cup whole milk ricotta
5 ounces sharp provolone cheese, diced small
3 ounces fresh mozzarella, diced small (I used a generous half of a standard mozzarella ball)
parmesan cheese and/or pecorino romano, grated, as needed (I had both so I used them, one or the other is fine)
fresh basil, torn, if you've got it - I used about two tablespoons
salt and pepper

Preheat your oven to 375F.

Bring a large pot of water to a boil and salt it generously.

While the water comes up to a boil, heat the olive oil in your largest skillet over medium heat and add the onion, cook until translucent (5-10 minutes depending on your heat level), then add the garlic. After about a minute, move the onion and garlic to the sides of the pan, then add the eggplant. It's going to look like a lot of food. Now's a good time to season it with salt and pepper. Cook, stirring occasionally, until the eggplant is soft. Add the tomatoes and stir, then bring to a simmer and cook until it's not watery anymore.

The sauce should thicken fairly quickly if you've got it in a nice wide skillet, so drop the pasta into the boiling water and cook for 2 minutes less than it says on the box (you'll be cooking it further in the oven so undercooking it a touch here keeps it from being soggy).

Just before the pasta is cooked, add the ricotta to the sauce and stir it in. When the pasta is done (it should be quite al dente), drain it and add it back to the empty pot. Add some sauce to the pasta and stir so it doesn't stick together. Put half a cup of the sauce in the baking dish and spread it out over the bottom. Reserve another half cup or so for the top layer, but go ahead and add the rest of the sauce to the pasta.

Spread half the pasta on the bottom of the baking dish, sprinkle half the cubed provolone and half the cubed mozzarella over it, then grate some pecorino and parmesan over it, then sprinkle with half your basil, if using.. Repeat with another layer of pasta, provolone and mozzarella and basil, spoon the rest of the sauce evenly over the top, then grate some parmesan and/or pecorino over the whole thing. Go ahead and be generous, here, you deserve it.

Put the baking dish in the oven and bake until lightly browned on top and bubbly, about 40 minutes, rotating halfway through. Let it sit for 5-10 minutes after it comes out of the oven so it can set up and you don't burn your mouth.

Thursday, December 22, 2011

Cabbage and Smoked Cheddar Galette

Cabbage Galette

Our friend Tyler has an grandfather in Vermont (and, you know, a mom and a dad and a whole family). But the grandfather is the one with a smokehouse where he smokes, among other things, Vermont cheddar cheese. Cheese so smokey it imbues its woodsy flavor on anything else you keep in near it in the fridge, so you have to keep it double bagged. Cheese that, it turns out, is completely brilliant in a pie with cabbage. Brilliant!

My apologies for a lousy photo, but this is was (I ate it for breakfast!) the last piece of galette. Galette is French for sloppily made pie (or something) and it couldn't be easier - roll out a crust, fill it with stuff, fold up the edges and bake it. Ta-da! No pie tin necessary. I had a couple of ounces of sausage left over from the sausage rolls I was making and freezing for my New Year's brunch, so I threw that in, but don't sweat it if you don't have any. Vegetarian cabbage pie will be equally delicious.

Cabbage and Smoked Cheddar Galette
serves 6-8 depending on how big you slice it

I prefer the Ratio 3-2-1 pie crust for most applications - three parts flour, two parts fat, one part ice water. I also find it very handy to have pie crust in the freezer so I make them four at a time (enough for four single or two double crust pies). Here's how: put 24 ounces of flour, two big pinches of salt, and 16 ounces of chilled, cubed butter in a stand mixer fitted with the paddle attachment and bang it up a bit until the pieces of butter are the size of your thumbnail. Or the size of grapes. You know, not so big. Put some water in a bowl and add a bunch of ice cubes. Cold is key! Stir it up a bit (or do this before you measure the flour) and when you're ready for water, measure out 8 ounces (one cup) of the now-icy-cold water. With the mixer on low speed, add the water in a slow stream, just until the dough clumps together. When you squeeze some in your fist it should stick together well. Divide the clumpy mess into four parts and wrap each in plastic, using the plastic to shape the clumps into a cohesive disk. Rest the dough in the fridge for at least 30 minutes before rolling, or freeze for 3-4 months. 

one pie crust, thawed overnight in the fridge if frozen
flour, if needed for rolling out crust
half a green or savoy cabbage, core removed, thinly sliced
one small onion, diced
a few ounces of sausage, if you have it (totally optional, though)
2 cloves garlic, minced
1/4 cup sour cream
3-4 ounces smoked cheddar or another smoked cheese, shredded
one egg beaten with a splash of water or milk

2 tablespoons butter
salt and pepper

Preheat the oven to 375.

Let the crust sit out on the counter while you cook the onion and cabbage so it'll be easier to roll, but don't let it get actually warm.

Melt the butter in a large skillet and cook the onion until translucent. Add the garlic and cook until fragrant, then add the cabbage and cook until wilted, tossing regularly. Season with salt and pepper. Taste it and adjust the seasoning if it needs more salt. If you're using sausage, throw it in now, breaking it up with a spoon and let it cook most of the way through. Shut off the heat, then add the sour cream and stir to mix it in.

While the cabbage is wilting, roll out the pie crust on a lightly floured counter and transfer it to a cookie sheet lined with parchment paper. It doesn't have to be a perfect circle but go for at least an 11 or 12 inch amoeba-shape. Sprinkle the shredded cheese in a circle on the crust, leaving a two inch border all the way around and pile the cabbage over it.

Fold up the edges to contain the filling and brush the crust with the beaten egg. Bake for 20 minutes, rotate the pan and bake another 20-25 minutes until the filling is hot and the crust is golden brown.


Thursday, November 24, 2011

Two fun things from Thanksgiving

Spike!

Fun thing #1: look at this cute cat hiding in the pillows! Hello, Spike. Spike isn't allowed in the house during dinner because he will climb up on the counter and nom on the turkey carcass. Sorry, Spike.

Thanksgiving Cheeses

Fun thing #2: cheese plate! I swear it was prettier before we attacked it. From top left: Sage Farm Sterling, unidentified manchego, Bayley Hazen, and Moses Sleeper. I had a whole Vermont cheese thing going on and then my sister grabbed the manchego out of the fridge. Ah well, it was still delicious.

Sunday, October 23, 2011

Quinoa with Kale and Sweet Potatoes

Fall in a Bowl

I'm never really sure what to call this kind of dinner. It's really a shame that there's no good name for it because I eat this sort of thing all the time. Cook a grain. Cook some vegetables. Put them together in a bowl. I think some corporate lunch spots refer to it as a "rice bowl" or something, but that makes it sound like something... from a corporate lunch spot. Hm.

So I'll just say it's a simple one dish dinner or an excellent side that comes together quickly: the kale and sweet potatoes cook while the quinoa simmers. And hey, look how pretty it looks next to the centerpiece I took from my cousin's wedding!

Quinoa Bowl

Quinoa with Kale and Sweet Potatoes
serves 2-3 as a light meal, or more as a side dish

A note on cheese: I used an aged goat cheese called Colombier from the cheese shop where I work, and I liked the flaky texture and tang in this dish. Classic chevre would be a good fit but creamier, or a sharp feta would be a great counterpoint to the sweet potato.

1 cup quinoa, rinsed
2 large sweet potatoes, peeled and diced
1 small bunch kale, stems removed, leaves cut into 1/2" wide strips
1-2 cloves of garlic, minced
1 large pinch red pepper flakes (optional if you like it spicy)
2 ounces tangy cheese of your choice (see note)
olive oil
salt and pepper
a beverage for the cook

Combine the quinoa and two cups of water with a hefty pinch of salt in a sauce pan, bring to a boil, then reduce to a simmer and cover. It should be done in about 20 minutes.

Heat a medium saute pan over medium heat, then add a tablespoon of olive oil and when it shimmers, add the sweet potatoes in one layer. Partially cover the pan and cook for a few minutes, then stir or shake the pan so the cubes of sweet potato flip and cook on another side. Repeat the steaming/shaking action a few times until the sweet potatoes are cooked. They'll be browned on a few sides, you might have to adjust the heat down a bit if they're browning faster than you'd like. This could take 5-10 minutes depending on the size of your dice.

Once the sweet potatoes are cooked, deglaze the pan with a splash of water, or wine or beer if you're drinking while you cook (ahem). The liquid will help you scrape up the brown bits from the bottom of the pan. Season the sweet potatoes with salt and pepper and remove to another bowl.

Add another little splash of olive oil to the pan, then add the garlic and chili flakes and cook for about 30 seconds until fragrant, then add the kale and saute, stirring, until wilted and tender. This could take anywhere from 2- 8 minutes, depending on how tender you like your kale. Season the kale with salt and pepper. Add the sweet potatoes back to the skillet if they've cooled.

By now your quinoa should be done (if it's done earlier, just shut off the heat and leave the lid on. It'll be fine.). Fluff the quinoa with a fork, then put some quinoa in a couple of bowls and top with the sweet potatoes and kale. Crumble the cheese on top and drizzled with a little more olive oil. Mmm, fall in a bowl*.

*You know, I thought about calling this post "fall in a bowl" but then I figured somebody might  think I ran around tripping and ending up in a cereal vessel. Nope. Autumn in a bowl just wasn't as catchy. Look at the dilemmas we bloggers face! My goodness.

Wednesday, August 3, 2011

Fried Squash Blossoms

Squash Blossoms

I was going to tell you about bread today since the weather has finally cooled off a bit, and I've got a loaf in the oven right now. BUT. Squash blossoms are in season. I saw them Monday at the Central Square farmer's market and I'm sure there are a couple of weeks left, but guys... it's August.

Washed Blossoms

August, meaning that it'll be September before we know it, meaning that we must gorge ourselves on summer food now, while we still can! What are you guys wolfing down right now? Corn? Tomatoes? Peaches?

blossoms

You might consider adding squash blossoms to the list. The most popular way to eat them is to stuff them with something tasty and fry 'em up, which is precisely what I did here.

Fried Blossoms

I did learn something cool from Zoe while I googled around on methods for stuffing and frying. You don't have to be so super careful not to rip the petals when you're cutting out the stamens, you just have to be deliberate and only tear it in one place. Then you can fold the flap over the filling and the coating will seal it shut in the frying oil. No need to twist it shut for round cylinders, flat things are easier to fry in less oil, anyway.

Dinner Blossoms

Stuffed Fried Squash Blossoms
serves 4 as a light meal (we had salad, too)

I served these with a simple tomato sauce: finely chop a small onion, sweat in a bit of olive oil, add a minced clove of garlic, then add a 15 ounce can of crushed tomatoes - I used the very last pint jar of home canned from 2010 - and simmer until thick. Add herbs (basil, oregano, marjoram) if you have them around. 

one dozen squash blossoms
1 cup ricotta cheese
2-3 tablespoons finely chopped fresh herbs: basil and oregano are great, sage would be nice, I think.
salt and pepper
one egg
1/2 cup flour
vegetable oil for frying

Fill a big bowl with cool water.

First, prep the blossoms: remove the calyxes (little green leafy things) from the base of the flower. Slit the petal in one spot all the way down to the green part and carefully cut out the stamen. Carefully swish the flower in the water and lay it, open, on paper towels to dry. Repeat with all the blossoms and allow them to dry.

Meanwhile, get the filling ready. Mix up the ricotta with the herbs and some salt and pepper. Taste it, make sure it's good. Once the blossoms are dry, pipe or spoon in a small amount of filling into each flower. Don't overstuff! It'll just leak out and make frying more difficult. Fold the flap over the cheese.

Beat the egg in a shallow bowl until well blended, season with a little salt and pepper. In another shallow bowl season the flour, too. In a heavy skillet, heat about an 1/8 of an inch of oil over medium-high heat. The oil is hot enough when a pinch of flour dropped in sizzles immediately. One at a time, carefully dip each filled flower in the egg, letting the excess drip off, and then into the seasoned flour, patting off excess flower so the coating is light, not clumpy. Fry until golden, a few minutes on each side, then drain on paper towels. Don't eat them right out of the pan or you'll burn your mouth on the hot cheese, make sure to give them a minute!

Thursday, October 21, 2010

And Now We're Married

It's true what they say about your wedding day flying by. It was a wonderful day, sunny and warm for New England October, but it seemed like we woke up, put on our party clothes and BOOM, it's over. Who's taking home the centerpiece? Is there any cake left? (No, there was not. I only had about four bites of cake and I WANT MORE.)


These wedding photos were taken by our photographer David Barnes. If you want to see more wedding photos, you can see some on Facebook on the David Barnes Photography page. I also want to point out that David is awesome: he is calm and collected even though we didn't have a ton of time for photographs (read: didn't stress us out one bit) and he still managed to get a ton of awesome shots. I can't wait to see the whole set!

Two other local Somerville businesses were totally awesome, so if you're in the market for flowers check out Nellie's Wildflowers in Davis Square. My bouquet was freaking gorgeous and it had baby pine cones in it! The centerpieces were exactly what we wanted, even though I was vague and unhelpful with my ideas. Our amazing cake was from Lyndell's bakery in Ball Square: holy chocolate frosting. I might have to go down there on our one month-iversary (please, did you think I was going to wait a year?) and get myself a tiny cake just so I can eat more of it. Four bites is not enough. 

Queechee Gorge

The day after the wedding we headed home from the Museum, packed up, and drove up to Woodstock, Vermont, to the Village Inn (warning: their website plays music) for a three day mini honeymoon (mini-moon?). It was perfectly delightful even if we were the youngest tourists in town. The thing is, retirees make dinner reservations, and we are young! and crazy! and newlyweds! Which means we only had reservations for one night (at Simon Pearce, where we had a gift certificate from the best man - thanks Tyler!) Luckily, there are tons of awesome restaurants in and around Woodstock and we managed to find great food every night. We had a really wonderful crab cake that I can't wait to recreate at Richardson's Tavern, and the house special whole fish at Mangowood was crispy and flavorful. 

I'm winning!

In addition to awesome food (breakfast at the Village Inn was unbelievably good), we got in two solid mornings of hiking and plenty of cribbage. We also tasted cheese and maple syrup and brought home plenty of deliciousness to savor for the next little while.

286/365: Woodstock

We've been back in Boston for about a week, and it's been a little weird adjusting back to real life. Not much is different, except that Adam wears a ring now. He still goes to work, I still go to school (oh, and I got a part time job doing prep work, so I go there, too, and make hundreds of spinach triangles), but we're not planning a wedding any more. Frankly, it's pretty nice. 

289/365: Raw Kale Salad

I'll be back again soon enough with something more substantial, but to ease back into things, here's a blurry picture of a salad for fall that we had a few days after we got back. It's made with a bunch of raw lacinato kale, center ribs removed and sliced into 1/4 inch strips, one sliced honeycrisp apple, and a nub of diced smoked gouda, with a handful of chopped walnuts for crunch. The dressing is red wine vinegar, salt, and olive oil, and you can just mix it all up and let it sit for an hour while you make the rest of dinner if you want. Raw kale can stand up to the vinegar without wilting much; it's even good the next day! 

Wednesday, August 4, 2010

Stone Soup Farm CSA: Week Nine (and Greek Salad)

CSA Week 9

Week nine is awesome, guys, and primed for chunky salad making. We got: two ears of corn, two cucumbers, four tomatoes, three peppers, a pound and a half of potatoes, a bunch of parsley and a bunch of chard. That first night we turned two of the tomatoes and the cucumbers into a greek salad. First, I sliced half a sweet red onion and tossed it with a couple capfuls of red wine vinegar. I let that sit for about twenty minutes to mellow out the bite of the onion and I chopped the rest of the vegetables.

Greek Salad

I like my cucumbers peeled and seeded before I chop them, so that's what I did. I cut up two CSA tomatoes into chunks and added a handful of the Sun Gold cherry tomatoes from our back patio garden. I added a handful of pitted Kalamata olives and tossed those with the chopped vegetables with the onions (I drained off some of the excess vinegar) and then topped it with a little slab of sheep's milk feta, which made a nice bed for the patio garden oregano and freshly ground black pepper sprinkled on top. The finishing touch was a drizzle of good olive oil and a piece of bread for scooping up cheesy bits of tomato.

Caprese

Ah, and speaking of cheese and tomatoes: we used the other two tomatoes for insalata caprese tonight with home grown basil and Fiore di Nonno mozzarella. I think I'm in love with summer.

Wednesday, July 21, 2010

Stone Soup Farm CSA: Week Seven (and Shaved Zucchini Salad)

201/365: CSA Week 7

Check out the bounty this week, friends! Corn, green beans (the first green beans, yay!), dill, beets (the first beets, wahoo!), kale, and zucchini. I grabbed a yellow zucchini in the mix because I had something in mind for them and I thought the variety would be nice.

Odd man out

Apparently that something was taking lonely pictures of the yellow zucchini being shunned by his green brethren. Well, not actually, the something I was thinking of was the shaved zucchini salad from the August issue of Bon Appetit. I haven't had my fill of these abundant squashes yet, and I am always intrigued by a raw preparation of something we tend to eat cooked.

Slice it

I had used a vegetable peeler to get thin slices of zucchini before, but forgotten how they tend to bow in the middle; you'll end up with the end you're holding, a very thin bridge, and then a big lump on the blossom end. If you rotate the zucchini as you peel this isn't as much of a problem, but the slices aren't as pretty and symetrical. For this particular recipe I'd recommend smaller zucchini, not the monster baseball bat variety. Smaller ones are more tender, and the size of the slices will be more suited to a salad. If you see a yellow zucchini (not a summer squash), pick one up just to prettify things.

Shaved Zucchini Salad

Shaved Zucchini Salad with Parmesan and Pine Nuts
adapted, just barely, from Bon Appetit

serves 4 as a side

1 tablespoon lemon juice
1/2 teaspoon kosher salt
5-6 turns of the pepper grinder
a pinch of dried red pepper
1/4 cup olive oil
4 medium zucchini, mix of green and yellow (about a pound)
small handful of pine nuts, toasted
1/4 cup of basil, sliced
wedge of parmesan cheese

First, make the dressing: whisk the salt and both peppers with the lemon juice, then whisk in the oil. Set aside. Shave the zucchini using a vegetable peeler to get very thin, long slices, and pile them in a bowl. Add the pine nuts and basil, and toss with the dressing. Turn out onto a serving platter (or if you're me, you just tossed it carefully with your hands ON the serving platter so as not to dirty up any unnecessary dishes). Using the vegetable peeler again, shave strips of parmesan cheese onto the salad. Top with more basil as garnish, if you like, or another grind or two of black pepper.

Thursday, July 15, 2010

Stone Soup Farm CSA: Week Six

Stone Soup Farm CSA: Week 6
I must admit I'm a little amused by how green our CSA shares still are, but there's a glimmer of color there if you squint. Do you see it? No? Well, that's because it's still wrapped. We got two ears of sweet corn in this week's share, and I say that counts as yellow. Also, let's talk about that gorgeous lettuce, all wrapped around itself like a big green rose. Lovely!

195/265: Happy Veal Chop

We grilled the corn along side some astonishingly good grass fed veal, and I whizzed the basil and some other herbs from our garden into a a pesto to plop atop the chops. (Hee!) I thinned the pesto with some lemon juice and a bit more olive oil and used it to dress a salad of the lettuce and one of the cucumbers. That lettuce though, I swear, it was so darn pretty I almost had a hard time tearing it up to wash and eat.

Thursday, June 17, 2010

Stone Soup Farm CSA: Week Two

166/365: Stone Soup Farms CSA Week 2
 
Here's our half share from Stone Soup Farms this week: red leaf lettuce, a quarter pound of spinach, lacinato kale, garlic scapes, turnips and POPCORN! I'm pretty excited about that last one, as we are popcorn fans here at Hungry Bruno. I especially like it with pimenton de la vera, Spanish smoked paprika, and butter. What do you put on your popcorn?

Galette of Greens
 
I used the turnip greens and spinach to make a galette, as I had some leftover 3:2:1 pie dough (about 10 ounces) from the rhubarb pie I made last weekend. I caramelized one onion, then added the greens and sauteed them until they were wilty. Rolled out the dough, spread a tablespoon of dijon mustard on it, then a flurry of grated cheddar (gruyere would be nice, too!), then the onions and greens and a little more cheese. I crimped up the edges and slid the whole shebang on parchment onto the baking stone in my 375 degree oven. Thirty-five minutes later: dinner. With asparagus and lemony butter. Not bad for a Tuesday!

Sunday, May 9, 2010

Cheesy Polenta with Skillet Roasted Mushrooms

Cheesy Polenta with Skillet Roasted Mushrooms


We've been eating a lot of pasta lately. I think it's because we're starting to get tasty produce again, and I'm not quite warmed up for vegetable season yet; I haven't gotten into the swing of meals on the fly based on what looks good that week. My default has been yay, asparagus! I don't know what to do with it, but I guess we can just toss it with some pasta. And you know what? That was a wonderful meal.


Mushroom Meez


But sometimes I remember that there are other starches out there in the world. Wonderful things like rice! and quinoa! and polenta! And that those, too, can be the base of an improvised dinner. We had a cup of instant polenta in the cupboard, and some Monterey Jack in the fridge, Adam stopped on the way home to pick up some portabello mushroom caps.


Thick Slices


It was also very exciting to be able to walk outside and snip some fresh thyme and chives from our container garden, it makes remembering how to use vegetables that much more fun. Do you grow herbs or vegetables? Which are you most excited about for the spring?


Cheesy Polenta with Skillet Roasted Mushrooms


Cheesy Polenta with Skillet Roasted Mushrooms
Serves 2 with leftover polenta*, to serve four, double the mushrooms.


I happened to have some homemade vegetable stock in my fridge - we make it in big batches and freeze it, and I had recently defrosted some. I don't know if I'll ever go back to making polenta with water ever again. If you've got broth or stock on hand, please try it! It is so flavorful. I wanted this polenta to be pourable, so I used a lot of liquid, but you could cut it down if you like it firmer. Oh, you could also do this with regular non-instant polenta, it would just take longer. It's entirely between you and the contents of your pantry.


For the polenta:
1 cup instant polenta
4 cups vegetable stock (or chicken broth or water)
4 ounces monterey jack cheese, shredded


For the mushrooms:
3-4 portabello mushroom caps, cut into 1 inch pieces
1 tablespoon olive oil
1 tablespoon butter
1 teaspoon chopped fresh thyme
1 medium shallot, finely chopped
salt and pepper
chopped fresh chives for garnish.


Heat the olive oil and butter over medium high heat in your largest skillet (12 inches is good). Once they are hot, add the mushroom pieces and toss to coat with the fat. If the mushrooms don't fit in one layer, do them in batches. If you crown the pan, they'll steam instead of browning. Add the thyme and salt and pepper to taste, and cook the mushrooms, stirring occasionally, for three minutes. Then add the shallot and a touch more oil if necessary, and continue cooking until the mushrooms are tender and browned and the shallot is softened. If you haven't cooked the polenta yet, turn the heat way down and keep the mushrooms warm over a low flame.


Meanwhile, bring the stock or water to a boil in a medium sauce pan. Pour the polenta in a slow stream while whisking to combine it with the broth. Whisk constantly for about 5 minutes over medium heat, then add the cheese in three handfuls so it melts and doesn't clump. If the polenta is too thick, thin it with a little hot water or stock.


Pour the polenta onto two plates, then top each with half the mushrooms. Garnish with chopped fresh chives.


*Leftover polenta should be spread in a plastic-wrap-lined square baking pan and allowed to cool then refrigerated for up to three days. You can slice it into squares, toss it with some tomato sauce, and grate a little Parmesan over the top. Bake it in a 350 degree oven for 20-30 minutes until heated through and the top is starting to brown.

Monday, May 3, 2010

Pasta with asparagus, bresaola and smoked gouda

Asparagus tips


Aaah, asparagus. Is there any more longed for harbinger of spring? I made pasta with asparagus last year, but I went slightly heavier this year - no pea shoots and lettuce, this time we're using smoked cheese and cured beef! Mmmm, charcuterie...


Cheeeeeeese


This is a riff on a recipe from Giada De Laurentiis that I used to make all. the. time. I even suggested it to an old house mate as a simple and delicious meal to impress a date. From what I remember, he was impressed. I, however was NOT impressed when she left the resulting dishes in the sink for three days, but that's a story for another time. Anyway, I couldn't find smoked mozzarella at the store, so I used smoked gouda. Mozzarella is meltier, but gouda worked fine. For the sake of pork avoidance, I used bresaola, a cured beef salumi instead of prosciutto. It's not the same; bresaola is distinctly beefy, but it filled the salty fatty meaty hole left by prosciutto.


Meat mosaic
I got the bresaola at Dave's Fresh Pasta right in Davis Square, which is also where I picked up this, uh, fresh pasta. This made an obscene amount of food, much more than we needed. When I bought the fresh pasta, the woman at the shop suggested 1 1/3 pounds for 4 people (I wanted dinner for two + leftovers), but we got 7 (admittedly not enormous) servings out of that much pasta. It was good enough for us to eat for a few days later, but it certainly was not as good reheated as freshly cooked. If you do use that much pasta, use two bunches of asparagus and a bit more cheese.

Pasta with asparagus, bresaola and smoked gouda

Pasta with Asparagus, Bresaola and Smoked Gouda
I originally found this recipe in one of Giada's cookbooks and she suggests you make it with penne or ziti to mimic the shape of the asparagus. I think it's very good with penne, but I liked it with fresh pasta quite a bit. She would also have you saute some minced garlic in olive oil and toss the whole mess in that pan, but I skipped garlic and drizzled olive oil on at the end. If you have fresh basil or parsley on hand (I didn't), a tablespoon or two of slivered herbs works very well, toss it with the pasta just before serving.

1/2-3/4 pound fresh pasta (I used a variety with black pepper in the dough)
1 bunch asparagus, woody ends removed, cut into 1 1/2 inch long pieces
scant 1/4 lb bresaola (or prosciutto) cut into strips
3 oz smoked gouda (or smoked mozzarella), cut in small (1/4 inch) cubes
olive oil
salt and pepper

Bring a large pot of salted water to boil. Add the fresh pasta, then 1 minute later add the asparagus pieces. When fresh pasta is cooked through (taste to check, it should only take another two or three minutes after you add the asparagus), and the asparagus is crisp-tender, reserve a cup of the cooking water, then drain pasta and asparagus.

Return to pot, add strips of bresaola and cubed cheese, toss with a couple of tablespoons of olive oil, salt and pepper to taste (I used 1/2 a teaspoon of salt and 8-9 grinds black pepper). Remember that the meat is quite salty, and if you've salted your pasta cooking water well you shouldn't need much salt at this point. Taste, add more salt or pepper if necessary or pasta cooking water if it seems dry, then serve.

Wednesday, April 21, 2010

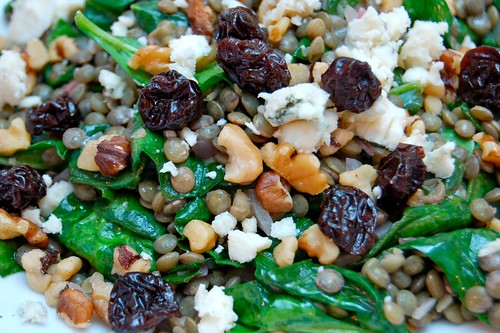
Warm Lentil Salad with Spinach and Blue Cheese


Do you ever have a thought that pops into your head and then will not go away? Like at work when you're refilling your water bottle at like 10:30 in the morning and you suddenly remember that you have a bag of french green lentils in the cupboard and you spend the rest of the day figuring out how to eat them for dinner that very night? Is that just me? Sometimes it's like a song gets stuck in my head, but instead of a song it's an idea for something to eat.

So, last week I remembered these lentils. And then I remembered the little chunk of blue cheese in the fridge. And one thing led to another, and this is what we had for dinner, with a slice of crusty bread and a glass of white wine.

Warm Lentil Salad with Spinach and Blue Cheese
serves 2 as a light main course or 4 as a starter

This is one of those dishes where I'm not sure whether to call it a salad, because it's got not-quite-cooked greens or a side dish because the lentils are warm. Whatever you want to call it, it's darn tasty. 

1 cup French green lentils
5 ounces baby spinach (1 small bag)
1 large shallot, finely chopped
1/4 cup olive oil
3-4 teaspoons sherry vinegar (or red wine vinegar)
1 teaspoon dijon mustard
1 handful dried cherries
1 slightly larger handful toasted walnuts, chopped
1/3 cup blue cheese, crumbled
salt and pepper

First, cook the lentils: in a saucepan, cover then lentils by an inch or two with water, turn to high heat and bring to a boil, then turn the heat down to a simmer and cook until the lentils are tender but not falling apart, 15-20 minutes.

Meanwhile, make the dressing: in a saute pan, heat the olive oil over medium heat and cook the shallots until translucent, 5 minutes or so. Add the vinegar and mustard and swirl to mix, add 1/4 teaspoon or so each of salt and pepper. Turn off heat.

When the lentils are done, drain them and add them back to the pot, then add the dressing and the spinach, tossing to coat lentils and spinach with dressing. The heat from the lentils will wilt the spinach, yay! Taste for seasoning and add more salt and pepper if necessary. Dish out the lentils and spinach onto plates, then evenly distribute the blue cheese, cherries and chopped walnuts on top of each salad.

Sunday, December 27, 2009

Baked Cheddar Olives


Oh my goodness. Has it seriously been NEARLY A MONTH since I told you about sweet potato latkes? My friends, it appears December has gotten the better of me.

No no, it's not that I haven't been cooking! It's the holidays; I most certainly have been cooking, and I've done a LOT of baking.  I made these sweet, sharp, unstoppable ginger chocolate chip cookies no fewer than four times. Those cardamom pistachio cookies over on The Wednesday Chef? Twice. They're subtle, mysterious, and a great foil for the in-your-face combo of peppermint and white chocolate we are often assaulted with this time of year. I've made at least five loaves of dill bread. I made three panettone: one for my Sicilian landlord, one for my mom, and one for my Nonna. I made a blueberry pie for Christmas dessert, and we ate it with my mom's homemade chocolate chip ice cream. For Christmas dinner, we had a big, gorgeous prime rib roast and I made eggy, sky-high yorkshire puddings.

In the non-carbohydrate arena I've been less successful. I tried a riff on this warm rice salad from the New York Times, but I couldn't find smoked duck so I used smoked turkey. Way too much smoked turkey. It was a heavy, greasy mess, but we ate it anyway. These little appetizers I'm about to tell you about fall into the carbohydrate category I suppose, and perhaps that's why they work so well, but they are the savoriest little buggers and wonderful for parties. Like, say, that party you're going to on Thursday?


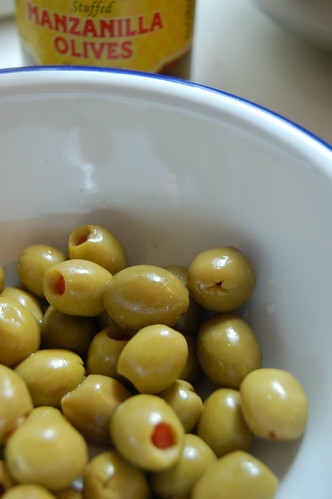
Start with some small green olives stuffed with pimento. These little Manzanilla olives are just the right size, no bigger than my thumbnail.

 
Grate up a flurry of cheddar cheese - I always double the original recipe because these things fly out of the bowl and 24 just isn't enough. I usually use Cabot extra sharp, and half a block is about enough (a block is 8 ounces) The tiny little shreds from a microplane make the dough cohesive; you don't want to use pre-shredded cheddar here or the big chunks will make the dough lumpy.


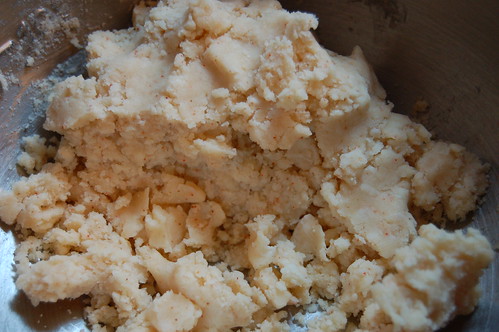
Smush that together with a cup of flour, half a stick of softened butter, and as much cayenne as you can handle. I use about half a teaspoon here - more than the original recipe, but not enough to overpower the brine with heat. I also add a splash of the olive juice from the jar to bring the dough together, but you might not need it. Also keep in mind that the olives will still be a little wet and that will help he dough hold.


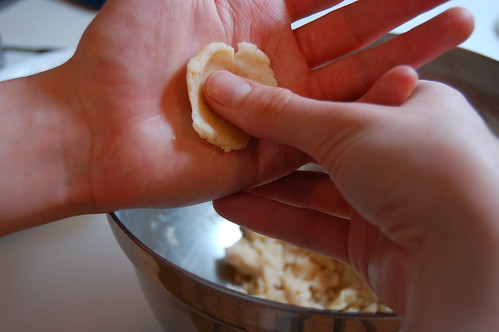
Break off a small chunk of dough. It's easier to start with too much and tear the excess off.


Squash it flat.


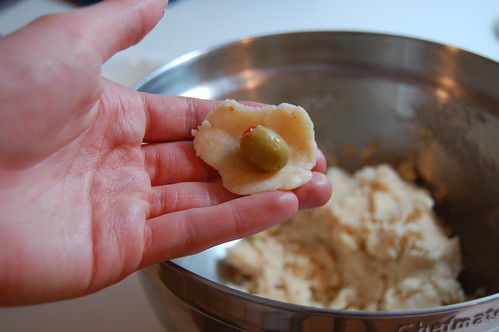
Make a little pocket with your thumb. The heat of your hands helps the dough go from crumbly to smooth.


Pop an olive in there, and begin to close it up.


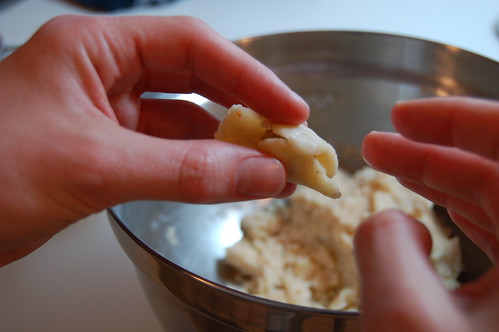
Fold two sides together, then pinch the ends closed.


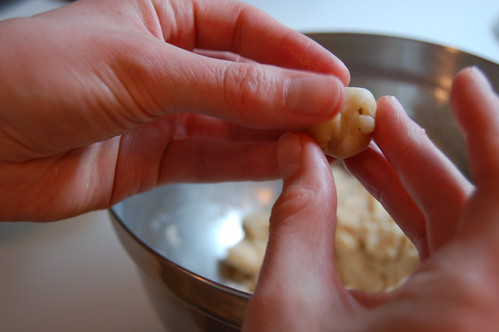
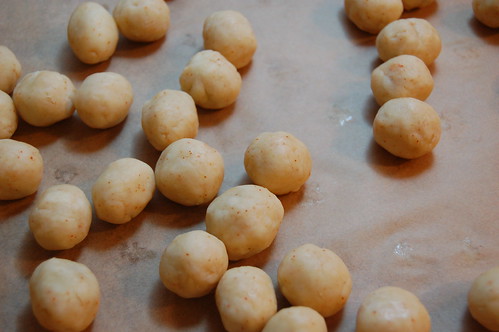
Pinch the holes closed or roll it gently to make it a smooth-ish ball.


Lay the olives out on a baking sheet lined with parchment.


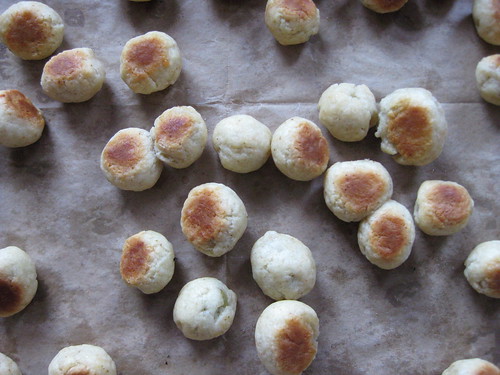
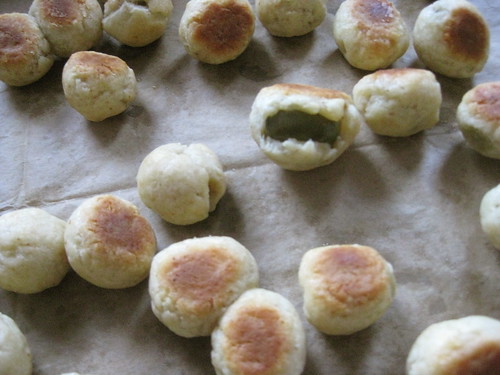
And bake! Don't worry if the dough splits away from some of them, they'll still be delicious and you can just eat those ones in the kitchen before anybody sees.


Baked Cheddar Olives
adapted from Gourmet, January 1991

48-60 small green pimento stuffed olives such as manzanilla, drained (from a 7 ounce jar, you will have extras)
4 ounces finely grated sharp cheddar cheese (a generous 2 cups)
2 ounces (four tablespoons) unsalted butter, softened
1 cup all purpose flour
1/2 teaspoon cayenne pepper

Preheat oven to 400F.

Combine butter and cheddar in a bowl, and add the flour and cayenne. Smush it together with a wooden spoon or your hands until it starts to come together as a crumbly dough. You may need to add a little of the olive juice to make it go from crumbs to dough, but do so sparingly, start with a couple of teaspoons and add it slowly.

Break off a small chunk of dough, press it in your palm into a sheet, and wrap it around an olive, rolling and pinching to surround the olive completely. Repeat with remaining olives, and lay them on a parchment lined baking sheet. These freeze beautifully at this point - stick the whole sheet in the freezer for an hour, then take the individual frozen olives and put them in a freezer bag. You can bake them all or just a few straight from the freezer, they just need an extra couple of minutes.

Bake olives for 15-20 minutes, or until the pastry is golden. If you think of it, turn them over once, but it's not completely necessary.

Makes 4-5 dozen olive poppers.