Showing posts with label vegetarian/vegan. Show all posts

Saturday, November 21, 2015

Sloppy Josies (Vegetarian Sloppy Joes)

Untitled

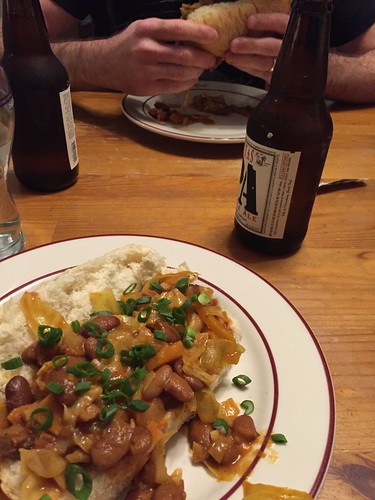
My friend Liz (who calls these Sloppy Junes after her toddler) recommended this Eating Well recipe, and since I already had a bunch of pinto-ish beans cooked (I think they're actually tiger's eye beans?), I made a non-slow-cooker version. I started by sauteeing an onion, a pepper, some garlic, and two carrots, then adding 1 tbsp chili powder, 8 oz tomato sauce, a blorp of tomato paste, 1-2 tbsp soy sauce, some molasses, some honey, and maybe a tablespoon of dijon mustard (I was pretty proud of this one: I swished some water in an almost empty mustard container to get the very last bits out *and* add the water to the recipe). I also added the end of a cabbage, thinly sliced, which I really enjoyed, plus the last 2-3 cups of cooked beans, and the last cup of roasted butternut squash. I simmered it all together for like half an hour and added some more seasoning in the form of soy sauce. I wish I had thought to add worcestershire, but that would have rendered these not-vegetarian, and also I forgot. Served over some old sub rolls I unearthed from the depths of the freezer. Josie ate beans beans beans and also some of the bread.

Monday, October 26, 2015

Hahvest Taht and the Rest of The Plan

Meal plan for the week of October 26th!

Sunday: Harvest Tart, kale salad, broiled cod
Monday: big salads (leftover beans from Friday for protein power)
Tuesday: Tex Mex Sweet Potatoes
Wednesday: TBD/Adam cooks
Thursday: Shepherd's pie
Friday: TBD/pasta something or other

Untitled

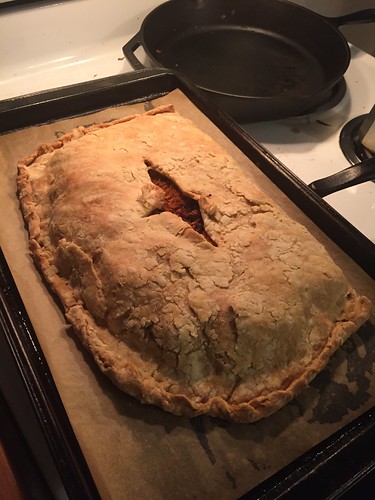
On Sunday I made this Harvest Tart from NYT cooking with red kuri squash (couldn't find "cheese pumpkin" and I get bored of butternut), two half-green, half-yellow peppers, an onion, sweet paprika, thyme, and olives. Josie loved it, but Adam and I ate too much at the Moms of Camberville Halloween Shindig in the late afternoon so we had a popcorn for dinner action movie* night. I figure I'll just bump all the dinner plans back by a day.  Also I was too tired after a great dinner party Chez Durand Saturday night to do much cooking on Sunday so tonight is my big prep night. I plan to:

roast the sweet potatoes
cook some chicken breasts w/ adobo sauce to shred for the tex mex meal
make mashed potatoes for the shepherd's pie
cut up aromatics for shepherd's pie
maybe? cut up veg for big salads tomorrow

Back to the tart: it looks like it was baked by Georgia O'Keefe and my crust is oddly patchy but the flavor is excellent. You grate and salt the squash and it rests in the fridge a while before you mix up the rest of the filling. I was expecting it to let out a lot of water but it didn't at all, so I pressed on it and got like a tablespoon or two. I don't know that I'd skip the step necessarily because it definitely softened the squash shreds, but maybe red kuri squash is denser than the recommended ones? Anyway it's delicious. And vegan! Though I might add feta or goat cheese next time.

*Brick Mansions, Paul Walker's last movie before he died - not much for a plot but it co-stars David Belle, the inventor of Parkour, so the fight scenes are really beautifully choreographed and watching that guy move was a treat throughout the whole movie.

Friday, January 3, 2014

Celery Salad with Dates


These days it takes a particularly good recipe to bring me back here, but this one is so simple and surprising that I didn't want to leave it undocumented. I cleaned out a big pile of old magazines the other day, but I went through them first and pinned all the ones I had flagged with sticky notes and scraps of paper (it's an imperfect system but it works for me, heh). This little gem is from a back issue of Bon Appetit. The slightly salty crunch of the celery next to the sweetness of the dates is an unexpected and delightful combo.

Celery Salad with Dates
Serves 4 as a side

The original recipe called for a couple of ounces of shaved parmesan, which I skipped because I tasted it before I added cheese and loved it as is. The next day I ate the leftovers for lunch (they were a little soggy and the dates were kind of bloated, so I recommend you eat this one right when you make it), and I added some leftover crumbled bacon. The salty fattiness was a nice foil for the sweetness of the dates, so I'll add the parmesan next time I make this one. 

1/2 cup sliced almonds
8 stalks celery, thinly sliced on a strong bias
5 dates, pitted, roughly chopped
juice of half a lemon
salt and pepper
a good size pinch of red pepper flakes (I used a combo of aleppo and maras pepper)
3-4 tablespoons extra virgin olive oil
2 oz parmesan cheese or 4-5 strips of bacon, cooked until crisp and crumbled (optional)

Preheat the oven to 350, spread the almonds on a baking sheet and toast until golden, about 5 minutes. Pro tip: don't leave the kitchen, and make sure you set a timer. Nuts are tricky, tricky buggers and they burn in like a second. I use the toaster oven and literally watch them toast, though in a small toaster oven with more hot spots, you'll probably want to stir them every couple of minutes.

Combine the celery, dates, salt, pepper and red pepper flakes in a bowl, squeeze the lemon juice over and toss. Add the parmesan, if using, and the almonds, and a splash of the olive oil, then taste and adjust the seasoning. If you want more heat, add more red pepper, or if it's too aggressively acidic, add a little more olive oil. If you're using the bacon instead of the cheese, sprinkle the crumbles over the top of the salad just before serving.


Friday, August 9, 2013

Last Night's Dinner (and a recipe for Roasted Carrot "Hummus")

The cover recipe from Plenty (Pom molasses instead of Pom seeds), carrot "hummus" from river cottage veg and sautéed kale. And naan. #dinner #awyeah

Adam's been traveling for work a lot lately, spending Sunday through Friday in New York and coming home just long enough to do laundry and give me a quick hug before getting back on a train. That project is almost over, thank goodness, but while he's been gone I've reverted to my single lady food habits. By which I mean that I've had an awful lot of tomato sandwiches for lunch and dinner in the last month.

Anyway, he got to come home early this week and yesterday I made us an actual honest to goodness dinner with some actual honest to goodness thought behind it. I started with the cover recipe from Yotam Ottolenghi's gorgeous book Plenty, but at Rivka's suggestion I used pomegranate molasses instead of the out-of-season pomegranate seeds. Sauteed kale was a no brainer given the enormous bunch taking up half the space in my refrigerator.

Then, since the oven was already on, I figured it was time to try the roasted carrot "hummus" that my friend Samantha suggested as a way to use up a glut of carrots (oh the woes of a CSA member!) I put hummus in quotes because there are no chickpeas in here, but carrot dip sounds like something you dip carrots in, not a dip made of carrots, and carrot spread just doesn't really capture the vaguely middle eastern flair of it. This stuff is so good, you guys. It's sweet from the honey and the carrots themselves, with smokey, herbaceous notes from the toasted cumin and coriander. I threw together some quick flatbread to scoop this up with, but I think it would be equally good on crudites (especially cauliflower) or crackers. If you can eat this outside to enjoy the waning summer (sob) so much the better.

Roasted Carrot "Hummus"
adapted (but not much) from River Cottage Veg

When I make this again (after we inevitably get another pound or two of carrots next week) I want to try using the green coriander from the gone-to-seed cilantro plants in my garden to bump up the vegetal flavors.

1 - 1.5 pounds carrots
1/2 cup olive oil, divided
1 teaspoon cumin seeds
1 teaspoon coriander seeds
1 tablespoon neutral flavored honey 
3-4 garlic cloves
3 tablespoons tahini
juice of one orange
juice of half a lemon
salt and pepper

Preheat the oven to 400 degrees while you peel the carrots and cut them into 1 inch chunks.

Toast the cumin and coriander seeds together in a dry skillet just until fragrant (if using green coriander, just toast the cumin). Transfer to a mortar and pestle or a spice grinder and grind to a fine-ish powder. Combine the spices with 1/4 cup of olive oil, a big pinch of salt and the honey, then toss the carrots in the mixture, spread on a baking sheet, add the garlic (don't peel it) and roast, tossing once, for about 30 minutes or until the carrots are dark brown (but not burnt!) in spots.

When the carrots are out of the oven, let them cool for a minute or two, then add them to a food processor with the garlic (it should be easy to squeeze the garlic from the skins, now), tahini, orange and lemon juices and another big pinch of salt. Pulse a few times to get it started, then add 2 tablespoons of the remaining olive oil and pulse a bit more. You may need more oil, or you may not, but keep adding oil and pulsing until you get a thick paste. Taste for seasoning - I added more lemon juice and more black pepper - and pulse again if you add anything just to finish mixing. Serve warm or at room temperature, drizzled with a little more olive oil if you like. 

Tuesday, December 18, 2012

Simple Celeriac Gratin

Celeriac Gratin

Found myself with three celery roots in the crisper drawer the other day. Also in the fridge: rather too much heavy cream. Hence this gratin. Simple, rich, quite tasty as dinner with a salad. I put this in a small 6x8 baking dish but I bet it would scale up well, and next time I have a lot of celery root kicking around, I'm definitely making this again.

Celeriac Gratin
serves 2-4 as a side dish

3 medium celery roots (celeriacs), peeled and sliced 1/4" thick
1 1/2 - 2 cups heavy cream
salt and pepper
2 ounces gruyere cheese, grated
butter for the baking dish

Preheat the oven to 375.

Put the sliced celery roots in a sauce pan and add enough cream to almost cover them. Season with salt and pepper and bring to a simmer over medium high heat, then reduce the heat and let cook, stirring a couple of times, for 15-20 minutes until the celery root is tender when pierced with a knife.

Butter a 2 quart baking dish, and transfer the celery root to the dish. Pour the cream over it, but you might not want to use all the cream - it's ok if the top layer of celery root isn't covered. Shred the cheese and put that on top. Stick it in the oven for 20 minutes, then rotate the pan and cook another 15-20 minutes or until the top is richly browned. Let stand 5-10 minutes (until no longer bubbling), then serve.

Sunday, November 20, 2011

Mushroom Pâté

Mushroom Pate

As you might be aware, Thanksgiving is in about four days. Four days! Some of you already have your menus all planned, and some of you have probably already gone shopping, but for those of you wondering what to put out for noshing while everybody waits for the turkey, I'd like to add this pâté to the list of possibilities.

Technically this isn't a pâté, since it isn't a forcemeat. Actually it's not meat at all! What's that? Yes! It's vegetarian. But what with all the eggs and cream and porcini, it certainly doesn't lack for richness, and it's perfectly at home on your cheese plate or just by itself next to a pile of crackers. Don't skip the topping, the pâté is all smooth, creamy, and cool, so the bite of the scallions and crunch of the pecans is a perfect counterpoint.

mushroom pate


Mushroom Pâté
Makes 2 mini loaf pans of pâté
Adapted from Vegetarian Cooking for Everyone by Deborah Madison

If you don't want to spring for porcini, any mix of dried wild mushrooms will work just fine, porcini just adds a bit more depth of flavor. Don't be intimidated by the long instructions, this isn't a super quick and easy! type recipe, but it's worth the effort, and you can make it four or five days ahead to no ill effect. Make it today, serve it Thursday. What more can you ask?

1/2 ounce dried porcini   
1 medium leek, sliced  
10 ounces cremini or white button mushrooms, sliced  
4 ounces shiitake mushrooms, sliced  
4 tablespoons (1/2 a stick) butter  
2 cloves garlic  
3/4 cup pecans  
salt  
pepper  
1 tablespoon thyme, chopped 
2 eggs  
1/2 cup cream  
2 tablespoons breadcrumbs (fresh or panko)
1 tablespoon lemon juice  
5-6 scallions, chopped 
1/2 cup parsley, chopped

Soak the porcini in 2 cups warm water for 30 minutes. Once they're soft, remove the porcini, finely chop, and then pour the liquid into a small sauce pan (leaving any dirt behind in the bottom of the bowl) and reduce the soaking liquid over medium heat to 2 tablespoons.     

Meanwhile, prepare the pans: butter two mini loaf pans, then line them with parchment and butter the parchment. I know it seems crazy but you do want to be able to get this out of the pan, right?

Preheat the oven to 325.

Heat a tablespoon of butter over medium-low heat, then add the leek and garlic and half a cup of pecans. Cook until the leek is soft, 8-10 minutes depending on your pan and how much you stir (enough so the garlic doesn't burn, ok?) Remove to a large bowl, but don't clean the pan. Melt another tablespoon of butter and cook 3/4 of the cremini mushrooms until tender. Add them to the bowl with the leeks, and season the mixture with salt and pepper. Taste it now, because you'll be adding raw eggs to it shortly. Cook the rest of the cremini, the shiitake and porcini mushrooms in one more tablespoon of butter until soft, then set aside in a separate bowl.

Make sure the leek mixture isn't too hot (just stick your finger in it), then add the eggs and cream and puree them (in a blender or using an immersion blender). Gently fold in the reserved mushrooms, the breadcrumbs and lemon juice.

Divide the batter (actually technically it’s a custard) evenly between the two prepared pans. Cover them with foil. Lay a clean kitchen towel in the bottom of a roasting pan or other baking dish with fairly high sides. Put the loaf pans on the towel, and fill the pan around them with very hot water (if your tap runs very hot, great, otherwise, set a few quarts on to boil when you start cooking. Look! You’re baking in a hot water bath! Bake for an hour to an hour and fifteen minutes, or until the center of the “loaf” is just barely set. Remove the whole contraption from the oven and let the loaf pans hang out in the hot water for an hour or so (they’ll finish cooking here and the center will set up firmly). Let cool to room temperature, then wrap in plastic and chill thoroughly, at least four hours or overnight.

Bring to room temperature before serving; give it about an hour on the counter (out of the pan). Slice the scallions and cook briefly in another tablespoon of butter, along with 1/2 cup chopped parsley and remaining 1/4 cup pecans. Top pâté with scallion mixture before serving with crackers or bread. 

Sunday, October 23, 2011

Quinoa with Kale and Sweet Potatoes

Fall in a Bowl

I'm never really sure what to call this kind of dinner. It's really a shame that there's no good name for it because I eat this sort of thing all the time. Cook a grain. Cook some vegetables. Put them together in a bowl. I think some corporate lunch spots refer to it as a "rice bowl" or something, but that makes it sound like something... from a corporate lunch spot. Hm.

So I'll just say it's a simple one dish dinner or an excellent side that comes together quickly: the kale and sweet potatoes cook while the quinoa simmers. And hey, look how pretty it looks next to the centerpiece I took from my cousin's wedding!

Quinoa Bowl

Quinoa with Kale and Sweet Potatoes
serves 2-3 as a light meal, or more as a side dish

A note on cheese: I used an aged goat cheese called Colombier from the cheese shop where I work, and I liked the flaky texture and tang in this dish. Classic chevre would be a good fit but creamier, or a sharp feta would be a great counterpoint to the sweet potato.

1 cup quinoa, rinsed
2 large sweet potatoes, peeled and diced
1 small bunch kale, stems removed, leaves cut into 1/2" wide strips
1-2 cloves of garlic, minced
1 large pinch red pepper flakes (optional if you like it spicy)
2 ounces tangy cheese of your choice (see note)
olive oil
salt and pepper
a beverage for the cook

Combine the quinoa and two cups of water with a hefty pinch of salt in a sauce pan, bring to a boil, then reduce to a simmer and cover. It should be done in about 20 minutes.

Heat a medium saute pan over medium heat, then add a tablespoon of olive oil and when it shimmers, add the sweet potatoes in one layer. Partially cover the pan and cook for a few minutes, then stir or shake the pan so the cubes of sweet potato flip and cook on another side. Repeat the steaming/shaking action a few times until the sweet potatoes are cooked. They'll be browned on a few sides, you might have to adjust the heat down a bit if they're browning faster than you'd like. This could take 5-10 minutes depending on the size of your dice.

Once the sweet potatoes are cooked, deglaze the pan with a splash of water, or wine or beer if you're drinking while you cook (ahem). The liquid will help you scrape up the brown bits from the bottom of the pan. Season the sweet potatoes with salt and pepper and remove to another bowl.

Add another little splash of olive oil to the pan, then add the garlic and chili flakes and cook for about 30 seconds until fragrant, then add the kale and saute, stirring, until wilted and tender. This could take anywhere from 2- 8 minutes, depending on how tender you like your kale. Season the kale with salt and pepper. Add the sweet potatoes back to the skillet if they've cooled.

By now your quinoa should be done (if it's done earlier, just shut off the heat and leave the lid on. It'll be fine.). Fluff the quinoa with a fork, then put some quinoa in a couple of bowls and top with the sweet potatoes and kale. Crumble the cheese on top and drizzled with a little more olive oil. Mmm, fall in a bowl*.

*You know, I thought about calling this post "fall in a bowl" but then I figured somebody might  think I ran around tripping and ending up in a cereal vessel. Nope. Autumn in a bowl just wasn't as catchy. Look at the dilemmas we bloggers face! My goodness.

Wednesday, August 3, 2011

Fried Squash Blossoms

Squash Blossoms

I was going to tell you about bread today since the weather has finally cooled off a bit, and I've got a loaf in the oven right now. BUT. Squash blossoms are in season. I saw them Monday at the Central Square farmer's market and I'm sure there are a couple of weeks left, but guys... it's August.

Washed Blossoms

August, meaning that it'll be September before we know it, meaning that we must gorge ourselves on summer food now, while we still can! What are you guys wolfing down right now? Corn? Tomatoes? Peaches?

blossoms

You might consider adding squash blossoms to the list. The most popular way to eat them is to stuff them with something tasty and fry 'em up, which is precisely what I did here.

Fried Blossoms

I did learn something cool from Zoe while I googled around on methods for stuffing and frying. You don't have to be so super careful not to rip the petals when you're cutting out the stamens, you just have to be deliberate and only tear it in one place. Then you can fold the flap over the filling and the coating will seal it shut in the frying oil. No need to twist it shut for round cylinders, flat things are easier to fry in less oil, anyway.

Dinner Blossoms

Stuffed Fried Squash Blossoms
serves 4 as a light meal (we had salad, too)

I served these with a simple tomato sauce: finely chop a small onion, sweat in a bit of olive oil, add a minced clove of garlic, then add a 15 ounce can of crushed tomatoes - I used the very last pint jar of home canned from 2010 - and simmer until thick. Add herbs (basil, oregano, marjoram) if you have them around. 

one dozen squash blossoms
1 cup ricotta cheese
2-3 tablespoons finely chopped fresh herbs: basil and oregano are great, sage would be nice, I think.
salt and pepper
one egg
1/2 cup flour
vegetable oil for frying

Fill a big bowl with cool water.

First, prep the blossoms: remove the calyxes (little green leafy things) from the base of the flower. Slit the petal in one spot all the way down to the green part and carefully cut out the stamen. Carefully swish the flower in the water and lay it, open, on paper towels to dry. Repeat with all the blossoms and allow them to dry.

Meanwhile, get the filling ready. Mix up the ricotta with the herbs and some salt and pepper. Taste it, make sure it's good. Once the blossoms are dry, pipe or spoon in a small amount of filling into each flower. Don't overstuff! It'll just leak out and make frying more difficult. Fold the flap over the cheese.

Beat the egg in a shallow bowl until well blended, season with a little salt and pepper. In another shallow bowl season the flour, too. In a heavy skillet, heat about an 1/8 of an inch of oil over medium-high heat. The oil is hot enough when a pinch of flour dropped in sizzles immediately. One at a time, carefully dip each filled flower in the egg, letting the excess drip off, and then into the seasoned flour, patting off excess flower so the coating is light, not clumpy. Fry until golden, a few minutes on each side, then drain on paper towels. Don't eat them right out of the pan or you'll burn your mouth on the hot cheese, make sure to give them a minute!

Monday, July 18, 2011

Roasted Carrots with Dill

roasted carrots with dill

Summer is truly hitting its stride, now. The markets are full to bursting with fruits and roots and leaves of every color. Last week I had a bunch of bright orange carrots in the fridge and I remembered a quick preparation I had seen in a magazine somewhere recently (I think it was Bon Appetit, again).

carrots

I roll cut these carrots because I think it's prettier than straight sided chunks: cut about an inch and a half from the tip of the carrot on a strong bias. Then roll the carrot toward you so the cut side is up and cut again on a strong bias. Roll it again so the cut side is up, and continue.

peas and carrots

These roasted carrots were excellent as the only warm component of my favorite kind of meal: a meal of snacks! Well, that is, a meal consisting entirely of "side dish" vegetables. I made some excellent cheese (which we schmeared on a toasted baguette slice with a sprinkle of pepper and a drizzle of olive oil) and a sugar snap and radish salad and we ate outside in the shade. Happy summer, indeed.

Roasted Carrots with Dill
serves 4 as a side

one bunch (8-10 medium) carrots, peeled and cut into chunks
one tablespoon olive oil
salt and pepper
2 tablespoons chopped dill

Preheat the oven to 425. Toss the carrots with the olive oil and season with salt and pepper, you can do this right in the baking dish. Roast until the carrots are tender (a paring knife can be inserted and removed with little to no resistance), 15-20 minutes, then remove from the oven and toss with the dill.

Monday, June 27, 2011

Grilled Vegetable Sandwich

Grilling veg for sandwiches

There's a little restaurant in Inman Square Cambridge called All Star Sandwich Bar. Yeah, you guys who've been there, I can see you nodding your heads. This place is ridiculously good and correspondingly popular.

grilling veg for sandwiches
Usually when we walk by on a Saturday around lunch time it's packed with a line out the door, but for whatever reason, two weeks ago at noon there were plenty of tables and since we just happened to be hungry, we stopped.

Building a sandwich
I ordered the tuna melt, not because I love a good tuna melt (though I do, in fact, love a good tuna melt) but because Adam ordered first and he totally ordered the sandwich I wanted! It's ok, though, because we went halvsies and split both sandwiches. Excellent perk of being married: I'm pretty sure he's legally obligated to share his food with me.

Stacked up high
The sandwich in question is the Grilled Vegetable Cubano. Traditionally, a Cubano is a sandwich with roast pork, ham, pickles and swiss cheese, pressed and grilled. It is a totally delicious sandwich, but this all veggie version is lighter and quicker to put together, since, you know, you don't have to roast any pork.

Brick it.

I used some soft crusted baguette-shaped bread I found at Whole Foods, standard baguettes would be too crunchy, so look for something more like a sub roll. What I should also have done is flip the sandwiches and grilled both sides, but I pre-heated the bricks so I assumed I was sort of grilling them both at the same time. Next time, I'll know better!

Grilled veggie sandwiches


Grilled Vegetable Sandwiches
inspired by the All Star Sandwich Bar

I made two sandwiches from one 12-14 inch loaf of bread, but we had a ton of veggies left over, certainly enough for another sandwich or two. If you're going to make more sandwiches, you might want to double the mayo. Incidentally, homemade mayo would be outstanding here should you have the time or inclination.

1/4 cup mayonnaise
2 tablespoons cilantro, chopped
1-2 teaspoons lime juice
pinch of salt
one medium eggplant
one medium zucchini
one yellow summer squash
one whole red bell pepper
1/2 a red onion
two portabello mushroom caps, or 8 large cremini mushroom
vegetable oil
salt and pepper
4 slices swiss cheese
some sort of dill pickle - I used green beans, but you could slice cucumber pickles to an appropriate sandwich thickness
enough bread for two sandwiches (see note above)


First, mix up the mayo: stir in the cilantro and lime juice and season with salt. You might have to adjust the seasoning with more lime juice or more salt, just make it taste good. Cover it and put it in the fridge until you're ready to assemble the sandwiches. 

Start a chimney full of charcoal for a charcoal grill, or preheat your gas grill. You're aiming for medium to medium-high heat. 

Slice the eggplant on a strong bias into thick slices, between 1/3 and 1/2 an inch thick. If you have time, layer the eggplant with some salt in a colander and weight it down for about half an hour to squeeze out some liquid and leech out some of the bitterness. If you have a fresh young eggplant this may not be necessary. Slice the zucchini and summer squash the long way into the same thickness, maybe a touch thinner. Cut the onion into thick wedges; keep the root end somewhat intact so the wedges don't fall apart. Take the stems out of the mushroom caps. Brush all the vegetables except the pepper with a light layer of vegetable oil on both sides and season with salt and pepper. 

On the pre-heated grill, roast the pepper until all the skin is charred. Place in a bowl, cover with plastic wrap, and allow to steam for 15 minutes or until cool enough to handle. Meanwhile, grill the onions, mushrooms, zucchini and summer squash. Rinse the salt off the eggplant (if you salted it), squeeze it dry with paper towels, and brush with oil and season. Grill the eggplant. With all the vegetables, you should cook them until they are soft with some grill marks. 

Peel the red pepper and cut it into large pieces. Discard seeds and stem.

Leave the grill on while you assemble your sandwiches. In fact, put your bricks on the grill while you assemble the sandwiches. Slice the bread in half, spread each side with a teaspoon and a half of mayo, or to taste. Starting from the bottom, layer in this order: swiss cheese, red pepper, onion, mushroom, eggplant, zucchini, summer squash, pickles, top of bread. 

Wrap each sandwich loosely in foil, then place it on the grill and weigh each one down with a foil wrapped brick. Careful, they're hot! Cover the grill and cook for five minutes or so, then (do as I say, not as I do!) carefully flip the sandwiches over and weigh again with bricks. Cover the grill for another couple of minutes or until the cheese is melted and the sandwich is completely awesome.  Remove from the grill, unwrap the foil, and slice the sandwiches. Serve with potato chips and a pickle, deli style. 

Thursday, June 23, 2011

Stuffed Zucchini

Stuffed Zucchini

I don't know if I can even express in words how awesome it is to have vegetables back. Seriously. I forgot how much fun it is to pull together dinner with whatever's around at the farmer's market, and things are finally ramping up. The markets are aaalmost in full on summer mode - I'm just waiting for that first good tomato sandwich!

On Monday I bought a couple of zucchini (plus some rhubarb and strawberries for an awesome batch of jam) at the Central Square Farmer's Market and then I scrounged around for what we had left in the fridge from my week of finals prep and came up with this: stuffed zucchini that manages to pull a ton of flavor from not a ton of ingredients. The secret is to season the zucchini once you've hollowed them out, that way you don't get stuck with delicious filling in a bland and boring vehicle. Season your boats, folks! Oh, and this is vegan, but you could use butter instead of oil if you wanted a little more richness.

Stuffed Zucchini
serves 2 as a light main, 4 as a side dish

2 medium zucchini, halved lengthwise
1-2 tablespoons vegetable oil
one leek, thinly sliced
5-6 mushrooms (I used cremini), halved and sliced
1 teaspoon chopped fresh marjoram
1/3 cup breadcrumbs
salt and pepper

Preheat the oven to 350. Use a spoon to scoop out the flesh of the zucchini and chop the flesh; you're going for something like little zucchini canoes. Lightly grease a baking dish with oil and put the zucchini boats in it, cavity side up, and season with salt and pepper. Put them in the oven to begin softening while you prepare the filling.

Heat the vegetable oil in a skillet and cook the leek over medium low heat until soft, about ten minutes. Add the mushrooms and cook until lightly browned and then add the chopped zucchini flesh and the marjoram. Cook another 5-7 minutes, stirring, until the mixture dries out some.

Remove the zucchini boats from the oven and spoon the filling evenly into them - careful, it's hot! Season the breadcrumbs with salt and pepper and top the zucchini with breadcrumbs. Return the dish to the oven for 20-30 minutes or until the breadcrumbs are browned and the zucchini boats feel soft when poked with a toothpick or paring knife.

Wednesday, June 22, 2011

Wheat Berries

Wheat Berries

I made wheat berries for the first time today. I bought some on a whim on our last trip to Christina's, and I used them for a stir-fry of sorts for dinner tonight with carrots, CSA garlic scapes and arugula, and some mushrooms I found lurking in the crisper drawer. It was not my best work, so I ask you: what's your favorite recipe using wheat berries? Clearly I need a little guidance.

Thursday, February 10, 2011

Celery and Potato Soup with Tarragon Yogurt Swirl

Celery and potato soup

Did you see Grey's Anatomy last week? One character is cooking for another and she says she's adding tarragon, even though she has no idea what tarragon tastes like, but that adding tarragon makes you sound like you know what you're doing.

[Aside: Yes, I still watch Grey's, and don't you judge me. Did you know that there are people out there writing Grey's fan fiction? I didn't know until I googled the tarragon quote.]

And that's the thing about tarragon; it's sort of a tricky herb to use. If you can figure it out, you will definitely look like you know what you're doing. It tastes a little licorice-y, like fennel, but not nearly as strong as a black jellybean. Floral, fragrant, interesting. Goes very well in chicken salad, and in this soup, specifically in that it makes potatoes and celery (cheap-o pantry staple type vegetables) taste like a million bucks.

Celery and Potato Soup with Tarragon Yogurt Swirl
Adapted from Bon Appetit
serves 4-6

6 green onions or scallions, chopped
1 tablespoon plus 2 teaspoons olive oil
1 lb celery, chopped, including leaves
1 lb white skinned potatoes, peeled, cut into 1 inch chunks
1/4 teaspoon celery seeds
1 - 2 teaspoons salt
1/8 teaspoon white or black pepper
4 cups chicken or vegetable broth
1 tablespoon lemon juice (you may only need a few drops, really)
1 cup cubed bread (sourdough or baguette or whatever you have)
2 tablespoons plain yogurt
1 teaspoon fresh tarragon, chopped as fine as you can

Heat a tablespoon of olive oil in a pot and saute the green onions over medium-high heat for a couple of minutes until they start to soften. Add the celery and celery leaves, potatoes and celery seeds, saute another minute, then add the chicken or vegetable broth. Bring soup to a boil then reduce heat to medium and simmer until all the veg is soft, 15 to 20 minutes.

Meanwhile, make the tarragon swirl: mix the yogurt and fresh tarragon in a small bowl, set aside. Toss the bread cubes with a teaspoon or two of olive oil, 1/2 teaspoon salt and a little fresh black pepper, then toast the cubes in a low (300 degree) oven or toaster oven until crispy, set aside.

When the potatoes and celery are tender, shut off the heat and puree the soup in the pot using an immersion blender, or puree it in batches in a traditional blender. Put it back on the heat to warm up if it's cooled down, and season with salt and pepper and a few drops of lemon juice. Taste and adjust seasoning. Serve topped with tarragon cream and croutons.

Sunday, January 16, 2011

Tagliatelle with Brussels Sprouts, Walnuts and Gorgonzola

Pasta with brussels sprouts, walnuts and blue cheese

This is not the pasta I ate tonight. Today I practiced making tortellini for my upcoming midterm and made a big batch of marinara. But what if, say, you're watching your team fumble themselves out of the playoffs and you just don't have time for homemade pasta? Or you have a bunch of brussels sprouts and you're sick of roasting them? Then this is the pasta for you, my friends.

This is not a subtle dish to be sure. Brussels sprouts can be bitter if overcooked so make sure you don't cover the pan when they're cooking, and don't stir too often! You want to make sure they get some nice golden brown bits on them. Gorgonzola is a good strong blue, but I think cambozola (a triple cream blue) would be a nice choice here as well.

Tagliatelle with Brussels Sprouts, Walnuts and Gorgonzola
serves 2-4

1 1/2 lbs brussels sprouts, trimmed and roughly chopped
1 onion, thinly sliced
1/2 cup chopped walnuts (or more)
2 ounces (ish) gorgonzola or other blue cheese
tagliatelle or fettucine
olive oil
salt and pepper

Heat the olive oil over medium heat in large skillet. Saute the onion until translucent, then add the chopped brussels sprouts. Cook over medium heat until the sprouts are tender and starting to turn golden. Season with salt and pepper to taste (be generous, you're about to add a bunch of pasta).  Toast the walnuts in a dry skillet or a 350 degree oven (I use the toaster oven) for a few minutes until they smell extra nutty. Be careful not to leave toasting nuts unattended, they go from toasted to burnt in an instant.

Meanwhile bring a large pot of salted water to a boil for the pasta. Cook the pasta until al dente; note that if you're using fresh pasta this will only take a couple of minutes, otherwise the timing will depend on the type of dry pasta you choose. If you forget to start the pasta until the sprouts are ready, just turn down the heat on the sprouts and let them hang out over a super low flame for a while, it'll be ok.

When the pasta is al dente and the brussels sprouts are done to your liking, use tongs to transfer the pasta from the cooking water into the saute pan. A little water clinging to the noodles is a good thing, it'll keep everything moist. Add the toasted walnuts and toss the pasta and sprouts together long enough to heat the sprouts back up if they've been resting. Taste and adjust seasoning if necessary (mine needed more salt and pepper). Dish the pasta out into serving bowls and top with blue cheese and a little drizzle of olive oil.

Thursday, January 13, 2011

Sesame Bok Choy

Sesame bok choy

Hello again, friends. How were your holidays? Things got a little crazy for me (ahem, hence my long absence), working most days I wasn't at school and traveling a lot. We spent Thanksgiving with my parents in Maine and the week of Christmas in Oklahoma with Adam's family (including our adorable nephew Eliot, squee!).

This bok choy isn't much like what I've been cooking lately. My midterm practical exam was supposed to be yesterday but, uh, it got snowed out. Anyway, I did a bunch of practicing this past week: lemon souffles, braised beef in red wine, puff pastry to hold the beef, poached salmon with beurre blanc, roasted chicken and veloute to go with it, creme brulee, mayonaisse, hollandaise, cheese danish for New Year's Day brunch, and the list goes on. Please note how much butter and cream and wine goes in all of these things. Oof.

Even though I still have to take the exam (it's been rescheduled to next week), this afternoon I just could not take it anymore. I wanted something simple and a little spicy, so I sauteed some greens with garlic and red pepper flakes and called it lunch.

Sesame Bok Choy
serves 2 as a side dish or 1 as a light lunch

If I had any rice in the fridge I would have put this bok choy on top of it, but I didn't. So I just ate it plain, on the couch, watchng Desperate Housewives on Netflix. And now you know how I unwind after spending the morning studying for the written exam, which is on Saturday. Heh. I found this pleasantly spicy but if you're looking for more heat, increase the red pepper flakes. The other good thing about this is that it took me all of ten minutes from getting the bok choy out of the fridge to eating. Yay! 

1 head bok choy, sliced crosswise into half inch wide strips, separated into rib pieces and leaf pieces
2 tablespoons vegetable oil
2 cloves garlic, thinly sliced
1 large pinch red pepper flakes
several dashes soy sauce
a few drops of toasted sesame oil
sesame seeds for garnish

Heat the oil in a large skillet over medium high heat until hot but not smoking and add the garlic and red pepper flakes. Saute, moving everything around the pan so it doesn't burn, until the garlic just begins to take on color.

Add the stem pieces of the bok choy - they take longer to cook, so adding them to the pan first ensures everything will cook evenly. Give them a minute or so until they just start to soften, then add the leaf pieces of the bok choy and continue to cook over medium high heat until the leaves wilt, just a few minutes.

Turn off the heat. Add a few dashes of soy sauce and a couple drops of sesame oil and stir it all around. Take a bite. It might need more soy sauce. Remove to a plate, garnish with sesame seeds, and enjoy.

Thursday, November 18, 2010

Momofuku's Soy Pickled Shiitakes

Momofuku's soy pickled shitakes


I pickled these mushrooms to go with a feast of sorts we had on Sunday. I needed a big project to kick myself off the couch and back into the kitchen, and since it was decidedly soup weather, it seemed as good a time as any to tackle pho. I used a mash up of Andrea Nguyen's recipe, and the interpretation of it over at Steamy Kitchen. (Aside: any Boston area readers know where I can find yellow rock sugar? I couldn't track it down at the Reliance Market in Union Square.)

The pho broth simmered for a few hours while I pleated dumplings and Adam put the leaf in the table. I whizzed raw shrimp in the food processor - not very pretty, but the shrimp toasts were delicate and crunchy, so it was worth the cleaning (ahem, Adam does the dishes). And then I pickled these mushrooms. They practically sing in your mouth, they are so flavorful and vibrant. I've been eating the leftovers out of the fridge every time I walk by, and I bet they'd be fantastic in a cold noodle salad.

Soy Pickled Shiitakes
Adapted, just barely, from Momofuku

Dried mushrooms at the regular grocery store can be pricey, but if you head to an Asian market you can get a one ounce bag for ninety-nine cents. Just be warned, once you start exploring the aisles you may not be able to stop at just mushrooms. 

4 cups (loosely packed) dried shiitake mushrooms - about 3 ounces by weight
1 cup sugar
1 cup soy sauce
1 cup white wine vinegar (or sherry vinegar if you can find it, I couldn't)
1 thumb-sized knobs of ginger, peeled

Re-hydrate the mushrooms in hot water (doesn't have to boil, just really hot) for 15 minutes or so or until the mushrooms are softened. Once the mushrooms are soft, lift them out of the soaking liquid; strain the liquid through cheesecloth or a fine mesh strainer to remove any sand or debris and reserve the liquid. Remove the stems from the mushroom caps and discard. Slice the caps into 1/4 inch wide slices.

Combine the mushrooms with 2 cups of the reserved soaking liquid, sugar, soy sauce, vinegar and ginger in a sauce pan. Bring to a simmer over medium heat, then reduce heat and simmer (gently, please) for 30 minutes. Allow the mushrooms to cool in the liquid.

Pack the pickled mushroom slices into a quart size container and add enough of the cooking liquid to cover. They'll keep in the fridge for a month or more, but they're ready to eat now, hooray!

Tuesday, September 28, 2010

Tofu and Tomato Stir Fry

Tofu and Tomato Stir Fry

This is weird, right? Tofu and tomatoes together? I know, that's what I thought, too. Tomatoes are not the first thing I think of when I think tofu (soy sauce is the first thing I think of when I think tofu). And tofu is not the first thing I think of when I think tomatoes (basil is). And I admit, it took me a few bites to decide that I liked this; it's not clear immediately that they play well together. Which I guess is really not something I should say if I want you to make this, huh?

242/365 Tomato Butt

However, I had an overflow of tomatoes from our CSA (clearly I made this a few weeks ago) and I  didn't want pasta or caprese or tomato sandwiches... and I had tofu in the fridge. So I googled. And  came across this little number on Epicurious, from Charles Phan, the chef at the famed Slanted Door restaurant in San Francisco. I was skeptical, but you can't learn if you don't try, right? And while it wasn't the obvious home run combo of chocolate and peanut butter or figs and bacon, tofu and tomatoes was good. Good enough that you shouldn't discount it immediately, is what I'm saying. Give it a try. I'm curious to know what you think.

243/365 Fried Tofu

Since I am, ahem, prone to adjusting recipes based on what I have, I made a few changes to the original. First of all, I don't often deep fry at home, so I used my usual tofu frying method: shallow oil, cast iron skillet. If you wanted it crispy you could dredge it in corn starch first. I added a bell pepper because there was one in the crisper. And I used rice vinegar instead of mirin because I was out of mirin. You could add more vegetables if you had them, I bet broccoli rabe or arugula would be a nice counterpoint to the sweetness of the tomatoes.

Tofu and Tomato Stir-Fry
Serves 3-4

I like to press my tofu before I slice and cook it so it lets go of a lot of water and absorbs the marinade better. I find that it improves the texture and makes it easier to stir-fry. I prop up one end of a cutting board so it slopes into the sink at just a slight angle, then put the tofu on the cutting board. Lay a paper towel on the top of the tofu, then balance a saute pan on top and put a couple of cans of whatever's in the cupboard in the saute pan to give it some extra weight. Then I just leave it alone for half an hour or so. It's less precarious and easier to set up if you don't  make the cutting board slope into the sink, but then the tofu just sits in a puddle of its own liquid instead of really draining. Remind me to take a picture of this step next time I blog about a tofu recipe...

14 ounces firm or extra firm tofu (I generally buy Nasoya brand, which comes in 14 ounce packages, but up to a pound is fine), cut into bite-sized cubes
1/4 cup canola or vegetable oil
3 tablespoons soy sauce
1 tablespoon sriracha or similar hot chile sauce
3-4 medium sized ripe tomatoes, cut into wedges (about a pound)
3 cloves garlic, minced
1/2 a large onion or a whole small onion, sliced
1 bell pepper, sliced into strips
2 tablespoons rice vinegar (preferably unseasoned)

cooked white or brown rice for serving
basil chiffonade or sliced green onions for garnish

Mix the soy sauce and sriracha together in a medium bowl. Pat the tofu pieces dry, then add them to the marinade in the bowl, tossing gently to coat each piece. Let stand 15 minutes while you cut the vegetables.

Heat the canola oil in a large wide skillet over medium high heat. Add one piece of tofu; if it sizzles, add the rest. You may have to do this in batches. Cook, turning occasionally so all sides brown, until the tofu is golden brown and crispy on the edges. Remove from pan and drain on paper towels or a paper bag.

Turn the heat down to medium and add the onion slices, cook for 2 minutes until the onion is just starting to go translucent, then add the garlic and bell pepper strips. Cook for about a minute, stirring constantly so as not to let the garlic burn, until the pepper is just tender (it will still be crispy, add it with the onion if you prefer a softer pepper). Add the tomato wedges and cook for just a couple of minutes until the tomatoes start to break down and give off juice. Add the rice vinegar and cook for about a minute to deglaze the pan, then add the tofu to the pan and stir to combine everything, then remove from heat and serve over rice. Season with salt (or soy sauce) and garnish with strips of basil or green onions if you like.

Thursday, September 16, 2010

Stone Soup Farm CSA Week Fifteen

257/365: Stone Soup Farm CSA Week Fifteen

I know I said this last week, but I love this part of the year, all the jumping back and forth between fall produce and summer vegetables. Last week we got acorn squash and cabbage, this week eggplant and corn. And also: two pounds of carrots, two tomatoes, three big potatoes, a few onions, a head of broccoli, and a bunch of parsley.

It feels like I haven't quite gotten my fill of eggplant yet this year (I've actually got another eggplant recipe on the docket), so I bought another eggplant at the farmer's market on the way home from picking up the CSA. Last week's cabbage was still in the fridge, and I thought they might be nice together. I tossed the sliced eggplant with a little oil and some five spice powder, then baked it at 400 degrees for about 20 minutes. I like baking eggplant because you can use much less oil - eggplants are super absorbent, and if you cook them in a pan with oil every time you turn around the pan will be dry. I sauteed the shredded cabbage with some homemade hot sauce and added some soba noodles for bulk. Hot spicy plus five spicy equals delicious dinner.

258/365: Spicy Cabbage and Five Spice Eggplant

Five Spice Eggplant with Spicy Sauteed Cabbage
serves 2-3

I thought about calling this a stir-fry because it's sort of in that vein, but, um, I baked half of it. If you didn't make your own hot sauce (but why? it's so easy and delicious!) then use sriracha or something similar. I'd use two small eggplants instead of one large one, and if you can find the skinny Japanese kind, that would be ideal. Don't use the biggest eggplant you can find, the big ones are often bitter so it's not really a good shortcut.

2 small eggplants
3 tablespoons vegetable oil
1 1/2 teaspoons five-spice powder
1/2 teaspoon dark sesame oil
1 medium head napa cabbage
1 tablespoon chili garlic hot sauce (more or less to taste)
2 cloves garlic, minced
2 more tablespoons vegetable oil
another 1/2 teaspoon sesame oil
1/2 package soba noodles
salt
chopped chives for garnish

Preheat the oven to 400. Slice the eggplants about 1/3 inch thick in halves or quarters depending on the size of the vegetable. Combine three tablespoons of vegetable oil, 1/2 a teaspoon of sesame oil and the five-spice powder and toss with the eggplant slices, making sure each slice is coated. Line a baking sheet with aluminum foil and lay the eggplant slices out on it in a single layer, sprinkle with salt, then bake for 20 minutes. You may want to flip them once if you think of it.

Slice the cabbage into thin strips. Heat a large saute pan over medium high heat add two tablespoons of vegetable oil. Add the cabbage, in batches if necessary - maybe let half of it cook down before you add the other half. After a all the cabbage is in the pan, add the garlic and hot sauce and continue cooking until cabbage is just tender. Turn off the heat if the eggplant isn't done yet.

Meanwhile, bring a pot of water to a boil and cook the soba noodles according to package directions.

When the eggplant is tender, remove it from the oven and add it to the pan with the cabbage. When the noodles are done, drain them and add them to the pan as well. Toss to combine, plate, and garnish with chives.

Thursday, August 19, 2010

Stone Soup Farm CSA: Week Eleven (and Gazpacho!)

Stone Soup Farm CSA Week Eleven

People keep talking about how summer is winding down, and folks, I'm not having any of it. Nope. Nosiree, not interested. Do not talk to me about back to school sales or beef stew or halloween, because I am not ready for summer to end. I mean, look at that pile of vegetables. Does that say "end of season" to you? We got: a bunch of huge scallions, six tomatoes, two pattypan squashes, spinach, basil, cucumbers, potatoes and some really gorgeous string beans in purple and yellow.

I'm not sure what possessed me to make gazpacho with this haul. I first had gazpacho in the eighth grade when I was intrigued by the name - say it with me. gazzzzPacho! throaty G, smooth Z, explosive P, and a nice long ooooo at the end -  However, I was at some chain restaurant (maybe Chili's?) when I ordered it and when I tasted it all I could think was ugh, runny salsa... and they're passing this off as soup? I spent the next fifteen years saying I didn't like cold soup.

Dudes, I was wrong. I do like cold soup. This is just exactly the ticket for those insanely humid days when just picking up a knife is enough to make you break a sweat, because even though it involves a fair bit of chopping, you let the blender do all the hard work.

229/365: Gazpacho
 
Simple, Straightforward Gazpacho
serves 2-4

Because you blend the whole thing up till smooth, there's no need to peel the tomatoes, but you do want to peel the cucumbers because the skins can be waxy. You can use any kind of tomato you like, here. I used two CSA tomatoes, plus a few romas from our container garden. Imperfect tomatoes can be used in gazpacho, too, because there's no need for lovely presentation of whole slices, you just chop, blend, and chill. Easy and delicious! Oh, and if you want this soup to be vegetarian or vegan, skip the worcestershire sauce (it has anchovies) or use soy sauce instead. 

1 1/2 lbs tomatoes, roughly chopped
1 jalapeno, seeded, minced
1 huge or 2 regular cloves garlic, finely chopped or passed through a press
scant half an onion, roughly chopped
2 small cucumbers, peeled, roughly chopped
1 tbsp red wine vinegar
1 1/2 tsp worcestershire sauce
2 tablespoons olive oil, plus more for garnish
2 tablespoons chopped parsley, plus more for garnish
salt and pepper
1/2 an avocado, cubed, for garnish (optional)

Combine the tomatoes, jalapeno, garlic, onion, cucumbers, vinegar, worcestershire sauce (or soy sauce), parsley, olive oil, 3/4 teaspoon salt and several grinds of black pepper in a blender or food processor, or in a pot if using an immersion blender (that's what I did). Blend to desired consistency (but don't leave it too chunky or you'll end up with the cold runny salsa thing). Chill for at least an hour or up to overnight. Ladle into bowls, garnish with avocado if you like, drizzle with a little more olive oil, and serve. Garlicky toasted baguette makes a nice accompaniment.

Thursday, July 29, 2010

Stone Soup Farm CSA: Week Eight (and classic bruschetta)

Stone Soup Farm CSA: Week 8

What a colorful week! We got a very heavy load of: a small watermelon, five baby yellow zucchini, a big bunch of carrots, two cucumbers, two tomatoes (the first tomatoes!) a baby eggplant, a bunch of basil, a bunch of arugula and FOUR ears of corn.

Positively thrilled by the tomatoes (tomatoes! tomatoes! they're here!), I wanted to keep it simple so I could really savor them. So I chopped 'em up and slapped 'em on some toast. I pushed a couple of cloves of garlic through a press - you could mince, too. Then I added a splash of a mild balsamic vinegar to mellow out the raw garlic. Next up, three chopped tomatoes and three tablespoons of basil chiffonade (rolled up like a cigar and sliced into strips), then seasoned it with salt and pepper and doused it with a tablespoon or so of olive oil.

208/365: Bruschetta

A little stir and a 10 minute rest later, here's the finished product piled on some crunchy toasted baguette slices. Oh, and that green toast-topper in the background is two cucumbers, peeled, seeded and grated, mixed with salt, pepper, two tablespoons of chopped fresh dill and a dollop of yogurt. Yeah, we like snacks for dinner. What's your favorite thing to put on toast?