Monday, March 29, 2010

I met a legend!

You guys! No recipe today, but I have to tell you: I met Jacques Pepin last week! Ok, so more like, I listened to him talk and then bought his memoir and he signed it and let me take a picture with him. But still. So cool.

Last Thursday afternoon Kate asked via twitter if I was going to an event at BU featuring Judith Jones, Alex Prud'homme and Monsieur Pepin... and I promptly bought a ticket and sent an apologetic email to my very understanding friends, begging off from a restaurant week dinner. I ended up eating a granola bar and some goldfish crackers for dinner, but listening to these personal-hero-type people discuss their lives, Julia Child, and the state of food in general was more than worth it. And it's always fun to meet blog friends in real life!

PS, Kate's description is much more thorough than mine.

Tuesday, March 23, 2010

Baked Beans with Honey and Dill


After the glorious weather we had this weekend (it was 70 degrees and sunny on Saturday!), it's rather difficult for me to come back to you with this recipe. I want to tell you about spring breezes, runs in the sunshine, and the crab cakes and asparagus we ate on Sunday! I want to tell you that we planted our first seeds this weekend: tomatoes, eggplant, basil, and hot peppers, which will live indoors getting a head start for the next 8 weeks or so. I want to tell you about the amazing surprise of my two best friends showing up at my door on Friday night from Atlanta and New York to spend the weekend hanging out and helping me pick out a wedding dress!


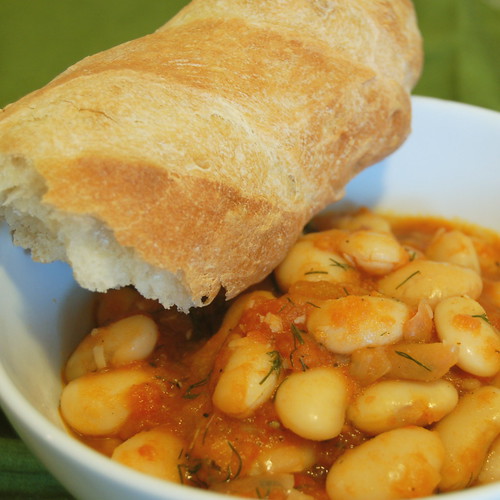
Alas, today the weather is back to true New England spring: rainy and cold. Delicate little salads and spring vegetables are not quite what I want to eat after I've slogged home in rubber boots, fighting with my umbrella. Instead, I want something warm and stewy, preferably something that I can sop up on a piece of bread. These baked beans with honey and dill from the New York Times fit the bill nicely.

Greek* Baked Beans With Honey and Dill

I used Rancho Gordo runner cannellini beans for this, and soaked them for a few hours but not overnight. Rancho Gordo beans almost always cook up faster for me than grocery store beans, but regular old white navy beans would work well here, too.

1 pound dried white beans, soaked for 4-6 hours or overnight, drained
1/4 cup olive oil
1 large onion, chopped
1 28-ounce can chopped tomatoes (I used a quart of tomatoes I canned last summer)
1 bay leaf
3 tablespoons honey
2 tablespoons tomato paste
1/4 cup red wine vinegar or sherry vinegar
Salt and pepper
1/2 cup chopped fresh dill (I used 3/4 of a cup, but I loooove dill)

In a large dutch oven (you want something ovenproof with a lid), combine the drained beans and enough fresh water to cover by a couple of inches. Bring to a boil over high heat, allow to boil for 5 minutes, then reduce heat to low, cover, and let simmer for 30-60 minutes (I'll explain how to check if they're done in a second). You want a couple of bubbles breaking the surface every few seconds, adjust the heat accordingly.

Preheat the oven to 375. In a skillet, heat the olive oil over medium heat, and saute the onion for 10 - 15 minutes or until lightly caramelized. If onion is browning too fast, lower the heat. Remove from heat.

Check the beans: If you lift a few out on a wooden spoon and blow on them gently, do the skins peel away? They're ready for the next step. Drain the simmered beans, then return them to the dutch oven. Add the rest of the olive oil, the tomatoes and their liquid, the bay leaf and honey, the onion, and enough water just to cover the beans. Bring to a simmer over medium heat, then cover and place in the oven. Bake for an hour, stirring every 10 minutes and adding water if the level gets below the top of the beans. (You could also do this on the stove top over very low heat, but then they're not technically "baked" beans and it may take a little longer.)

After the beans have been in the oven an hour, take the pot out and add the tomato paste, vinegar, and salt and pepper. I started with a teaspoon of kosher salt and a half teaspoon of black pepper.

Cover and simmer on the stove top for another 30 minutes, until the beans are tender and the stew has thickened.

Stir in the dill, and let sit off the heat for 15 minutes. Taste the beans; they may need more salt. Serve with bread for dipping.

Serves 6.

*I put Greek in quotation marks because I don't know how authentic this recipe is. I don't actually care, because it's quite tasty, but just because it's got honey and dill doesn't make it Greek. Sort of like adding salsa doesn't makes something Mexican and adding peanuts and lime doesn't make something Thai.

Thursday, March 11, 2010

Chocolate Orange Brownies


Do you remember Terry's Chocolate Orange? This UK import is most popular in the states around the holidays, when I think it's supposed to evoke some prehistoric memory of when an orange in your stocking was a highly coveted prize from the man in red. In case you've never seen one, it's a spherical milk chocolate confection flavored with orange oil and separated into segments in the style of an actual orange. To eat one, you follow the directions on the label: whack and unwrap! Give the butt of the faux-range a solid thwack on the table, then peel off the foil. If you've hit it right, the segments will fall away from each other in 20 identical pieces for you to share with 19 friends or to savor over the course of 20 days or, let's be serious, to eat all at once in front of an Ab Fab marathon.


The one and only time I had a Chocolate Orange of my own was at least 10 years ago. I don't remember where it came from, but I do remember sitting in my high school drama coach's classrom and giving the orange a timid tap on the desk in front of me. Someone told me I had to hit it harder, and when I did, the whole thing shattered instead of separating neatly. It was so traumatizing I never had another one.

Ok, not really. I mean, it was not traumatizing, but I haven't eaten a Chocolate Orange since high school - that part's no joke. Given that it's been so long since I've eaten one, I'm not sure why this recipe in the letters section at the beginning of this month's Bon Appetit caught my eye the way it did, but boy am I glad it did. These brownies are cakey, not fudgey which is my usual preference, but they pack a real whallop of orange flavor, and it sets off the bitterness of the natural unsweetened cocoa powder quite nicely. The chopped toasted pecans add an interesting texture, but if you're nut sensitive or just out of pecans, chocolate chips would make a nice substitute, or you could just skip the textural bits all together.
 
Chocolate Orange Brownies
adapted from Bon Appetit, March 2010, which was adapted fromthe Homepage Cafe in Bozeman, MT
makes 16 cake-like brownies

Nonstick spray
1/2 cup hot water (almost boiling)
6 Tbsp natural unsweetened cocoa powder
1 1/4 cups dark brown sugar
3/4 cup all purpose flour
1/2 tsp baking soda
1/2 tsp baking powder
1/4 tsp salt
1 cup pecans, toasted and chopped
2 large eggs
10 Tbsp butter (1 1/4 sticks) melted and cooled
1/2 tsp vanilla extract
zest of one orange

Preheat the oven to 350˚. Melt the butter so it has time to cool off while you  prepare the rest of the ingredients.

Spray an 8x8 or 9x9 square metal baking pan with 2 inch sides with nonstick spray. (I used 8x8 and I had to adjust the baking time up by a few minutes; the recipe is written for a 9x9 pan but I don't have one of those.)

Whisk the 1/2 cup hot water with the cocoa powder in a small bowl (I used the same mug I microwaved the water in). In a medium bowl, whisk together the flour, brown sugar, baking bowder, baking soda and salt until they are well combined. Stir in the pecans. Whisk the eggs in a large bowl, then add the butter, orange zest and vanilla and whisk to combine. Whisk in the cocoa mixture. (While you're adding the warm things - the butter and cocoa mixture - make sure you add them slowly while whisking, so the heat doesn't scramble the eggs.) Add flour mixture, switch to a spatula or spoon and stir just until the flour disappears - don't overmix it.

Pour the batter into the oiled pan, and bake in the center of the oven, turning once for even baking, for 30 minutes. If using an 8x8 pan they may require another 2 minutes or so. A toothpick or small knife inserted in the center should have a couple of small crumbs attached. Cool the brownies completely in the pan on a cooling rack, then cut into 16 squares and enjoy.

Tuesday, March 2, 2010

Fried Chickpeas with Sausage and Spinach

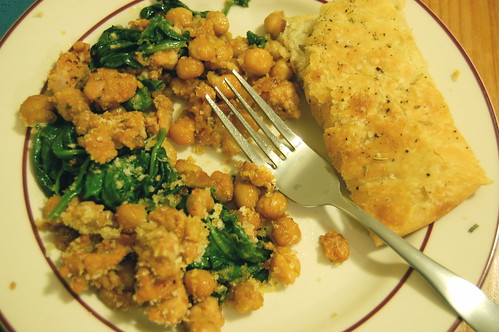
I have a thing for garbanzo beans. I eat them at least three times a week in soup, or salads, or as hummus, and I'm always on the lookout for a new way to use my favorite bean. When I saw Mark Bittman's Fried Chickpeas with Chorizo and Spinach in last week's New York Times I put it immediately into rotation.

I followed the method and the main ingredients of the recipe, but I did make one pretty big change. Instead of chorizo, I used spicy chicken sausage that I squeezed out of the casings and broke it into bits as it cooked. I wanted to stay true to the flavors of the original, so I added a scant half teaspoon of smoked hot paprika (pimentón de la vera) as the chickpeas and sausage cooked, and I think I could have been more generous with it.


Finally, I forgot the sherry. Oops! I didn't have any in the house, but I had thought it through and I was going to use dry vermouth or maybe a splash of vinegar to cut some of the oil a bit, and while I LOVED this the way I made it, it was missing that added depth that wine gives a dish. When I make it again (which will be very soon) I will not be so forgetful.

Fried Chickpeas with Sausage and Spinach
adapted from Mark Bittman at the New York Times
serves 3-4

Don't skip the drying off the chickpeas step, or they won't get crispy and browned, they'll just stay sort of mushy. I like mushy beans just fine, but that's not really what you're going for here.

1/4 cup olive oil
1 can (or two cups) cooked chickpeas, rinsed and patted dry with paper towels
3 links spicy chicken sausage, casings removed (1/2 - 3/4 lb)
1/2 teaspoon hot smoked paprika
salt and pepper
10 oz spinach (if you use grown up spinach, remove the tough stems and tear the leaves into smaller pieces)
approximately 1 cup bread crumbs (I used panko, but homemade breadcrumbs -sandwich bread whizzed in the food processor - would be ideal here)
1/4 cup sherry, dry vermouth or white wine OR a splash of wine vinegar

Heat the olive oil in a large ovenproof skillet over medium heat. When hot, add the chickpeas in one layer and cook, shaking or stirring occasionally, for five minutes. Then add the pimentón and chicken sausage, breaking it up in the pan with a wooden spoon. Cook for another 5-10 minutes until the sausage is cooked through and the chickpeas have taken on some color. Remove to a bowl using a slotted spoon.

Add the spinach and sherry to the oil remaining in the pan and saute until the spinach is thoroughly wilted down and liquid has evaporated, 5-8 minutes. Season with salt and pepper, then add the chickpeas and sausage in one layer on top of the spinach. Turn on your broiler.

Sprinkle the dish with the breadcrumbs, drizzle with a little more olive oil if you like, and stick it under the broiler for a couple of minutes until the breadcrumbs brown.

Friday, February 26, 2010

Oven Poached Fish in Olive Oil


I have mixed feelings about the month of February. I mean sure, my birthday is in February, so that's usually pretty fun, but it's just so dreary sometimes, you know? On the other hand, it's so short! It's over so fast! But then again, that's a bad thing, too. Rent is due faster than you expect. March sneaks up on you. Here it is the two days before the end of February and I was all, oh, I've got time for my Gourmet Unbound post, it's only the 26th.

HA! Not so. Luckily, I glanced at the calendar at 4:45 this afternoon and noticed the rapidly approaching deadline.  I have lots of baking planned for the weekend, so I wanted to do something quick and easy from Gourmet for tonight's dinner. This oven poached fish in olive oil fit the bill.


As is my wont, I tweaked a tiny bit. Mostly since it was just the two of us for dinner tonight, so I cut the original recipe in half. I didn't garnish with more parsley at the end (gasp!), and I served the fish over a huge pile of spinach. And I do mean huge; we ate an entire 10 oz bag between us. You know that squidgy, frictiony feeling you get on your teeth after eating spinach or lemon? Big time. But worth it.
 
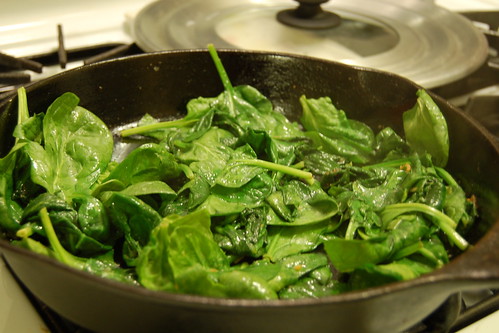
This recipe is dead simple, the only thing is that it takes an hour for the fish to poach, so start it right when you get home from work.  I waited until the fish was done, then sauteed a bag of spinach (washed, stems removed) in a few spoonfuls of oil from the fish pan. There will be plenty of leftover lemony, capery, fishy oil, when I come up with a way to use it in the next couple of days (salad dressing?) I'll let you know in the comments.


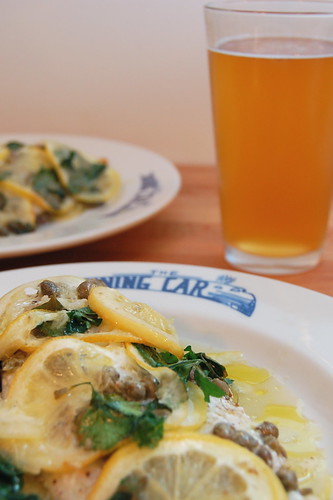
It's a layering game from the bottom up: start with the less attractive lemon slices (about half), then the fish, then salt and pepper, then capers, the pretty lemon slices and parsley. I wasn't sure whether to chop the parsley or not, but when it came out of the oven and a few of the parsley leaves were crispy from sitting up above the bath of olive oil. I see no problem with that at all.


Oven Poached Fish in Olive Oil
Gourmet, March, 2000


Don't be intimidated by the cup of olive oil. Very little of it sticks to the fish, so there's a ton left in the pan.

two fillets of cod, halibut or another white fleshed fish
1 cup olive oil
1 lemon, sliced as thinly as you can manage
3-4 tablespoons capers, rinsed if salt-packed
1/4 cup flat leaf parsley
salt and pepper

Preheat the oven to 250˚F.

Pat fish dry, and let sit at room temperature for 10 minutes to take the chill off (say, while you slice the lemon). Line an 8x8 inch baking dish with the least attractive half of your lemon slices. Lay the fish over the lemon slices.

Coarsely chop half the capers, then mix them back in with the whole capers, and sprinkle them over the fish. Top this with the prettier half of your lemon slices, then the capers, prettier lemons, and parsley. Stick it in the oven for an hour. If you're cooking 4 filets you may need an hour and fifteen minutes, but either way, cook it until the fish is flakey and cooked through.

Tuesday, February 23, 2010

Black Pepper Brioche Burger Buns


After our self-imposed vegetarian stint last month, I'm finding that I don't actually even want to eat meat all that often. In fact, while we have recently ordered meat dishes in restaurants, we haven't prepared it at home in... I don't know how long. I actually can't think of the last time we- oh wait, we made that chicken braised in milk like a month ago. Man, that was good. But I digress!

So last week when the craving for burgers hit me like a sack of iron deficiency, I knew it was time to break the meat drought (er, apologies for that somewhat icky metaphor). Conveniently, my friend Evan, a fellow home-cooking enthusiast* wanted to get together to cook and eat and generally make merry that Saturday night. I wasted no time in informing him we would be having burgers. In retrospect, perhaps it would have been more polite to ask what he wanted, but he seemed enthusiastic and told me he would pick up some ground beef and fixings.

Here's where it gets food bloggy: I offered to bring home-made buns. I know, I know, the bread's not really the point of a burger, but a couple of weeks ago Adam had enjoyed a burger at Lord Hobo in Cambridge, which they served on black pepper challah buns. Actually, 6 of the 8 people in our party ordered the burger (I did not) and when they were brought to the table the floral notes of black pepper were almost overhwelming, and I was instantly filled with orderers remorse. I wanted a black pepper bun!

You guys, this is the black pepper bun I wanted. They smelled like the buns in my mind, and were flavorful without being overtly peppery. And the burgers were exactly what I had been craving, juicy and meaty, all snug and cozy in their bready pillows. If you want to take your family's burger night or your neighbor's backyard cook-out up to the next level, you should really give these bad boys a try.

*Let's see if we can eradicate "foodie" once and for all, eh? I offer this up as a more accurate if slightly more cumbersome substitute.

Black Pepper Brioche Burger Buns
I used 3 teaspoons of black pepper, but I dare say you could use more. Or hey, go crazy, grind up one of those mixes of three colors of peppercorns and take the floral notes as far as you can! This is adapted from the Comme Ça burger buns recipe from the New York Times this past summer.

3 tablespoons whole milk, at room temperature
2 teaspoons active dry yeast
2 1/2 tablespoons sugar
3-4 teaspoons freshly ground black pepper
2 large eggs
2 cups bread flour
1 1/3 cup all-purpose flour
1 1/2 teaspoons salt
3 tablespoons unsalted butter, softened
sesame seeds (optional)
 
Combine 1 cup warm water, the milk, yeast and sugar in a small bowl. Stir then let stand until foamy
 
In another small bowl, beat one egg.

In a large bowl, whisk together the flours, then rub the butter in with your fingers until the mixture looks like crumbs or meal. Stir in yeast mixture and beaten egg; you will probably need a dough scraper.

Scrape the dough out onto the counter (don't flour it, just be prepared to use your dough scraper a lot). Instead of traditional kneading, you'll want to pick the dough up and slap it down, using some of the fold and push motion you'd normally use but trying to do it in the air. Do this weird pick up and slap knead thing for 8-10 minutes until it's smooth and elastic. It may be a little tacky. (The reason you don't flour the counter is that the more flour you work into the dough the tougher the buns will be. Sometimes sturdy bread is awesome, but we're going for soft and pillowy here.)
Shape the dough into a ball and return it to the (cleaned, lightly oiled) bowl. Cover and let rise until doubled in bulk, 1-2 hours.

Line a baking sheet with parchment paper or a silpat. Divide the dough into 8 equal parts (eyeball a half, then cut each half in half, and then again). Gently roll each piece into a ball and lay them out 2-3 inches apart on a baking sheet. Cover with a clean towel or the plastic wrap you used to cover the bowl, and let rise again for another hour or two.

Fifteen to twenty minutes before you want to bake, (say, after the buns have been resting for an hour or so), put a large shallow pan of water on the oven floor (or bottom rack). Preheat the oven to 400 degrees. After 15-20 minutes, beat the remaining egg with one tablespoon of water and brush the egg wash over the tops of the buns, then sprinkle with sesame seeds, if using. Bake for 15 minutes, turning the sheet halfway through, or until the tops are golden brown and toasty. Remove buns to cooling rack to cool completely before slicing and stuffing with burgery deliciousness.

Monday, February 15, 2010

Potato and Green Chile Stew

 
Back in August, I went to Whole Foods and bought every Hatch green chile they had out that day. It was only about 25 peppers, which I guess in retrospect is a sort of crazy amount of peppers to buy from a Whole Foods in Boston. If, however, you happened to be shopping for produce in Hatch, New Mexico at the time, 25 peppers may seem a paltry number. When I tweeted about buying them, friends from the southwest commented on the dreamy smells that waft through the town, filling the air with the aroma of roasted chiles, and confessed to buying pounds and pounds at a time (already roasted and peeled by the roadside vendor!) to eat througout the year. Wouldn't it be grand to live in a place where you can buy delicious roasted chiles from abuelas with carts on the side of the road? A small town famous for it's delicious produce? With a yearly festival celebrating peppers? And what a pepper it is, justifiably famous for its sweet heat and intensely green aroma.

Or maybe I'm just getting sentimental because I placed my first seed order of the year this afternoon, and I'm positively yearning for spring, for something fresh and verdant and spicy. This afternoon I saw three trees with buds on them! It's almost time to start seedlings! Daylight Savings ends in less than a month! I find that cooking from the freezer is a nice reminder that these dark, cloudy days of winter are not forever. If you didn't go nuts and roast and freeze a bunch of Hatch chiles last year when you had the chance, you might try making this stew with the canned variety, or using anaheim peppers if you can find them in stores now.

Potato and Green Chile Stew
adapted from Deborah Madison's What We Eat When We Eat Alone
Yes, I know I'm on a D-Mad kick. I can't help it if the woman's a genius with vegetables! Obviously this is scaled up from a one-person meal.

serves 4-6


4-6 long green chiles or poblano chiles, roasted and peeled
3 tablespoon sunflower seed oil or other vegetable oil
1 medium onion, diced
2 teaspoons ground coriander
1 teaspoon ground cumin
3-4 garlic cloves, minced
3 pounds (4-5 medium) russet potatoes, peeled and chopped into 1 1/2-inch chunks
Salt and pepper
4 cup chicken stock, vegetable stock or water (I used vegetables stock)
Sour cream to finish
Chopped cilantro to finish

Coarsely chop the chiles. Heat the oil in a large pot over medium heat, add the onion and stir frequently. Cook until softened, about 4 minutes. Add the coriander, cumin, garlic, and potatoes, followed by the chile along with a teaspoon of salt and stir. Let this all sizzle for a minute or two, then add the liquid and bring to a boil. Reduce heat to simmer.

Simmer all together about 25 minutes until the potatoes are completely softened. Taste and adjust seasoning (mine needed more salt and some pepper). Using a potato masher or the back of a spoon, mash up a few of the potatoes to thicken the stew. 


To serve, ladle into bowls and top with a plop of sour cream and a sprinkle of chopped cilantro if you like.